Who understands the PAIR system to know I can clamp it off, leaving it in place?

OP
OP
moddy

moddy

the mod
Joined
Dec 2, 2011
Messages
836
Location
Seymour, IN
Bike
05 ST1300
STOC #
8843
With the symptoms and inconsistent complications I've had I decided to contact who I bought it from and he mentioned it could be 10 to 15 years old. It is servo R&R inspection time
 

Uncle Phil

Site Supporter
Joined
Feb 26, 2007
Messages
11,353
Age
71
Location
In The Holler West Of Nashville, Tennessee
Bike
4 ST1100(s)
2024 Miles
005383
STOC #
698
Moddy - The folks at McCruise (which also uses vacuum cannisters) said that they have found our ethanol mix is hard on the rubber O-rings in their canister units. When the O-rings go, you get the same behavior that you are seeing. It seems the vapors through the vacuum lines is what causes the problems for them. I don't know if that applies to your situation or not but it did on my McCruise cruise control units.
 
OP
OP
moddy

moddy

the mod
Joined
Dec 2, 2011
Messages
836
Location
Seymour, IN
Bike
05 ST1300
STOC #
8843
Moddy - The folks at McCruise (which also uses vacuum cannisters) said that they have found our ethanol mix is hard on the rubber O-rings in their canister units. When the O-rings go, you get the same behavior that you are seeing. It seems the vapors through the vacuum lines is what causes the problems for them. I don't know if that applies to your situation or not but it did on my McCruise cruise control units.
My unit was new in the box could be from 2005 though.
 
Joined
Apr 7, 2007
Messages
624
Location
Tacoma, wa
gotta ask, since it was bought used.... did it come with a wiring diagram?. you might check it against the wiring diagram shown on Murphskits site for the audiovox vacuum type c.c.
 
OP
OP
moddy

moddy

the mod
Joined
Dec 2, 2011
Messages
836
Location
Seymour, IN
Bike
05 ST1300
STOC #
8843
gotta ask, since it was bought used.... did it come with a wiring diagram?. you might check it against the wiring diagram shown on Murphskits site for the audiovox vacuum type c.c.
I could verify the wiring diagram. Like I mentioned before it was all wrapped up in its original package, complete with instructions, it's just an older unit. Likely without proper exercise before the lubricants had a chance to wear out could be the problem I'm having so I'm looking forward to putting some oil on the solenoids.
 
OP
OP
moddy

moddy

the mod
Joined
Dec 2, 2011
Messages
836
Location
Seymour, IN
Bike
05 ST1300
STOC #
8843
I'm back, I've had a couple days rest, got some other things done and have disassembled my servo with the help of the 5 year old thread John posted recently
https://www.st-owners.com/forums/showthread.php?112500-Need-opinion-on-CC-wiring-re-do&highlight=

Here is what I discovered. By taking the mounting bracket off, then loosening the tabs circled in blue, (4 of them), without replacing the mounting bracket screws (yellow circle) will be the cover for the circuit board. It's worth taking a look at it to see if there are any swollen capacitors or burnt areas of the green board.
IMG_20170601_201137.jpg

Just a little lower is a little harder to get into until I used multiple pry tools (go slow) and was able to access and inspect the diaphragm and spring.
IMG_20170601_201206.jpg

Replace the cover for the circuit board and put the mounting bracket screws, will aid in pulling off the next cover to reveal this.
IMG_20170601_201250.jpgIMG_20170601_201304.jpg

This is a manifold of 3 solenoids used in the function of the servo, vent, vacuum, and dump, not necessarily in that order pertaining to my picture, however each of the solenoids behave in the same way when 12 volts are applied to each pair of these leads, not polarity specific.

ST1300 CC-38.JPG

This photo of the manifold of solenoids is nikonhonda's. Each pair of leads, easy to pull off it's mount, only placed by friction of the pins through the circuit board.

First thing I did before I understood they could be individually taken off of the manifold for closer inspection and disassembly was put 12 volts on each pair of leads to watch the function of the solenoid.
This can be viewed by looking down the hole the o-rings are in. Applying 12 volts, with a short burst or letting them stay on is irrelevant. The coil of wires making the electromagnet is designed to pull the shaft up for the allotted time the circuit board deems necessary.
By my observation, no solenoid appeared to be stuck. This doesn't mean it wasn't, it does mean that the solenoids total movement is about a 16th of an inch, not much. You will see movement, looking closely.
From my multiple test rides and failures, at different times and different circumstances, frustratingly inconsistent given the same speed and time parameters, my main goal was to furnish each solenoid with a drop of fresh lubricant. My choice was light oil I had on hand for my hair clippers. My unit was new old stock. My theory is, and doesn't just pertain to cruise control units, lubrication doesn't last forever. In what is likely a decade before it went on my bike, though it was in a box and parts sealed in all the bags, it needed this attention.
I hope this is the trick, for more consistency in it's operation. I'll even go for fully functional given that more than one rider has opened their servo, added fresh lube and was on their way. Will know in about 3 days when I put the Audiovox back on the bike.
 
Last edited:
OP
OP
moddy

moddy

the mod
Joined
Dec 2, 2011
Messages
836
Location
Seymour, IN
Bike
05 ST1300
STOC #
8843
I had some time to replace the servo and connections after it was lubed and did some test riding. It still disconnects with the slightest hill. It's an obvious vacuum issue. I pull around 10.5 to 11.0 inches of vacuum at my vacuum ports. Having hooked up a vacuum gauge to my vac lines, as soon as I hit set on the cruise control remote it dives to 5 inches, system cutoff follows until I hit set or resume again.
My observations.

1. When I had the servo apart and lubed the solenoids, I also inspected the vacuum bladder, a potentially 10 year old element of rubber, what if isn't flexible enough and inhibits the air to be removed.

2. The spring tension that pushes the bladder, back to reset, it is pretty stiff. Not saying it's too stiff, it just works against the ability for the vacuum system to pull against this spring and be able to pull on the throttle cable.

3. Lastly, what if my throttle cable is too hard to pull. The throttle cables are new and have been lubed regularly. What if the spring tension on the carburetor's spring is harder to twist than it should be. I'm not the 1st owner, who knows if it's been messed with. It feels like it's harder to twist the throttle than it should be, making the vacuum system in the servo give up, not being able to hold speed for very long.

4. Maybe the o-rings could use being replaced. It's worth a try, I have a couple sets of replacement o-rings.

The vac lines aren't kinked or pinched. I have #2, 3 and 4 cylinder pulling vacuum for the servo, however all of the cylinders pulling vacuum go to the one way valve that goes to the servo and vac canister. Maybe this presents an issue without there being a one way valve for each cylinder pulling vacuum.

So, some answers I'm looking for. How much vacuum does the engine pull? Others only "T" into #2 and #4 cylinder and it seems sufficient with vac container. Some haven't even plumbed a vac container and don't seem to have a problem just using a length of 3/8 vac line.

It's getting close to giving it a break for a while. Soon, the only thing left would be to switch out the servo with one that was known to work, to see if that worked.

Funny thing is, it's not the end of the world without cruise.I have a good working machine for 26 years old and almost 81k miles.

So, I'll still be working on it in the mean time with the o-ring replacement.
 
Joined
May 28, 2013
Messages
28
Location
Brisbane, Australia
Bike
ST 1300 Honda
Understood. When I went after my wired connections I noticed the ground from the servo had paint before the metal and though attempts were made to clear the paint and make an actual ground, warranting another test ride, it will just not hold longer than a couple of minutes. It was an improvement for the length of time that it would hold but somewhere after I press set or resume it just gives up.
There seems to be good vacuum, there is a strong pull for the portions that it does work. The dip switch settings are one is on, 2 through 6 is off and seven is on. This is the way a lot of the ST1100's are set up the way I've been able to tell.
So after about 20 hours of wrestling with this thing it looks like I'm going to be defeated unless I were to have another hand control or servo I could test with. Don't know what else I can do.
I do have the repair/test instructions for my system, but you would have an entirely different system I'm sure.. they helped me diagnose the issue with mine, and it was old and split vacuum pipes..


Sent from my iPhone using Tapatalk
 
OP
OP
moddy

moddy

the mod
Joined
Dec 2, 2011
Messages
836
Location
Seymour, IN
Bike
05 ST1300
STOC #
8843
I do have the repair/test instructions for my system, but you would have an entirely different system I'm sure.. they helped me diagnose the issue with mine, and it was old and split vacuum pipes..


Sent from my iPhone using Tapatalk
The vac hoses under the carbs? If I have to pull the carbs, to repair the lines, it isn't that bad.
 
OP
OP
moddy

moddy

the mod
Joined
Dec 2, 2011
Messages
836
Location
Seymour, IN
Bike
05 ST1300
STOC #
8843
it was old and split vacuum pipes..
I had 10 inHg at the port. A lower vacuum hose could be leaking, but right at the vacuum port on the engine shouldn't be likely. As a test, I will plug #2 and #4 to the one way valve and supply it with #3 only. With a vac container it should be able to do something.
 
OP
OP
moddy

moddy

the mod
Joined
Dec 2, 2011
Messages
836
Location
Seymour, IN
Bike
05 ST1300
STOC #
8843
Oh yeah, forgot. The only way to rule out the servo kicking off because of the 125mv present in the "brake light when levered on only" wire. I'll have to wire the relay in, to insure it's not that.
 

Blrfl

Natural Rider Enhancement
Joined
Aug 24, 2005
Messages
5,601
Age
55
Location
Northern Virginia
Bike
Fast Blue One
STOC #
4837
Oh yeah, forgot. The only way to rule out the servo kicking off because of the 125mv present in the "brake light when levered on only" wire. I'll have to wire the relay in, to insure it's not that.
Or just ground it.

--Mark
 
OP
OP
moddy

moddy

the mod
Joined
Dec 2, 2011
Messages
836
Location
Seymour, IN
Bike
05 ST1300
STOC #
8843
Or just ground it.

--Mark
That's right, now I remember grounding it for test rides and it seemed to kick off sooner trying to eliminate another reason. Going out to replace some o-rings, probably not the issue, but while it's open, exploring the drag from the vacuum chamber, I might as well.
2 days ago, with the servo apart, I noticed the cable movement where the rubber diaphragm is, wasn't all that great. I don't believe it's path to the throttle connections was any different than how John's is, but it seemed to take more than an effort than it should, so re exploring that.
 
OP
OP
moddy

moddy

the mod
Joined
Dec 2, 2011
Messages
836
Location
Seymour, IN
Bike
05 ST1300
STOC #
8843
Ok, where are we at?..hopefully where you are. Based on the most recent symptoms, sleeping on it, going over everything I've done to it and think I need to redo to it, it's time to open the servo again. First thing to look at from my experience I wrote about in post #108, o-rings should be checked 'cause they're old, could be cracked, or non elastic. I have to be thinking "Incapable of holding a vacuum", believing there to be enough vacuum for the system with a vac canister. It's not the biggest canister but neither are the hills where I am test riding.
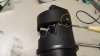
Opening the servo, going straight for the diaphragm, I'll get to the o-rings in a bit, they are easy, I don't want to forget the pull test on the servo cable that's connected to my bellhousing. With the spring removed from the center to be able to grab the spring retainer with needle nose pliers, I observe the direction the servo cable's trajectory toward the servo cable mount. It's a little off, not that bad, but I align it to remove any unnecessary drag for the cable. I put some oil, not a lot, maybe 8 drops, under the diaphragm plate, to reduce cable drag. Don't know if it reduced it, but a little lubrication can't hurt, the servo can't try so hard it gives up. That's what we're dealing with here, the cruise is set, between 2 to 30 seconds, then disconnect.
While I'm exercising the cable with the fresh drops of oil I notice something. There is a molded arrow on the diaphragm.
IMG_20170605_174019.jpg
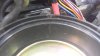
I'd seen it the last time I opened the servo, but couldn't work out any kind of alignment by deduction. It didn't take long to dismiss this arrow without any instructions or documentation, reassemble. Post #108 is the only test ride after servo reassembly and why I opened it again, today.
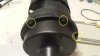
Well, guess what. The arrow has a purpose. All three of them do. That's right, there's more than one arrow. Guess what they're for? When you reassemble the servo you are to carefully align those 3 arrows to any of the 5 tabs before allowing it to clip together. You can orient the servo anyway you want before you assemble it, like making sure the vac port on the servo is aiming the way you'd like to for mounting it to the bike again.
One side of the diaphragm is molded for where it clips together, so it fits the way the two halves come together for reassembly.
So, since the odds are, when assembling this before the test ride I talked about in post #108, I likely did not have it aligned properly (not knowing about it) which could explain why when I pressed set, it didn't have that hard lurch as it did before I disassembled the servo the first time.
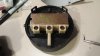
Moving on to the condition of the o-rings. What a special material the internal rubber components are made of. I did not replace them, they were extremely pliable and non cracked.
Before I snapped everything together I cleaned the seal the case will make around the diaphragm and put a light coat Vaseline on the edge, as an aid to a better seal than just dry and snap it back together.
A few more pictures I have, since there are more o-rings than the 3 shown in previous pictures.
IMG_20170605_172419.jpg
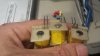
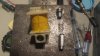
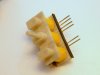
Once you pull the solenoids from their manifold, not hard to do, use a small standard screwdriver to pry in the front of the silver cylindrical shape. They should come out easily.

IMG_20170605_172503.jpg
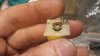
This piston, with an o-ring has a spring below it (no tension) then another piston (the moving part of the solenoid with an o-ring) will follow.

IMG_20170605_172630.jpg
The o-rings were in good condition as well.

With the next test ride I am expecting great things. Having lightly oiled the solenoid pistons, realizing I likely assembled the servo the time before erroneously, losing valuable suction. I should be really close. If it doesn't work again, I can make a vac container slightly larger. It may not seem like a lot, going from 1" 1/2 pvc to 2" pvc for volume, but it could make the difference for overall operation.
The next time I test ride, with having resealed the diaphragm like it should...we'll see. I'm ready for this silly thing to work.
 
Last edited:

John OoSTerhuis

Life Is Good!
Joined
May 10, 2005
Messages
5,225
Location
Bettendorf, Iowa
Bike
1991 SSMST1100
STOC #
1058
I admire your perseverance.

- the ST1100 throttle cables should not be lubed, they are teflon lined. If they have been lubed and are now gummed up, or are dragging/binding for any other reason, replace them.

- the brake light/power source shouldn't be the cause of the problems. Too many of us just use other simple switched sources.

- you still haven't done the vacuum leak test I described above (engine off, vacuum applied to the system on the other side of the check valve {hose, servo, reservoir}, watch the gage for bleed off). If there is, then test each hose and component separately to identify the culprit. You are guessing there's a leak and this is the way to find it...

John
 
OP
OP
moddy

moddy

the mod
Joined
Dec 2, 2011
Messages
836
Location
Seymour, IN
Bike
05 ST1300
STOC #
8843
I admire your perseverance.

- the ST1100 throttle cables should not be lubed, they are teflon lined. If they have been lubed and are now gummed up, or are dragging/binding for any other reason, replace them.

- the brake light/power source shouldn't be the cause of the problems. Too many of us just use other simple switched sources.

- you still haven't done the vacuum leak test I described above (engine off, vacuum applied to the system on the other side of the check valve {hose, servo, reservoir}, watch the gage for bleed off). If there is, then test each hose and component separately to identify the culprit. You are guessing there's a leak and this is the way to find it...

John
Some time back, maybe 4 years ago, I replaced my throttle cables with VenHill, custom kit. Having just read their website for care and maintenance, it appears flushing the cable housing annually with WD40 then replacing the cable is all that is required, no lube, it attracts dirt. I can't honestly remember if I did lube them, it's not documented, but it doesn't mean I didn't do it. After as long as they've been in there, a cleaning is due. Hopefully there is a noticeable difference. I've definitely rolled the throttle back enough times to recognize it being smoother immediately. Believe me, before I test ride again, the cable housing will be cleaned out. Throttle cable drag would contribute to the servo working harder than it should.

I don't have a mightvac, I know I know, I should do. So, tomorrow, after the throttle cable housing has been cleaned, with my shop vac and engine off, it's anybody's guess what's about to happen. Could have used the shop vac trick sooner, it was probably mentioned and I was probably preoccupied. It's a super power of mine.
 

John OoSTerhuis

Life Is Good!
Joined
May 10, 2005
Messages
5,225
Location
Bettendorf, Iowa
Bike
1991 SSMST1100
STOC #
1058
.... I don't have a mightvac, I know I know, I should do. So, tomorrow, after the throttle cable housing has been cleaned, with my shop vac and engine off, it's anybody's guess what's about to happen. Could have used the shop vac trick sooner....
David, IIRC you do have a vacuum gage that you can plug into the downstream (or is it upstream as we're talking about air flowing OUT of the reservoir {vacuum} :) ) side. I don't know how much vacuum you can apply with a shopvac, but I just checked how much I can apply by mouth with a short hose to my MityVac. Its gage says: 20"Hg. That seems enough for a leakdown check. I'd sure try that before trying to rig up a vacuum cleaner. FWIW YMMV

John
 
OP
OP
moddy

moddy

the mod
Joined
Dec 2, 2011
Messages
836
Location
Seymour, IN
Bike
05 ST1300
STOC #
8843
David, IIRC you do have a vacuum gage that you can plug into the downstream (or is it upstream as we're talking about air flowing OUT of the reservoir {vacuum} :) ) side. I don't know how much vacuum you can apply with a shopvac, but I just checked how much I can apply by mouth with a short hose to my MityVac. Its gage says: 20"Hg. That seems enough for a leakdown check. I'd sure try that before trying to rig up a vacuum cleaner. FWIW YMMV

John
Thanks John. A short run with a shop vac got me all the way up to 5 inHg, not enough for a happy dance. So, reluctantly, by mouth get up to 20 for a bit, then 15 inHg more consistently. Will be able to report leak test results soon, throttle cables are clean.
 

DAS

Joined
Feb 20, 2007
Messages
527
Location
Newberg OR
STOC #
6662
I also admire your persistence and I watch with interest because my CCS100 has always been kind of lazy. Not as bad as yours but only occasionally it sets firmly and holds speed. Most of the time it looses 2 - 5 mph when set and then slowly looses more especially at over 65 mph and won't set and hold at all at over 75mph. I too have checked and rechecked the geometry on my bell crank arm to be sure the leverage is optimum at mid throttle range. Maybe my only issue is weak vacuum so I should put a vac. gauge on it to monitor the vacuum at the control unit when riding.
 

John OoSTerhuis

Life Is Good!
Joined
May 10, 2005
Messages
5,225
Location
Bettendorf, Iowa
Bike
1991 SSMST1100
STOC #
1058
JTBC - apply vacuum with your mouth and quickly pinch off that end of the hose. Then watch he gage for bleed off/leak. It should hold the vacuum for quite a while.
 
Top Bottom