After 3 years finally starting the 40 amp upgrade,looking for advice tips,2 cents,...

Joined
Aug 10, 2008
Messages
167
Location
New York
Bike
1993 ST1100
Hi all,
Finally scratched together the $ the take on the 40 amp upgrade.
Am planning on doing a full service and all bearings while at it.

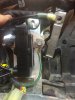
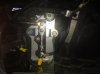
Part 1, I'll attack the rear-end,Alt,swing arm,rear wheel bearings,drive shaft service, rear brakes.
Part 2,will be valve check-adjust,possibly timing chain,carb sync,plugs,front wheel bearings/brakes,dump all fluids
Part-3 Add some friggin farkles! Heated grips,driving lights,outlet or 2

Ive read the threads about the the upgrade and Mike M's article about the swing arm service,this is the list of parts I ordered,any thing I'm missing o

13411-MAJ-G20 SHAFT
* 11202-MAJ-G20 ALTERNATOR BASE
* 91004-MT3-003 BEARING (20x47x10.5)
* 31100-MAJ-G41 ALTERNATOR ASSY.
* 91302-MM4-003 O-RING (90x2.3)
* 32130-MAJ-G40 SUB-HARNESS, ALTNTR
* 95701-08070-00 BOLT, FLANGE (8X70) - quantity: 3
* 94001-06080-0S NUT, HEX, (6MM
38270-MAJ-G40, BOX ASSY., MAIN FUSE
* 38260-MAJ-G20, STAY B, FUSE BOX
* The fuseblock comes with two fuses:
o 98200-65500, FUSE G (55A)
* 93891-06016-08, SCREW-WASHER (6X16)
* 95701-06012-00, BOLT, FLANGE (6X12) - quantity: 2
* 90153-SB2-003, SCREW-WASHER (5X10) - quantity: 2
* 91358-MG9-003 O-RING (50.5X3.5)
* 91302-MA6-003 O-RING (61X2)
* 91356-MG9-003 O-RING (39.5X2.4)
* 40210-MT3-000 CAP, PROPELLER SHAFT
* 91361-MT3-003 O-RING (22.1X1.9)
* 91263-MT3-005 OIL SEAL (30X43X7)
Other than bearing 91066-HA7-672 ,am I missing anything?
Any suggestions,silly comments?
I'll be requesting the tool kit,probably late June from John O once I get SA bearings,but before I ordered I wanted to check with y'all,....
Thanks,
Michael
 
OP
OP
mznyc
Joined
Aug 10, 2008
Messages
167
Location
New York
Bike
1993 ST1100
Re: After 3 years finally starting the 40 amp upgrade,looking for advice tips,2 cents

Ok 6 years.New 40 amp alt is in.I'll post my thoughts once I have her all back together.
First question, in this thread the poster mentions "final drive alignment".http://www.st-riders.net/index.php?PHPSESSID=telcbbh1r4oig30k2s3h1660t7&topic=7763.0
Is there a specific alignment required to mate the final drive to the shaft? Couldn't find a reference to this in the shop manual.On my Guzzi the shaft is split in two and the two pieces have marks that need to be aligned,just want to make sure that something like this is not the case with the ST.
Michael
 

John OoSTerhuis

Life Is Good!
Joined
May 10, 2005
Messages
5,224
Location
Bettendorf, Iowa
Bike
1991 SSMST1100
STOC #
1058
Re: After 3 years finally starting the 40 amp upgrade,looking for advice tips,2 cents

Short answer: no.

Looking forward to hearing the deed is finally done and you're seeing ~14.2V at idle.

John
 
OP
OP
mznyc
Joined
Aug 10, 2008
Messages
167
Location
New York
Bike
1993 ST1100
Re: After 3 years finally starting the 40 amp upgrade,looking for advice tips,2 cents

Just wanted to post and update and had questions about the re-wire.
Got rear-end back together,removed PAIR plumbing,cleaning up new carbs and installed new fuse box but wanted to check the wiring as pics I had from another write-up were different from explanation in the text.
In the Clymer manual it has you make 2 short jumpers.One that goes to the lower terminal to the starter relay and another from the lower terminal to the pos batt post.
In Rob Parker's pics he only shows the short jumper the the starter relay, http://koczarski.com/mmartin/OEMfuse.htm
This is what mine looks like,is it correct?
Also the 2 red connecters are unused,correct?
I bought a set of clean carbs off of Ebay and am in the process of checking and cleaning the slides.diaphragms and float chambers.Have new float gaskets and I'll wipe the rubbers with denatured alcohol but so far no holes or tears.
Checked the pan for debris or tape that could have fallen in there from alt install but was clean.Unfortunately one of the headers was rusted through where it meets the rear section so I'll have to repair or find a used one on Ebay.
Down for a couple weeks for work but looking forward to hearing her start.
 

Attachments

OP
OP
mznyc
Joined
Aug 10, 2008
Messages
167
Location
New York
Bike
1993 ST1100
Re: After 3 years finally starting the 40 amp upgrade,looking for advice tips,2 cents

It's an OEM fuse box.
 

John OoSTerhuis

Life Is Good!
Joined
May 10, 2005
Messages
5,224
Location
Bettendorf, Iowa
Bike
1991 SSMST1100
STOC #
1058
Re: After 3 years finally starting the 40 amp upgrade,looking for advice tips,2 cents

Michael Michael... Remove one of your leads from the new OEM fuseblock. Recommend leaving the one to the starter relay as that duplicates the harness connection of the 96-02 models with the OEM 40ampers. The extra lead you've added leading to the battery post is not needed and should be removed.

The little red connector should be connected to the fuel tank sending unit on the left side of the tank. The larger red connector is from the old 28amper and should be removed along with its yellow wires from the wire loom. In the past I've asked upgraders to save serviceable white 6Ps that connected to the old 28amper VRRs, along with their wire leads, long enough to be spliced into somebody's system needing repair.

John
 
Last edited:
OP
OP
mznyc
Joined
Aug 10, 2008
Messages
167
Location
New York
Bike
1993 ST1100
Re: After 3 years finally starting the 40 amp upgrade,looking for advice tips,2 cents

I thought they were redundant John but that's what the Clymer manual has you do,build 2 jumpers, so wanted to check.Tank is still out and will be till I get new carb set back in,so probably would have discovered the FSU connection when re-installing but thanks for the confirmation.
 

John OoSTerhuis

Life Is Good!
Joined
May 10, 2005
Messages
5,224
Location
Bettendorf, Iowa
Bike
1991 SSMST1100
STOC #
1058
Re: After 3 years finally starting the 40 amp upgrade,looking for advice tips,2 cents

PS Don't forget to cap the unswitched red/white-stripe and switched black wires that are left after the white 6P leads are striped out of the loom. You can use them for future electrical farkles. BTDT

John
 

John OoSTerhuis

Life Is Good!
Joined
May 10, 2005
Messages
5,224
Location
Bettendorf, Iowa
Bike
1991 SSMST1100
STOC #
1058
Re: After 3 years finally starting the 40 amp upgrade,looking for advice tips,2 cents

Dunno about the Clymer manual. It might be describing the two options for getting the charging current to the battery. Getting a ring connector small enough to fit the hex-socket bolt on the starter-relay/main-fuse unit, and still crimp to 12 or 10 gage wire can be problematic. Frankly, it's easier to make a lead to connect directly to the battery post.

John
 
OP
OP
mznyc
Joined
Aug 10, 2008
Messages
167
Location
New York
Bike
1993 ST1100
Re: After 3 years finally starting the 40 amp upgrade,looking for advice tips,2 cents

OK got an update.Alt went in without too much drama.powered her up and all lights came up except neutral light,worked before storage,maybe disconnected switch.Can't start her till I put carbs back in.
Took pictures but didn't have one of this T from under gas tank.Anyone know where it goes to and switch?
Also removed PAIR system.Blocked off plates,removed T from the two front cyln vacuum hoses, capped hoses and large vacuum port on from of the alu housing.Anything else I should do?
My pictures weren't clear and neither are the Haynes for the carb boots,which are to be installed with the "carb" marking "facing away from the cylinder" but wasn't clear when trying to line them up with marks on head.Can someone explain.
Thanks
Michael
 
Joined
Jul 28, 2007
Messages
3,141
Location
finger lakes ny
Bike
1999 ST1100
STOC #
7959
Re: After 3 years finally starting the 40 amp upgrade,looking for advice tips,2 cents

Where in NY are you?
 
OP
OP
mznyc
Joined
Aug 10, 2008
Messages
167
Location
New York
Bike
1993 ST1100
Re: After 3 years finally starting the 40 amp upgrade,looking for advice tips,2 cents

OK got an update.Alt went in without too much drama.powered her up and all lights came up except neutral light,worked before storage,maybe disconnected switch.Can't start her till I put carbs back in.
Took pictures but didn't have one of this T from under gas tank.Anyone know where it goes to and switch?
Also removed PAIR system.Blocked off plates,removed T from the two front cyln vacuum hoses, capped hoses and large vacuum port on from of the alu housing.Anything else I should do?
My pictures weren't clear and neither are the Haynes for the carb boots,which are to be installed with the "carb" marking "facing away from the cylinder" but wasn't clear when trying to line them up with marks on head.Can someone explain.
Thanks
Michael
 

Attachments

OP
OP
mznyc
Joined
Aug 10, 2008
Messages
167
Location
New York
Bike
1993 ST1100
Re: After 3 years finally starting the 40 amp upgrade,looking for advice tips,2 cents

I'm near New Paltz Dean.
 

John OoSTerhuis

Life Is Good!
Joined
May 10, 2005
Messages
5,224
Location
Bettendorf, Iowa
Bike
1991 SSMST1100
STOC #
1058
Re: After 3 years finally starting the 40 amp upgrade,looking for advice tips,2 cents

Michael. The little black plastic T is an alternate vent-to-atmospheric for the vent line, in case the end down behind your left foot gets blocked. I see the neutral switch connector in your picture. It needs to be connected for the light to work.

I'll post a link my pictures in a minute which should help with your carb boot query.

John
 
Last edited:
OP
OP
mznyc
Joined
Aug 10, 2008
Messages
167
Location
New York
Bike
1993 ST1100
Re: After 3 years finally starting the 40 amp upgrade,looking for advice tips,2 cents

Thanks John.I had that series and didn't see it,I'll check it out again.I tried to remove the post ,....twice.Mike feel free to remove the duplicate.Thanks
 
OP
OP
mznyc
Joined
Aug 10, 2008
Messages
167
Location
New York
Bike
1993 ST1100
Re: After 3 years finally starting the 40 amp upgrade,looking for advice tips,2 cents

Michael. The little black plastic T is an alternate vent-to-atmospheric for the vent line, in case the end down behind your left foot gets blocked. I see the neutral switch connector in your picture. It needs to be connected for the light to work.

I'll post a link my pictures in a minute which should help with your carb boot query.

John
So I leave the T as is? no cap,no connection to another hose?
 

John OoSTerhuis

Life Is Good!
Joined
May 10, 2005
Messages
5,224
Location
Bettendorf, Iowa
Bike
1991 SSMST1100
STOC #
1058
Re: After 3 years finally starting the 40 amp upgrade,looking for advice tips,2 cents

So I leave the T as is? no cap,no connection to another hose?
Yes. [edit: leave as is, unless you need to replace the short extension hose with a longer one to reroute because of the larger 40amper. BTDT] The Honda engineers designed it that way. All ST1100s came from the factory that way.

Did you get the neutral switch connected?

John
 
Last edited:
OP
OP
mznyc
Joined
Aug 10, 2008
Messages
167
Location
New York
Bike
1993 ST1100
Re: After 3 years finally starting the 40 amp upgrade,looking for advice tips,2 cents

I did get that switch re-connected John it's fairly well hidden,works now.Carbs and airbox are in,should have fuel tank and all connections back together tonite or tomorrow.Psyched to hear that sweet big ole V-4 run again.
 
OP
OP
mznyc
Joined
Aug 10, 2008
Messages
167
Location
New York
Bike
1993 ST1100
Re: After 3 years finally starting the 40 amp upgrade,looking for advice tips,2 cents

Whoo Hooo.Finally got it back together and she fired on the 3rd or fourth try after fuel got circulated into the dry carbs.Synced the carbs(first carb sync have FI's on my other bikes) and she's running as good or better then before the alt died.Changing hydraulics in the next few days, put the plastic back on and she should be good to go for a road test.Thanks to John and Mike Martin and all the ST pioneers who have been scraping knuckles for the better part of the last 25 years wrenching these classics.
 
Top Bottom