CB400F Engine Rebuild

OP
OP
bmcdonau
Joined
Mar 11, 2007
Messages
1,493
Location
Texas
Bike
2013 Triumph Trophy
Well good news, I didn't leave out dowel. Whew!

I took a few minutes after work and started putting the gearshift mechanism back together. I've got lots of parts and pics of them installed, but I couldn't decide where to start.


I decided to start with the star attached to the shift drum.


This pin goes into a hole in the star to index it. After I installed it, I realized this should have gone on first, but luckily it will fit even after the star is installed.


Then I realized, the two cams wouldn't fit with the big washer installed on the end of the star so I took it off and installed the cams..


Then I put the big washer back on.


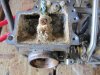
Next I installed the kick start shaft. It goes here and the end of the spring gets inserted into the hole in the case.


Then I installed the stopper and shift shaft.

Next I installed the primary gear that engages the clutch. It's in the lower right in the picture.


I think this is right, but I won't be able to check it until the cylinder is installed and I can rotate the engine.

I also took the oil pump apart and measured the clearances, they are in spec. I replaced all the o-rings, including the one Honda doesn't sell. I ordered a 2X40 mm vitton o-ring from an o-ring supplier--it's the brown one in the picture.


Then I installed the oil pump in the left side of the engine.
 

Bones

Your Humble Scribe
Joined
Dec 6, 2004
Messages
4,904
Age
60
Location
western Mass
Bike
2014 BMW R1200RT
STOC #
5575
The five point star with the four point star kind of rotating inside...what is that?
 
Joined
Feb 5, 2006
Messages
6
Location
Purcellville, VA
Oil pump...through it's movement of a rotating vane (4 star thingy) it creates vacuum on one side of the five star housing and compression on the other.
 
OP
OP
bmcdonau
Joined
Mar 11, 2007
Messages
1,493
Location
Texas
Bike
2013 Triumph Trophy
It's called a trochoidal pump, most motorcycles still use them today. Here's a link to a wikipedia article that shows an animation of one. They usually wear out at the tip which reduces oil pressure.

OIL PUMP
 
OP
OP
bmcdonau
Joined
Mar 11, 2007
Messages
1,493
Location
Texas
Bike
2013 Triumph Trophy
Well ****, I'm going to have to buy new rings, the end gaps are too large. The max is .006 and I've got .010-.015 on most. I doublechecked the bore and they are all under the max size so these rings are just worn.


The cylinder looks good though.


A picture of one of the valves that were lapped. Notice the other valvve? My machine shop does good work at a good price, but they don't do anything unnecessary to making it run good.


I am working on supports to make it easier to drop the cylinder onto the pistons.

 
OP
OP
bmcdonau
Joined
Mar 11, 2007
Messages
1,493
Location
Texas
Bike
2013 Triumph Trophy
Man, what I wouldn't give for 1/8 of your knowledge.
Thanks, but this stuff isn't really that hard, a little knowledge goes a long way. Once you understand a single, a four is just four times as many of the same parts. One of the things I've been lucky with is having people willing to share their knowledge with me. Take that oil pump for instance, One of the guys on the SOHC forum figured out what size the o-ring was and I called an o-ring supplier and said I needed an o-ring that would withstand oil and high temps and they told me I needed one made of viton. I'd never heard of viton at that point, but I looked it up and wouldn't you know it's used in automotive appliations.
 

Bones

Your Humble Scribe
Joined
Dec 6, 2004
Messages
4,904
Age
60
Location
western Mass
Bike
2014 BMW R1200RT
STOC #
5575
The oil pump reminded me of a Wankel rotary engine, and looking at your link now I see why. In addition to being curious about your project, I'm learning some useful information along the way. Thanks, Teach! :yes:
 
Joined
Jan 12, 2010
Messages
441
Location
Eden Prairie, MN
Bike
2003 ST1300
It's rarely the mechanics of these engines that slows me down, but usually the cosmetics. You mentioned "plating chemicals" - what are you using for that ? Did you paint the cases or is that powder coat? It will look really nice when done.. :yes:
 
OP
OP
bmcdonau
Joined
Mar 11, 2007
Messages
1,493
Location
Texas
Bike
2013 Triumph Trophy
It's rarely the mechanics of these engines that slows me down, but usually the cosmetics. You mentioned "plating chemicals" - what are you using for that ? Did you paint the cases or is that powder coat? It will look really nice when done.. :yes:
I use zinc electroplating to restore hardware that was originally plated. It's simple and not toxic like cadium plating. The engine is painted with two part epoxy paint from Eastwoods. This is not a full on restoration, but a put it back original and make it mechanically sound so I can ride it while I collect parts for a restoration.
 
OP
OP
bmcdonau
Joined
Mar 11, 2007
Messages
1,493
Location
Texas
Bike
2013 Triumph Trophy
I'm getting close to putting this back in the bike!

These orange o-rings seal the cylinder spigots to the case.


I put the pistons (with new rings) on the rods and installed the small clips that hold in the wrist pins. The cloth keeps the clips from falling into the case if I drop them.


First I tried to use these wooden blocks I made to hold two high pistons square while I dropped the cylinder on to them. That worked well.


But, the outside pistons were so low I couldn't get the cylinder down any farther and get the hose clamps off so I had to back up and start over. I rotated the crank so the pistons were all the same height and put hose clamps back around the rings. The head went down over the pistons pretty easily this time.


The cylinder on the case.


Before I installed the head I replaced these valves and four oil seals.


Case, cylinder and head reunited!


There are two oil pipes in the head that lube the valve rockers. I replaced the o-rings and these rubber supports. The new ones were supple, while the originals were like hard plastic.


New carb boots, o-rings, and screws to make sure the intake doesn't leak.

 
OP
OP
bmcdonau
Joined
Mar 11, 2007
Messages
1,493
Location
Texas
Bike
2013 Triumph Trophy
I finally got most of the engine buttoned up. I installed new acorn nuts and copper sealing washers.


I installed the new carb boots so when I install the carbs they won't leak. It also seems easier to install carbs when the boots aren't harder than a rock.


Once that was done it was installing the cam chain and timing the cam and crank. These lines are supposed to be lined up with the top of the cylinder when the T is lined up with the timing mark. Here the mark appears to be about one tooth off. Its pretty easy to adjust by just pulling the chain off the sprocket and moving it forward one tooth.


New tensioner and slipper.


Installing them is pretty easy, just turn about 90 degrees and insert until it engages with the horseshoe under the crank.


You want to make sure this tab is outside the tensioner tunnel otherwise it won't flex.


Then you install the top cam tensioner bracket.

.

Here's the new cylinder head cover gasket installed in the cover. I just use wheel bearing grease to hold it in place until its bolted down.


I'm not ready to do a frame off restore on the bike, I just want to be able to ride it so I degreased the frame and am just going to reinstall the engine. I'll work on other things as I go along. I retire in a year and after I get settled in the retirement home I'll do this right.


The engine is light enough at this point that I can pick it up and place it in the frame by myself. After it's in the frame I'll install the rotor. clutch and carbs.


I had a few other parts to source, the o-ring around the oil pick up was broken and it wasn't available from Honda, but I found one at Northeast vintage Honda parts. I also need a few other odds and ends. Once I have them together I'll put everything back together.
 

Bones

Your Humble Scribe
Joined
Dec 6, 2004
Messages
4,904
Age
60
Location
western Mass
Bike
2014 BMW R1200RT
STOC #
5575
Looking good, Dennis. Looking forward to seeing (a) this bike operational, and (b) you retiring so we can see it totally restored. :yes:
 
OP
OP
bmcdonau
Joined
Mar 11, 2007
Messages
1,493
Location
Texas
Bike
2013 Triumph Trophy
I got the carbs rebuilt so I can get serious about getting the engine finished. These were the carbs before the rebuild.


Two of the carbs had broken float mounts and one was very eroded. I bead blasted all the parts and zinc plated the steel parts. I installed all new o-rings, gaskets, and float valves. I left the original jets and needles--I'll replace them if I have running issues.


A very small cotter pin goes here, but I couldn't find one so I used this.

 
Joined
Feb 5, 2005
Messages
8,538
Age
77
Location
Kingman, Arizona
Bike
2000 ST1100 ABS TCS
STOC #
004
Here's a pic of a set of ST1100 carbs I just trashed, bm. If ya want I can dig'em out and send'em to ya. :D
IMG_6401 (1600x1200).jpg

Good job on the 400, keep the pics coming.
 

Bones

Your Humble Scribe
Joined
Dec 6, 2004
Messages
4,904
Age
60
Location
western Mass
Bike
2014 BMW R1200RT
STOC #
5575
Those carbs still look a bit frightened, don't they? Kind of look like a smilie :eek: Bet they blow some great fuel/air mixture now, however.

Fun to follow your progress. :yes:
 
Joined
Mar 27, 2010
Messages
75
Location
MN.
Bike
'06 ST1300
Very cool. How did you go about zinc plating the steel parts? Did you send them away for plating or a DYI?
 
Top Bottom