ST1100 Cracked Oil Pan

Joined
Jul 1, 2012
Messages
12
Location
Garnet Valley, PA
Bike
2001 ST1100
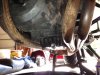
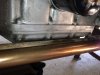
2 Days ago I was doing my first Oil/Filter change on my 2001 ST1100. When putting the plug back in, I set my torque wrench too high (not wearing my reading glasses when getting the # from my Clymer manual), and cracked my oil pan at the plug hole.:( It was a low moment and I know how careless/stupid it was. I deserve any ridicule directed my way. Pics of the damage attached.

I want a permanent fix, so I am tackling replacing the oil pan. I have researched this extensively and found surprisingly little information (further evidence that I am one in a million).

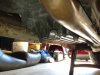
If the exhaust was not in the way, the pan would just drop, but the inner exhaust pipes obstruct that from happening. I have reviewed the posts on alternator upgrade since they involve removing the pan, but I am wondering if it is possible to more simply: 1. remove the right side exhaust 2. remove the left side from the exhaust ports 3. remove the center bolt after the collector box 4. leave the bolts on the mufflers loosely attached as a pivot point 5. carefully pivot the left exhaust down far enough to allow clearance for the pan to be lowered and removed. With the exhaust aging and surface rust at the joints, I would prefer to remove as little as possible.

The pan screws will disengage with the exhaust in place as is and it appears the pan only needs a little clearance to come off.

Any thoughts (including criticisms) are welcome. Nobody can beat me up more than I have myself in the last 2 days.

Thanks.

Jim
 

Attachments

Mark

Gotta make tracks
Moderator
Joined
Jan 19, 2005
Messages
6,123
Age
70
Location
Apache Junction AZ
Bike
KTM 525exc
STOC #
3768
You're right Jim, I have not heard of anyone else cracking the pan (and doing such a good job of it too! ;)). Thanks for warning us!

I think you might be able to 'sneak' the pan out after loosening all that; but, you're going to be awfully close to just taking it all off and getting it out of the way so you can do the replacement...
From what it looks like to me: if you don't drop them out of the way they will get in your way when you place your 'new' pan...
 
Joined
Feb 6, 2005
Messages
756
Location
Seattle area
Bike
2016 FJR1300ES
STOC #
265
I have reviewed the posts on alternator upgrade since they involve removing the pan,
Bummer!

Actually, you don't have to remove the pan to do the alternator upgrade if you do the "Lewis pin" method. The shop manual even directs you to remove the engine from the frame. Not required. That's probably why you're not finding anyone talking about it.
 

John OoSTerhuis

Life Is Good!
Joined
May 10, 2005
Messages
5,221
Location
Bettendorf, Iowa
Bike
1991 SSMST1100
STOC #
1058
Sorry to hear about the SNAFU, Jim. You have the distinction of being the firST in all of STdom to have such a problem. :) Well... the firST to report/admit to it, TIKO.

Give your removal plan a try, couldn't hurt. But I suspect that you'll want the extra space with the pipes out of the way to get the old pan gasket removed, a real PITA by all reports that I've read over the years. Others with that experience (Jeff B?) can chime in here on the beST method/product.

Anybody think the crack can be repaired (weld, threads chased/tapped)?

Good luck.

John

poSTed from my iPhone
 
Last edited:

John OoSTerhuis

Life Is Good!
Joined
May 10, 2005
Messages
5,221
Location
Bettendorf, Iowa
Bike
1991 SSMST1100
STOC #
1058
PS I never use the torque wrench on the oil drain bolt, but if one does... keep in mind that the spec'd torque value assumes a nice new crush washer.
 

RONST1300

STOC # 8616
Joined
Apr 5, 2012
Messages
400
Location
Council Bluffs, IA
Bike
2005 ST1300
STOC #
8616
Jim, actually you are not the first, and even the old guys can do dumb things. Below is a link to previous similar situation with pics.

https://www.st-owners.com/forums/showthread.php?65530-Cracked-Oil-Pan-Replacement-Help-Needed!-(Exhaust-Question)

http://www.ronayers.com/Fiche/TypeID/26/Type/Motorcycle/MakeID/1/Make/Honda/YearID/42/Year/2001/ModelID/7062/Model/ST1100A/GroupID/305279/Group/OIL_PUMP

Ron Ayers has them for $153 Linked above. If you take it off a good heliarc welder could repair it. Then put a banjo washer or o-ring on it. It would probably, buy maybe not need a metric tap run through it again to clean up the threads. On the exhaust I would leave them till it was obvious they have to come off.
Ron
 

Mark

Gotta make tracks
Moderator
Joined
Jan 19, 2005
Messages
6,123
Age
70
Location
Apache Junction AZ
Bike
KTM 525exc
STOC #
3768
Just a thought:

You might want to put out a *wanted* post as there have been a few who have done in their valves and have the engine sitting around...
 
OP
OP
Jhopk4
Joined
Jul 1, 2012
Messages
12
Location
Garnet Valley, PA
Bike
2001 ST1100
Thank you guys for your advice. I haven't ordered the parts yet as I am waiting to see if I am forced to separate the exhaust from the Mufflers thereby needing more parts (gaskets and clamps). I would like to have all the disassembly completed before ordering, so I need to stay at it. I will try to move slow and carefully at this point.
 

wjbertrand

Ventura Highway
Joined
Feb 8, 2005
Messages
4,418
Location
Ventura, CA
Well if you're gonna do something might as well do it thoroughly right? When I did my alternator upgrade (BLP -Before Lewis Pin) I had to remove the pan. The left and right headers were kind of rusted into the collector so I just dropped the whole exhaust system as a unit. There are just the four head pipes, a central hanger bolt for the collector box and a fastener for each muffler.

The pan will have to come down a bit lower than you might first think to clear the oil pick up assembly which resides right at the bottom of the sump. Once all the sump pan bolts are out, get a plastic mallet or a block of wood and a regular hammer a tap around the pan 'till it comes loose - gently!

The hardest part of this job was scraping the gasket material off the pan. In my case 99% of it followed the pan with little to nothing left behind on the crank case. I used some Permatex gasket remover and that helped make the job easier, but it was still pretty tedious. Of course if you are fitting a new pan and your experience is the same as mine, no need to scrape it all off.

You'll obviously need a new pan gasket but don't forget the exhaust port gaskets / seals and a new drain plug seal. I had a devil of a time trying to get all four exhaust port seals to stay in place (they face downward) while trying to line up all four pipes more or less simultaneously. I finally used a smear of wheel bearing grease to hold them in place and that worked like a charm.

I kinda forgot about that after finishing the rest of the alternator installation and upon start up a few days later was momentarily panicked when huge clouds of smoke grease started emanating from the engine a few seconds later - then I remember the grease. Not sure I'd do it that way again!
 
OP
OP
Jhopk4
Joined
Jul 1, 2012
Messages
12
Location
Garnet Valley, PA
Bike
2001 ST1100
Jeff

You give me new hope! Your description was what I saw in my minds eye, but to know it was done before gives me confidence to dig in. Thanks again.

Jim
 
Joined
Feb 11, 2006
Messages
1,102
Location
Bloomington, MN
STOC #
273
PS I never use the torque wrench on the oil drain bolt, but if one does... keep in mind that the spec'd torque value assumes a nice new crush washer.
Pretty sure Honda would have already factored a fudge to account for not having a new crush washer John. Think of all the torque wrenches out there that are way out of spec. FYI, I use a torque wrench and probably only changed out the crush washer twice in 100k miles. He never said how far over the incorrect setting was but to do that type of damage, one has to be way over I would imagine.
 
Joined
Apr 25, 2007
Messages
4,950
Age
62
Location
New Jersey
Bike
st1300 '04
STOC #
7163
Honda would assume you replaced the washer as specified not that I always do :)
Torque wrench is usually longer and able to generate a lot of torque if it's out of kilter.
Just use a regular old wrench and don't go nuts.

fwiw a lot of the torque you apply is taken up by the thread and bolt head/surface interface so lubed or not lubed makes a difference to the actual bolt tension which is the thing you're trying to control but can't directly measure.
 
OP
OP
Jhopk4
Joined
Jul 1, 2012
Messages
12
Location
Garnet Valley, PA
Bike
2001 ST1100
It was at least 2x the spec. It was late, not enough light in the garage, no reading glasses, had a glass of wine, and was eagerly anticipating testing my new oil. The common factor in the fault tree analysis would be me. As Jimmy Buffet said, "it's my own damn fault".

Jim
 

Firstpeke

NT1100D
Joined
May 23, 2009
Messages
1,689
Location
UK
Bike
Honda NT1100
STOC #
7764
Oh that looks like a pain in the pan......

Did my CX500 sump a number of years ago (about 1984 I think)..... I never replaced it but it always had a drip or two overnight......

I suspect that it's somewhat beyond a sensible repair.... I would replace it as it has to come off anyway.... for the effort you will put in to get it off, it won't be worth the annoyance of finding that a repair didn't work.
 
Last edited:

RONST1300

STOC # 8616
Joined
Apr 5, 2012
Messages
400
Location
Council Bluffs, IA
Bike
2005 ST1300
STOC #
8616
Smunderdog, thanks for sharing. I was a toolmaker in my first career. You are probably lucky you cracked the pan. Those self taping bolts throw chips just like a tap. Those fragments would have ruined the engine. The oil pan is a much cheaper fix.

Jim, keep up the good work, but cut down on the Buffet tunes. LOL It would have been worse if you forgot to put the oil in all together. And that has been done too! I concur with ST1300r. I don't remember the last time I used a torque wrench on an oil pan bolt. But I have learned over the years to go lightly. When I was younger, I striped out one or two bolts, and my dad would yell loudly, and I learned fairly quickly about over wrenching. My dad would also then say, "If you didn't make any mistakes you didn't do anything." The positive note is, over the years of coming oil changes, and bike work, you are much further doing it yourself than paying someone to do it, plus you can make sure it is right when it is done. You can travel without worrying about the bike.
Ron

Also after looking at the other pics, I doubt you will be able to do the job without taking off the exhaust. It has to be clean before you put the new gasket and pan on.
 
Joined
Mar 13, 2012
Messages
5,071
Location
soCal
Bike
'97 ST1100
STOC #
687
I never use the torque wrench on the oil drain bolt
+1

Torque wrenches have their applications for a few specific tasks, but for most things a simple ratchet/wrench is sufficient. Just because Honda specs a torque value for every damn fastener on the bike doesn't mean that torque is actually critical and needs to be exact.
 
Joined
Feb 11, 2006
Messages
1,102
Location
Bloomington, MN
STOC #
273
+1

Torque wrenches have their applications for a few specific tasks, but for most things a simple ratchet/wrench is sufficient. Just because Honda specs a torque value for every damn fastener on the bike doesn't mean that torque is actually critical and needs to be exact.
Don't get me wrong, I don't use a torque wrench on every fastener and I never use one on any other vehicle's oil drain bolt. But my 1100 would seep a bit with my normal *snug-little grunt* hand torque and found it did not seep with the prescribed 28 nm torque (even with a new crush washer.) I also have a rule for steel fasteners in an aluminum threading, *you will never go wrong with a torque wrench*. Well, not unless you goof up. :D
 
Joined
Mar 13, 2012
Messages
5,071
Location
soCal
Bike
'97 ST1100
STOC #
687
Don't get me wrong, I don't use a torque wrench on every fastener and I never use one on any other vehicle's oil drain bolt. But my 1100 would seep a bit with my normal *snug-little grunt* hand torque and found it did not seep with the prescribed 28 nm torque (even with a new crush washer.) I also have a rule for steel fasteners in an aluminum threading, *you will never go wrong with a torque wrench*. Well, not unless you goof up. :D
Years ago I borrowed a torque wrench from a co-worker, because I was too cheap to buy my own as little as I needed one. Turned out between the torque wrench not being calibrated very well, and the mfr claiming some aggressive torque figures for 6mm bolts into aluminum heads, I ended up stripping a few out and learning about helicoils the hard way. Went and bought a Snap-On torque wrench for the second attempt after the helicoils were installed, and learned to never take the cheap way out ever again.
 
Top Bottom