Article [13] ST1300 - Front wheel bearing replacement [VIDEO]

jfheath

John Heath
Site Supporter
Joined
Mar 18, 2006
Messages
2,823
Age
69
Location
Ilkley, W Yorkshire, UK
Bike
2013 ST1300 A9
2024 Miles
000679
STOC #
2570
Front Wheel Bearing Removal

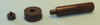
Note the 'official' Honda tools - but other methods work just as well.
Small taps work best for me. Larger ones knock the tool straight out of the bearing.


--------------------------------------------

Front Wheel Bearing Installation

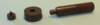
Note that for the second bearing at least, a flat, solid driver has to be used. The one I am using is the attachment which normally has a handle and a 'pilot' to fit inside the bearing. These hadn't arrived in time, so I just used the attachment. The 3 parts are shown in the photo below - left to right: pilot, driver attachment, driver handle. Alternative tools that do the same job are available, but not easy to obtain in the sizes required for these bearings.

1586415503383.png

Note that for the front wheel of the ST1300, the right hand bearing must be driven in first to meet the shoulder in the hub. (For the rear wheel, the left is inserted first).
Yes, it matters. Put them in in the wrong order, and the wheels will be slightly displaced on their axles, which may affect brake disc clearance, fork alignment and handling.
But don't take my word for it. Check your workshop manual.

The spacer is fitted, then the left bearing is driven in to meet the spacer. There is a shoulder inside the hub, but the bearing meets the distance collar first, which is why it is essential to have a driver which drives in the inner and outer race simultaneously. Note the checking, so that I can tell how close the bearing inner shell is to the distance collar. As soon as it meets, stop driving.


------------------------------------------------------------------------------
Other related articles:

Article13.png ST1300 - Fitting Wheel Bearings - What the manuals don't tell.
Article13.png ST1300 - Front & Rear Wheel Install and Front Axle Animation


------------------------------------------------------------------------------

Updated 9 April 2020
 
Last edited:
Joined
Jun 2, 2011
Messages
101
Location
Dublin, Ireland
Bike
ST1300
Re: Front wheel bearing replacement - Video

Nicely done....

I use one of these for removing the old bearing http://www.google.com/imgres?imgurl=http://images.toolbank.com/images/extralarge/RAW44505.jpg&imgrefurl=http://www.toolbank.com/p/B2053/RAW/RAW44505&h=480&w=640&sz=81&tbnid=vcuJCA-EN0gNDM:&tbnh=91&tbnw=121&zoom=1&usg=__PvRNzWa9K-SFmsf5PywpnA4kCDU=&docid=pAefZM6x0e4lPM&sa=X&ei=5WRuUfvTE9Kd7gb-sICoCg&ved=0CFcQ9QEwBw&dur=1774

For installing, I cut a slot in the outer shell of the old bearing and use it to drive the new one in.

It would be nice to have the proper tools though...
 

Mellow

Joe
Admin
Joined
Dec 1, 2004
Messages
18,867
Age
60
Bike
'21 BMW R1250RT
2024 Miles
000540
Excellent!.. this one was promoted to an article, thank you sir!
 
Joined
Jun 2, 2011
Messages
101
Location
Dublin, Ireland
Bike
ST1300
Not in the UK, but there's a dealer here in Co. Kildare listed on their website.....I'll give them a buzz tomorrow and let you know the story John.
 
Joined
Oct 23, 2009
Messages
28
Location
Huntsville, Alabama
Same thing here... The bearings feel way too tight even when just snugged up to the center spacer.

The right side bolt pulls the axle to the right side, and the combination of the two dust covers touching the inner races on the bearings side and the right fork on the outside and stepped shoulder of the axle on the left side is what squeezes the inner races snug against the center spacer.

If the outer bearing races can't move a little laterally, ( and I don't think they can ) then there is going to be a bind based on how
tight the center spacer was installed between the two bearings initially.

A device to push both the inner and outer bearing shells into the wheel equally is what is needed.
Press tightly against the center spacer, and that's about as close to perfect as it gets.

Too much tight on the big axle bolt on the right will pull both the inners to the right ( wheel follows to a point ) then you are compressing the center spacer if you tighten futher.

I'm going to turn the big axle bolt until I just barely have the dust covers touching the inner races and then tighten all four fork clamp bolts.... add some thread locker to the big bolt and snug it up lightly.


Just for comparison, my right dust cover protrudes .5mm out of the hub. The left dust cover is flush.


Don R
 
Joined
Jun 2, 2011
Messages
101
Location
Dublin, Ireland
Bike
ST1300
Not in the UK, but there's a dealer here in Co. Kildare listed on their website.....I'll give them a buzz tomorrow and let you know the story John.
Sorry for the delay, but I tried ringing them for a couple of weeks....must've been another victim of the celtic tiger :(
 
Joined
Jan 19, 2014
Messages
1
Location
Paris France
My method for removing the bearing
must make a washer approximately 25.3 mm in diameter
and at least 1 mm thick
must then make two flat on the side to reduce the width of the washer approximately 24.9 wide
this way I can get thru the bearing and then turn inside the wheel hub
then it is necessary to heat the hub has approximately 100 ? Celsius
such as aluminum expands faster than steel it is a roughly 0.2 mm difference each 100 ?
then I chase the bearing with the axis of the wheel and it comes out almost effortlessly
 
Joined
Aug 26, 2009
Messages
10
Location
CARIGNAN,QC
Bike
ST 1300 2010
Around what mileage do you need to replace the wheel bearing ? Same front and back ?
 
Joined
Aug 26, 2009
Messages
10
Location
CARIGNAN,QC
Bike
ST 1300 2010
Tank you for the info, my bike as 55000m, do you think it's a good idea to change all the bearings at 60000m ?
 
Joined
Apr 15, 2022
Messages
38
Age
58
Location
Walland TN
Greetings ST'rs,

I installed new front wheel bearings and I'm concerned they might be side loaded by installing to tight on the spacer. Before installing the new bearings, they were a little stiff to spin but really smooth. Now with both bearings in with the spacer, the bearings are difficult to spin by hand and feel a little rough or notchy. Did I get the left bearing in too tight, side loading the bearings?

Thanks,
Ron
 
OP
OP
jfheath

jfheath

John Heath
Site Supporter
Joined
Mar 18, 2006
Messages
2,823
Age
69
Location
Ilkley, W Yorkshire, UK
Bike
2013 ST1300 A9
2024 Miles
000679
STOC #
2570
How did you install the 2nd bearing - the left hand one ? Did you use a tool that drives the outer and inner race at the same time ?

If not, it is easy to drive the outer further after the inner has reached the spacer.

New bearing shouldn't feel rough though. Perhaps that is the bearing rubbing against the spacer ?

I'm guessing. Put the front wheel into the bike an torque the axle bolt. See how freely the wheel spins. This pulls the inner race against the spacer.. Take it out again and see how it feels.

If you have to knock out the bearing again, you will need a new one. I always buy 3 bearings - an extra one for the second one to install. Just in case it doesn't work out.
 
Joined
Apr 15, 2022
Messages
38
Age
58
Location
Walland TN
How did you install the 2nd bearing - the left hand one ? Did you use a tool that drives the outer and inner race at the same time ?

If not, it is easy to drive the outer further after the inner has reached the spacer.

New bearing shouldn't feel rough though. Perhaps that is the bearing rubbing against the spacer ?

I'm guessing. Put the front wheel into the bike an torque the axle bolt. See how freely the wheel spins. This pulls the inner race against the spacer.. Take it out again and see how it feels.

If you have to knock out the bearing again, you will need a new one. I always buy 3 bearings - an extra one for the second one to install. Just in case it doesn't work out.
Thanks John,

I drove the bearings in using the outer ring. I attempted to go slow when it got close but seams I failed. I will now have to wait for another bearing to get delivered.

Thanks,
Ron
 

W0QNX

Blacksheep Tribal Member
Joined
May 30, 2006
Messages
3,343
Location
Pensacola, FL. USA
Bike
06/ST1300 19/R1250RT
2024 Miles
007437
Greetings ST'rs,

I installed new front wheel bearings and I'm concerned they might be side loaded by installing to tight on the spacer. Before installing the new bearings, they were a little stiff to spin but really smooth. Now with both bearings in with the spacer, the bearings are difficult to spin by hand and feel a little rough or notchy. Did I get the left bearing in too tight, side loading the bearings?

Thanks,
Ron
Well you answered your questions with the new bearings on the way. But, I got mine in what I thought was a bit to tight too when I replaced them. So the first few thousand miles I was concerned. Over 150,000 miles now and they are still working fine.
 
Joined
Apr 15, 2022
Messages
38
Age
58
Location
Walland TN
Well you answered your questions with the new bearings on the way. But, I got mine in what I thought was a bit to tight too when I replaced them. So the first few thousand miles I was concerned. Over 150,000 miles now and they are still working fine.
Good to know, thanks. I think mine are just tight enough for a little bind. I'll try what John said and install the wheel and let the axle torque squeeze the inner races together.

Ron
 
Joined
Apr 15, 2022
Messages
38
Age
58
Location
Walland TN
My old bearings after being removed seam ok. They spin a little easier than the new ones but are smooth. The reason I replaced them is humming noise while leaning, curves or swerving back in forth in one lane. I first thought feathered tire but the noise remained after a new tires.
 
OP
OP
jfheath

jfheath

John Heath
Site Supporter
Joined
Mar 18, 2006
Messages
2,823
Age
69
Location
Ilkley, W Yorkshire, UK
Bike
2013 ST1300 A9
2024 Miles
000679
STOC #
2570
I'll try what John said and install the wheel and let the axle torque squeeze the inner races together.
@Rdisney No - don't do that with new bearings.
That is guaranteed to side load them.


Do you ever wish that you had chosen your words more carefully ?

I was suggesting something to try - since yours appeared to be biding already. They were either side loaded inner race too deep or outer race to deep. If the outer race was too deep there is slight chance that tightening the axle will pull the inner race into line. Otherwise, you were going to have to knock it out anyway, so there was nothing lost in doing this. This was a remote possibility, to see if it worked.

The correct method.

Put in the right hand bearing (front wheel). Make sure that you tap in both inner and outer races together with a large round flat tool like the proper one in the photo.
Clean any grit off the end of the spacer. Put it into position from the left hand side.
Then tap in the left hand bearring using the tool or the outer race until the inner race touches the spacer.

-----

If you do not have the proper tool, then use an old bearing shell - tapping only on the outer race. Not the inner. It is better if you can use the proper tool to cover both inner and outer races

1711298562795.png

The photo shows the three parts of a Honda Beraing Driver.

Left is the pilot which fits into the middle of the bearing - where the axle passes through.
Middle is the driver for the outer and inner shells. It covers the outer shell and also the inner shell. It has to be the correct size for the bearing
Right is the handle.

In the video on the first post, only the centre item had arrived, so I had to manage with that.

Before that, I made my own tools from old bearings and a grindstone.

1711298744003.png

These are the inner and outer races of various bearings that I have removed. The outer race (eg bottom left) has a slot ground out of the side. This is because the bearing is a very tight fit in the hub, and having used it to hammer the bearing in, you then have the problem of removing the tool. With the slot, the ring just lifts out.


For the front wheel the right hand bearing must go in first, the left hand goes in after the spacer has been inserted. I'll refer to them as upper and lower.

So - Drive in the first bearing squarely - tap around the outside edge of your tool. If you have the proper tool you can just hammer it in keeping the handle upright. There is an obvious sound to the ringing when the bearing meets up with the shoulder in the hub. Turn the wheel over. You have the lower bearing installed.

You can use the outer ring of an old bearing to tap in the outer shell of the 2nd (upper) bearing, tapping opposite sides working your way around the outer edge. Tap too much on one side and the bearing will rock and get jammed. Don't use an unmodified old bearing. You won't get it out again.

Then when the inner race of the upper bearing is getting close to meeting the spacer, tap more gently. In the video you will see me sticking my finger in the hole. This isn't some weird fetish that I have - I am feeling for how much gap there is between the inner race of the upper bearing and the spacing tube. When it gets close, stop tapping and slide the axle in - just to check the alignment of the lower bearing, the spacer and the upper bearing - before they all get tapped together. The axle should slide though both bearings easily. The lower one will be correct - that was tapped in to meet the shoulder in the hube. The spacer is free to move around at the moment. The upper one may be a little crooked as a result of slightly uneven tapping. Sliding the axle in will enable you to feel whether or not it has been tapped in 'square', and give you the opportunity to recognise this and to correct it before it finally meets the spacer.

Remove the axle and go back to tapping. Gentle taps, evenly around the sides. You may hear the sound change slightly when the inner race meets the tube. But you will be checking with your finger as to how close it is. Also check the position of the spacing tube hole in relation to the right (already inserted) bearing. If you can find something that will allow you to tap the ring down evenly - eg a block of hardwood laid across the top - for these last few taps - so much the better. When they get really close, check after each tap.

As soon as the inner race of the left bearing meets the spacing tube - STOP TAPPING.

If you tap any more, then all you are doing is driving out the lower bearing with the spacer bearing down on the inner race - which will side load it.

The spacing tube should not rock about - it shouldn't be loose. Another reason for checking it with your finger. The inner race of the left bearing, the spacing tube and the inner race of the right bearing should form a complete cylinder through which the axles slides - the spacing tube prevents the axle from trying to pull the two bearing together.

For the rear wheel it is the left bearing that has to be inserted first.

============================

Please note. There is a shoulder in the hub on both sides of the wheel. The 2nd bearing to be driven in does not quite meet that shoulder. The spacing tube is longer than the distance between the shoulders. You cannot simply drive in the upper (2nd) bearing like you can the first - ie until it meets the shoulder. That will never happen. Its not an error. It is a design feature, and it is clearly labelled in the workshop manual. (The fact that the workshop manual says for the rear wheel says "Drive in a new left bearing (6205UU)"..... and then says "Drive in a new left bearing (20x47x20.6)" isn't particularly helpful. But the diagram and the bearing numbers both point to it being the left bearing (single race) that is driven in first for the rear wheel.

It also says to drive in the bearing with the mark facing up. None of my bearings have ever shown a mark. Its possibly to do with the seal, but they are usually double sealed.
 
Last edited:
Top Bottom