Garnish modification

kiltman

Site Supporter
Joined
Apr 27, 2013
Messages
3,282
Age
68
Location
Stratford, Ontario Canada
Bike
2002,ST1100ABS
STOC #
8826
image.jpg
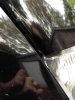
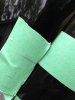
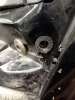
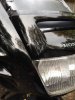
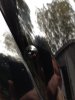
I modified the black plastic piece above the headlight which I understand to be called a "Garnish". Mine is missing two plastic tabs that lock it onto the cowl, resulting in some movement on the windshield. I have a rather tall windshield and I suspect along with age (my bike is a 1990 23 years old) is what made them fatigue. Replacing it is an option but expensive. I decided to install windshield screw grommets near where the tabs are supposed to be located. ( I would have installed them lower but it wouldn't work because of the headlight housing.)
I measured and marked the desired location, drilled the appropriate size holes and installed the grommets and refitted the garnish.
i'm pleased with the result, the windshield is firmer, less whistling at speed because of the lower part of the garnish secured to the cowl.
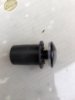
The photos show the gap, measuring prior to drilling, the finished look as well as what the grommet looks like.
i bought a package of 10 grommets for under $10. The spares I can use for replacements when needed. ( John, in posts to follow has correctly named them wellnut)
 

Attachments

Last edited:

John OoSTerhuis

Life Is Good!
Joined
May 10, 2005
Messages
5,221
Location
Bettendorf, Iowa
Bike
1991 SSMST1100
STOC #
1058
Nice job, Robert,

Another thing that can be done is to replace the puny plastic push-pin at the bottom center of the garnish with a 5mm nut-clip and shortened windshield truss-screw. BTDT

The rubber thing is called a 'wellnut.'

Regards, John :STOC: Ten Fifty-Eight

via iPhone 4S
 
Last edited:
OP
OP
kiltman

kiltman

Site Supporter
Joined
Apr 27, 2013
Messages
3,282
Age
68
Location
Stratford, Ontario Canada
Bike
2002,ST1100ABS
STOC #
8826
Nice job, __?__

Another thing that can be done is to replace the puny plastic push-pin at the bottom center of the garnish with a 5mm nut-clip and shortened windshield truss-screw. BTDT

The rubber thing is called a 'wellnut.'

Regards, John :STOC: Ten Fifty-Eight

via iPhone 4S
John that's excellent idea as well. To be honest I thought about something similar but this was closer at hand. But your idea would possibly be neater.
cheers
Robert
 
OP
OP
kiltman

kiltman

Site Supporter
Joined
Apr 27, 2013
Messages
3,282
Age
68
Location
Stratford, Ontario Canada
Bike
2002,ST1100ABS
STOC #
8826
How many wellnuts did you use? There are four tabs plus the front one John mentioned.
I was only missing the bottom two tabs. But the top of the garnish has a screw fastener point already.
I just did the lower tabs and I'm also thinking of doing the centre front too. ...like we need to have more screws in the Tupperware .....
 

Uncle Phil

Site Supporter
Joined
Feb 26, 2007
Messages
11,310
Age
71
Location
In The Holler West Of Nashville, Tennessee
Bike
4 ST1100(s)
2024 Miles
002064
STOC #
698
Here's the garnish mod that has been around a while (done on all three of mine with broken tabs) -

You need: 2-'wellnuts', 2-truss screws, 2-plastic washers, 2-rubber washers (if you want to be completely "oem". Minimum would be 2 wellnuts and 2 screws.)

To hit the fairing plastic underneath, measure up from the bottom corner of the garnish 2"; then from the edge of the garnish 3/8". Drill a 5mm hole through both the garnish and the fairing. Then, remove the garnish and drill the hole in the fairing large enough to fit the wellnut snugly.
 
Joined
Aug 24, 2012
Messages
127
Location
Moon, VA
Bike
1991 ST1100
STOC #
8654
I have read about a hacksaw blade farkle, where a hacksaw blade is glued to the garnish to help strengthen the plastic and a screw is run through the hacksaw blade. I would love to see photos of the mod.
 

Uncle Phil

Site Supporter
Joined
Feb 26, 2007
Messages
11,310
Age
71
Location
In The Holler West Of Nashville, Tennessee
Bike
4 ST1100(s)
2024 Miles
002064
STOC #
698
I have read about a hacksaw blade farkle, where a hacksaw blade is glued to the garnish to help strengthen the plastic and a screw is run through the hacksaw blade. I would love to see photos of the mod.
The feller that came up with the garnish included the hacksaw farkle as part of it. I believe the originator was Ray Stevens - but not the music one ... ;-)
 
OP
OP
kiltman

kiltman

Site Supporter
Joined
Apr 27, 2013
Messages
3,282
Age
68
Location
Stratford, Ontario Canada
Bike
2002,ST1100ABS
STOC #
8826
Here of course is another instance where I failed to do a search on the site before posting, however, some excellent suggestions on other avenues in making a strong repair to the garnish.
An observation; there is less vibration on my windshield. Less wind noise.
thanks for the suggestions.
cheers
 
Joined
Aug 24, 2012
Messages
418
Location
Park Ridge, NJ
Bike
1994 ST1100
That's a good idea. I was planning on buying a new one for same reason, but mine is cracked on top center as well. I'll try to glue it from the inside and use your idea on the bottom.

Mark
 
Joined
Jun 15, 2010
Messages
765
Location
Versailles, KY
Bike
2018 GL1800 Airbag
STOC #
8693
Here's the garnish mod that has been around a while (done on all three of mine with broken tabs) -

You need: 2-'wellnuts', 2-truss screws, 2-plastic washers, 2-rubber washers (if you want to be completely "oem". Minimum would be 2 wellnuts and 2 screws.)

To hit the fairing plastic underneath, measure up from the bottom corner of the garnish 2"; then from the edge of the garnish 3/8". Drill a 5mm hole through both the garnish and the fairing. Then, remove the garnish and drill the hole in the fairing large enough to fit the wellnut snugly.
I just did this last night. A few observations.

The drill bit size for the wellnuts is 3/8. On one side the hole for the wellnuts intruded into one of the slots. Maybe going over a 1/2 inch might be better. The curved surfaces are very difficult to measure. I used a tailors tape measure. I got extra wellnuts and screws from Clearview.

I haven't had a chance to test it yet, but I hope it works. It looks factory, along with my screw and nut clip in the center.
 
Top Bottom