I loosened up the bottom bolts while in the tree but they just keep turning. does anyone have a trick to stop the piece inside the fork from turn so I can unscrew the bolt? Don't want to drill head off if I can help it.

Front fork bottom bolt removal help needed
- Thread starter Tom P
- Start date
Or an electric one, mine was cheap..use air impact wrench....
You can also use an electric drill, just sacrifice an old allen wrench... cut off the 90 degree bend and insert into the drill. The impact wrench and the drill will spin up much faster than you can and most times the inertia will break it loose.
if you don't have an impact tool and don't want to spend the money on one just for this, take it to a local auto repair shop and ask them to loosen it with their air tools. Or if there's a m/c shop you frequent for tires, supplies, etc. that already knows you, ask one of their mechanics to break it loose.
Well I tried the penetrating oil which did not help. Remember they did break loose initially but then just kept turning with the valve body inside. Tried the spring and cap on which the manual say also. The bolt was turning so loosely that I am pretty sure an impact wrench would have been of no use. I decide the easiest way was to drill the head off. Even then I had to wedge a screw diver in to keep the bolt from spinning while I drilled them. After I did that I put the valve body in a smooth vise with a rag to hold it and took the rest of the bolt out, which was in pretty tight. I am convince that the bloody Locktight is over kill for these bolts and I am not going to use it on them this time. I did have to drill on out one the last oil change also. I also think from now on I will have a pair of bolts and washers on hand. You would think HONDA could engineer something a little better that this.
Thank you guys for all the advise. It is so appreciated!
Thank you guys for all the advise. It is so appreciated!
- Joined
- Feb 11, 2006
- Messages
- 9,682
- Location
- Jacksonville
- Bike
- GL1800 R1200RT NC700
- 2024 Miles
- 008131
- STOC #
- 6651
You remove the bolt for a fork oil change?Snipped..................... I did have to drill on out one the last oil change also...............
In 35 years of pulling forks apart I've only come across one bolt that spun even with an impact wrench, and that was on an old neglected bike. Not sure if the loctite from your previous removal contributed to the problem, but as you say, its not necessary so not using it this time was the correct call.I am pretty sure an impact wrench would have been of no use.
I did have to drill on out one the last oil change also.
Also, have to ask the same question dduelin asked, why are you removing that bolt to do an oil change? That bolt only needs to be removed for fork seal and bushing replacement. You can pump the forks with that bolt in place to remove all the old oil.
pdfruth
P.D.Fruth
I wish I had seen this before you had to resort to such extreme measures.
I too have had the same problem you described in your opening post.
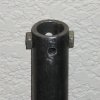
I rather simply fashioned a home-made tool comprised of: a 30 in. length of 5/8 in. black pipe from Home Depot, and a couple of spare 6-32 nuts.
At one end of the pipe, I attached the 6-32 nuts on opposite sides of the pipe (I think I epoxy'd them in place, but I don't remember).
See the attached close-up pic of the end with the nuts attached. (never mind the empty holes in the pic. They were already in the scrap of black pipe that I just so happened to pick out). I may have also had to round the nuts off a bit, in order to enable a nice snug fit in the final application.
Anyhow, sliding the length of pipe down over the damping rod piston shaft, until the those nuts slip into a corresponding pair of slots in the damping rod cylinder, allows you to hold the damping rod cylinder from turning whilst you remove the bolt from the bottom (I just used a channel-lock pliers to hold the black pipe from turning, which in turn prevented the damping rod cylinder from turning).
Make sense? Hopefully it made sense.
EDIT: As I think back about this, I can't remember if I used this on my RC51, or my CBR1000RR, or my ST1300, or all of em. I've done fork seals on each of those, and others, at some point. In any case, although dimensions may vary, the same concept applies.
Looking back in my RC51 service manual, I see that Honda actually makes a special tool called a "Fork damper holder" - part numbers 07YMB-MCF0101 or 07YMB-MCFA100
I too have had the same problem you described in your opening post.
I rather simply fashioned a home-made tool comprised of: a 30 in. length of 5/8 in. black pipe from Home Depot, and a couple of spare 6-32 nuts.
At one end of the pipe, I attached the 6-32 nuts on opposite sides of the pipe (I think I epoxy'd them in place, but I don't remember).
See the attached close-up pic of the end with the nuts attached. (never mind the empty holes in the pic. They were already in the scrap of black pipe that I just so happened to pick out). I may have also had to round the nuts off a bit, in order to enable a nice snug fit in the final application.
Anyhow, sliding the length of pipe down over the damping rod piston shaft, until the those nuts slip into a corresponding pair of slots in the damping rod cylinder, allows you to hold the damping rod cylinder from turning whilst you remove the bolt from the bottom (I just used a channel-lock pliers to hold the black pipe from turning, which in turn prevented the damping rod cylinder from turning).
Make sense? Hopefully it made sense.
EDIT: As I think back about this, I can't remember if I used this on my RC51, or my CBR1000RR, or my ST1300, or all of em. I've done fork seals on each of those, and others, at some point. In any case, although dimensions may vary, the same concept applies.
Looking back in my RC51 service manual, I see that Honda actually makes a special tool called a "Fork damper holder" - part numbers 07YMB-MCF0101 or 07YMB-MCFA100
Attachments
-
 67.2 KB Views: 25
Last edited:
...You remove the bolt for a fork oil change?
NOOO.....
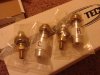
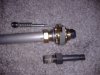
I am having an issue with slower speed bobbing. I pulled it apart to inspect the mechanical components. I have Racetech Golds with adjuster caps. I also wanted to see the condition of the oil and how clean or dirty the part were. I change from the Racetech 5w on the first oil change because I could not get it stiff enough with the adjusters. I went with Redline 5w which was a definite improvement. The oil was very clean as were all the components when I pulled it apart (probably 15,000miles on it). I also wanted to take one spacer out to have a better range of adjustment on the preload.
But now comes the fun part...I was still suspisious that there was something wrong, maybe bushing causing some slight sticksion or something keeping the forks from responding to unpreceivable soft irregularities in the road. But all the bushings looked fine.
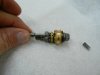
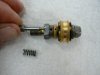
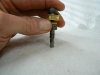
So I took the valving out of the tube and the valve off the end of the rods. this is a long story but the O rings that were on the needle were cut apart so natually debris could lodge in the orifice. But why would they be damaged? I call Racetech and informed Terry of this. I also informed him that the original instructions showed a slot for the O ring in the needle but mine did not have it. His said that they were old style (even though I had purchased just a 1 1/2 yrs ago) and that they were not made for an O ring and the oil goes up through the tube. Now you have to think that one through and the design of the valve to realize this sounded wrong. Well as I saw the picture here on the forum of another members needles I realized that mine seemed a lot shorter and when I aligned them with the valve saw that they would not even go past the exhaust hole not alone into the orifice to control the flow. And there was a slot for the O ring on his!
So I sent pictures and my opinion to Terry and he agreed with me that they had sent the wrong needles which I have been running for a year and a half. I am now awaiting the new needles and am anxious to see how real Gold valves preform. No wonder I had to change to heavier oil, there was no resistance to the flow.
By the way nice tool you made P.D.FRUTH! If it happens again I will try that.
Attachments
-
 91.9 KB Views: 13
 -
 95 KB Views: 9
 -
 87 KB Views: 10
 -
 126.4 KB Views: 10
 -
 193.5 KB Views: 15
Last edited:
bdalameda
PaleoCyclist
The next time you need some help with a problem like this give drop me a note as I have a pretty complete shop and many specialized tools for rebuilding forks and I live just outside of Salinas. I am quite sure that an impact wrench would have removed the bottom bolt....
NOOO.....
I am having an issue with slower speed bobbing. I pulled it apart to inspect the mechanical components. I have Racetech Golds with adjuster caps. I also wanted to see the condition of the oil and how clean or dirty the part were. I change from the Racetech 5w on the first oil change because I could not get it stiff enough with the adjusters. I went with Redline 5w which was a definite improvement. The oil was very clean as were all the components when I pulled it apart (probably 15,000miles on it). I also wanted to take one spacer out to have a better range of adjustment on the preload.
But now comes the fun part...I was still suspisious that there was something wrong, maybe bushing causing some slight sticksion or something keeping the forks from responding to unpreceivable soft irregularities in the road. But all the bushings looked fine.
So I took the valving out of the tube and the valve off the end of the rods. this is a long story but the O rings that were on the needle were cut apart so natually debris could lodge in the orifice. But why would they be damaged? I call Racetech and informed Terry of this. I also informed him that the original instructions showed a slot for the O ring in the needle but mine did not have it. His said that they were old style (even though I had purchased just a 1 1/2 yrs ago) and that they were not made for an O ring and the oil goes up through the tube. Now you have to think that one through and the design of the valve to realize this sounded wrong. Well as I saw the picture here on the forum of another members needles I realized that mine seemed a lot shorter and when I aligned them with the valve saw that they would not even go past the exhaust hole not alone into the orifice to control the flow. And there was a slot for the O ring on his!
So I sent pictures and my opinion to Terry and he agreed with me that they had sent the wrong needles which I have been running for a year and a half. I am now awaiting the new needles and am anxious to see how real Gold valves preform. No wonder I had to change to heavier oil, there was no resistance to the flow.
By the way nice tool you made P.D.FRUTH! If it happens again I will try that.
dan
Sounds good, Thanks.The next time you need some help with a problem like this give drop me a note as I have a pretty complete shop and many specialized tools for rebuilding forks and I live just outside of Salinas. I am quite sure that an impact wrench would have removed the bottom bolt.
dan
If you use an impact to zap it off, how will you hold it to torque it to spec on re-assembly?
you use an impact to zap it back on, and don't worry about the torque spec. Standard shop operating procedure AFAIK. I've never seen one loosen in 35 years of wrenching on them.If you use an impact to zap it off, how will you hold it to torque it to spec on re-assembly?