
Here is another idea that I was inspired to do from Rick (dr1954). Out of the way mounting your heat-troller, but keep it easily accessible, functional and in warranty.
I ended up doing two mountings, one dual channel on each side. Normally I would use three channels for myself on a below mild some call brisk day, but I could get by for the most part with two. So if one whoel controller dies mid-trip I can get on with the journey just using the other controller.
The joy that everyone faces when mounting something (espically electrical) on the bike is finding a good location that keeps the item useable and protect it form the elements. When I saw Ricks mounting I thought I could improve it by putting a multi-pin connector in between the knob thingies and the main unit. No joy, as that would void warranty. Mounting up these heat-trollers adds in the challenge of not cutting any wires, or you void the warranty. So I decided to take the easy route and mount the main body on the outboard panel with the rheostats. But I still wanted a disconnect to make the bike easily serviceable (relatively speaking with all the tupperware).
To make this work and still make the bike serviceable required two things, getting the main unit (and wires) attached to the side cowl and getting a disconnect so I could take the cowl easily off. The side pocket (toaster ovens) provide just the spot.
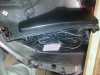
So pull the cowl and undo a few screws and remove the toaster oven from the panel. This provides a more convient work surface too for placing the knobs.
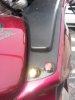
Drilled my holes for the knob and LED placement. Mounted the unit up with some nice VHB (really good double sided tape) and stuck it to the backside of the toasterbox, fold up the excess wire and tuck into place.
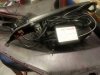
Now to make it useable (powered) and not violate warranty... a cheater cord. A SAE plug with some nice heavy wires. Crimped on some ring terminals and used some short screws and bolts and clamped 'em up. After screwing those together I insulated them with Scotch 88 electric tape. It's a little thicker then the standard stuff to resist abrasion, but still has their good glue so it releases cleanly and won't just become a gooey mess.

So I never cut any of the factory wires, the unit is protected from the elements and most important, I now have warm toes!
I ended up doing two mountings, one dual channel on each side. Normally I would use three channels for myself on a below mild some call brisk day, but I could get by for the most part with two. So if one whoel controller dies mid-trip I can get on with the journey just using the other controller.
The joy that everyone faces when mounting something (espically electrical) on the bike is finding a good location that keeps the item useable and protect it form the elements. When I saw Ricks mounting I thought I could improve it by putting a multi-pin connector in between the knob thingies and the main unit. No joy, as that would void warranty. Mounting up these heat-trollers adds in the challenge of not cutting any wires, or you void the warranty. So I decided to take the easy route and mount the main body on the outboard panel with the rheostats. But I still wanted a disconnect to make the bike easily serviceable (relatively speaking with all the tupperware).
To make this work and still make the bike serviceable required two things, getting the main unit (and wires) attached to the side cowl and getting a disconnect so I could take the cowl easily off. The side pocket (toaster ovens) provide just the spot.
So pull the cowl and undo a few screws and remove the toaster oven from the panel. This provides a more convient work surface too for placing the knobs.
Drilled my holes for the knob and LED placement. Mounted the unit up with some nice VHB (really good double sided tape) and stuck it to the backside of the toasterbox, fold up the excess wire and tuck into place.
Now to make it useable (powered) and not violate warranty... a cheater cord. A SAE plug with some nice heavy wires. Crimped on some ring terminals and used some short screws and bolts and clamped 'em up. After screwing those together I insulated them with Scotch 88 electric tape. It's a little thicker then the standard stuff to resist abrasion, but still has their good glue so it releases cleanly and won't just become a gooey mess.
So I never cut any of the factory wires, the unit is protected from the elements and most important, I now have warm toes!