10-12-17 My saddlebag maintenance
Total time it took was about 1 ½ hours (maybe 2). Next time 1 hour?
Tools required:
8mm nut driver (no socket wrenches)
Phillips screwdriver
Flat blade screwdriver
Rubber bands (2)
Grease (no oil)
Q-Tips
Forceps (aka tweezers) to replace springs & ball bearings
Work on one unit until it is complete. Use a nut driver instead of sockets as you can feel the applied torque better as you reassemble the parts. The parts should be tight but remember, you're working with small threaded parts and plastic. I purposely did not address lock lubrication, as more knowledgeable members (e.g., Igofar) have commented on this.
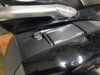
Open the saddle bag
Unhook the strap connected to the two halves
Remove the 4 acorn nuts on the inside bottom of the saddlebag with an 8mm nut driver
Remove the two metal rectangular washers and two rubber rectangular washers. A flat-blade screwdriver helps with this.
Separate the two saddlebag halves. The non-handle half is a good place to store the hardware you just removed until re-assembly.
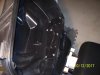
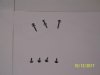
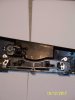
Turn the saddlebag half with the handle upside down. Using a Phillips screwdriver, remove the seven screws attaching the handle assembly to it. Note that the three long screws go into the holes along the straight edge of the saddlebag
Remove the 4 acorn nuts, 2 rectangular metal washers, and 2 rectangular rubber washers from the 2 studded parts
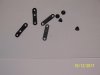
Before you separate the handle assembly, look at the two threaded stud units you removed the acorn nuts and washers from. These units rotate and have a groove in them. A spring-loaded bearing is part of the assembly. These pieces slide out of the assembly, and if you have the assembly tilted as you separate it, the ball bearing will fall out. Not a big deal if the spring and/or bearing falls out, just be prepared to have the assembly in or on something that will prevent it from disappearing onto the floor.
Separate the handle assembly from the saddlebag body. A flat-bladed screwdriver can help with this.
Separate the metal unit from the plastic unit
Apply grease to all parts that move against another. A Q-tip worked well for me when applying grease.
Use the rubber band to compress and hold in place the two studded units as you reassemble the metal and plastic parts. Once the units are back in place, cut and remove the rubber band before attaching the nuts and screws.
Attach the handle assembly to the saddlebag. Use the nut driver to tighten the acorn nuts. Similar to using the Phillips screwdriver, you will feel when the nuts are at their limit.
Attach the two saddlebag halves. Make sure the acorn nuts are tightened to their limit when re-attaching the two saddlebag halves. This is important, since a sloppy fit here will cause pretty much everything to bind.
Re-connect the strap connecting the two saddlebag halves
Hope this helps.
Just performed maint. on locks for both side bags, write up was awesome, especially note for tiny springs & check balls on the pair of stud pieces, would have lost them w/o that tip. Ordered a new lock but will keep it in stock for future. Thanks.

My Right Saddlebag Latch will not allow Lid to Open
- Thread starter Northern Dancer
- Start date
- Joined
- Mar 18, 2006
- Messages
- 2,826
- Age
- 70
- Location
- Ilkley, W Yorkshire, UK
- Bike
- 2013 ST1300 A9
- 2024 Miles
- 000679
- STOC #
- 2570
Just for Info. I took photos and wrote this up the last time I serviced my handles.
I never posted it on here, cos someone else did a better job of it, just before I got round to posting mine.
But this is a downloadable pdf, so it's worth including.
Perhaps some kinds soul will post a link to the other one ?
I never posted it on here, cos someone else did a better job of it, just before I got round to posting mine.
But this is a downloadable pdf, so it's worth including.
Perhaps some kinds soul will post a link to the other one ?
Attachments
-
837.8 KB Views: 20
Just for Info. I took photos and wrote this up the last time I serviced my handles.
I never posted it on here, cos someone else did a better job of it, just before I got round to posting mine.
But this is a downloadable pdf, so it's worth including.
Perhaps some kinds soul will post a link to the other one ?
My Right Saddlebag Latch will not allow Lid to Open | ST1300 Related
10-12-17 My saddlebag maintenance Total time it took was about 1 ½ hours (maybe 2). Next time 1 hour? Tools required: 8mm nut driver (no socket wrenches) Phillips screwdriver Flat blade screwdriver Rubber bands (2) Grease (no oil) Q-Tips Forceps (aka tweezers) to replace springs & ball bearings...
- Joined
- Mar 18, 2006
- Messages
- 2,826
- Age
- 70
- Location
- Ilkley, W Yorkshire, UK
- Bike
- 2013 ST1300 A9
- 2024 Miles
- 000679
- STOC #
- 2570
Here are a couple of other links that are worth looking at
@Sadlsor's contribution was the one to which I was referring - concentrating on the lock mechanism
 www.st-owners.com
@michaelbrooks hasn't been seen on the forum for a long time, but he left us this article about dismantling and painting the saddle bags. Some excellent close up photo attachments taken during dismantling.
www.st-owners.com
@Sadlsor's contribution was the one to which I was referring - concentrating on the lock mechanism
ST1300 saddlebag lock repair | Luggage / Fairings
Yesterday I had to fuss with closing / locking my left bag and removing the key. Finally found that the little leaf spring, which is depressed when lowering the inner handle, allows the pivoting lock blade to slide into the recess of said handle, has somehow twisted 90 degrees. This prevents the...
@michaelbrooks hasn't been seen on the forum for a long time, but he left us this article about dismantling and painting the saddle bags. Some excellent close up photo attachments taken during dismantling.
Article [13] - ST1300 - Side Pannier Disassembly / Painting | ST1300 Articles
I really don't know if this has been done on here. Tried looking for something similar but found nothing. So I'm going to do an entire writeup including pictures of taking apart the bag locking mech along with the key mech and the paint work, before and after, etc etc. I've really been wanting...
To avoid this issue, I had a couple of short keys made and leave them in the saddlebags. I remove them if I park where the bike is not in sight. I suppose leaving the bags locked all of the time is greater insurance that they won't open accidentally, but I've never had a problem.Re: My Right Saddlebay Latch will not allow Lid to Open
I cannot do this with my 2005 ST1300. The key will not come out when the bags are "unlocked". I've found it to be kind of annoying not to be able to unlock the bags and leave them unlocked....I will lock them from time to time, but I dont need them locked all the time.