
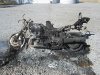
....So after reading of an Australian forum member toasted ST1100 (see last photo attached, heart breaking)
i decided it would be a good idea to replace my "Fuel Joint Pipe" on my 2006, ST1300.
I am convinced this has never been replaced by previous owner / dealership.
I purchased the fuel joint rubber pipe only $10.99 incl free postage (Australia).

http://www.bluecitymotorcycles.com.au/honda_search.php
Part Number # 17545-MCS-G00 TUBE, FUEL JOINT, (HONDA-OEM)
This is the way I replaced the pipe, you can do it alternate ways, but I found this was the best for me...:

This is a very simple procedure and really doesn't require any special tools or mechanical abilities, it takes about 1 hour.
I have listed a step by step procedure for those that are still hesitant...


NOTE: Make sure you have no MORE than 1 bar fuel on display (i rode 380 km from full tank the day prior to doing this repair) otherwise you will loose fuel and make a mess ,as well as a potential fire / explosion risk....

(remove the seats)
1) remove (2) 8 mm bolts at collar front of tank, remove 10 mm bolt that secures the tank hinge at the rear and remove the bolt and nut completly.
2) remove the seat height positioner (5 pc) 10 mm bolts
3) lift the tank and support with the tank strut support rod.
4) remove safety cable 10 mm nut
5) slide the tank backwards a bit, lift and support in (90 deg) vertical position with a cord, tied from the front collar hole to the rear grab rail.
6) from the left, rear of the tank, unclip the blue, fuel gauge connector and note how it is positioned behind the U shaped bracket.
7) carefully remove the vent pipes. use a blunt, small awl, or flat screwdriver to break the seal. Now use plastic pvc rubber hose pliers, to remove the vent / overflow rubber tubes, I marked the location of ea. rubber pipe, but they are each different inside diameters, so you cant get the mixed up.
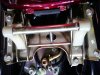
 now the moment you have been waiting for... unfasten your cord and place the tank back to its normal flat position and squeeze the lower tank (under the seat) metal hose clamp together, with a solid pair of pliers. Gently push / pry the rubber tube off its stem and free the fuel joint hose from the lower tank stem. the tank is now free from the bike and can be lifted off the bike and paced upside down, on a protected (heavy blanket, car mat etc...)
9) mark the direction of the original old pipe on the inside (remember, its upside down) of the top fuel tank, so you know what angle it should be positioned when replacing.
also note, the larger diam hose for the top tanks stem and smaller for bottom. remove the old hose pipe from the top fuel tank and keep it as a spare for emergency in your tool kit.
Note: this is a great time to perform other service procedures or farkles if required, such as air filter service, 5 way plastic throttle body vaccum clean, monnometer starting valve synch (see my posts re these procedures)
10) I decided to re-use the hose clamps as they seemed to be in good condition. next time I will splurge another $10 for a pair of new clamps as they are shipped with metalic holders in clamped-open position. I placed the hose clamps in a sturdy bench vise and placed a sturdy cable tie round the prongs, to hold the clamps in an open compressed position.
11) place the compressed hose clamps over the ends of the rubber joint pipe, assemble the new rubber joint pipe onto the top fuel tank stem, noting the correct angle (you marked the direction before removing the old pipe, right...? ) snip the cable tie and flip the tank back onto the bike.
12) slide the joint pipe onto the lower fuel stem and snip the cable tie, connect the fuel gauge blue plug, seat height bracket, 3 vent overflow rubber pipes, rear hinge bolt, safety cable nut, collar bolts.
13) fill with fuel while engine is cold, check for leaks, have a beer your done!
hope this helps, better safe than sorry (or worse...)
Zev
i decided it would be a good idea to replace my "Fuel Joint Pipe" on my 2006, ST1300.
I am convinced this has never been replaced by previous owner / dealership.
I purchased the fuel joint rubber pipe only $10.99 incl free postage (Australia).
http://www.bluecitymotorcycles.com.au/honda_search.php
Part Number # 17545-MCS-G00 TUBE, FUEL JOINT, (HONDA-OEM)
This is the way I replaced the pipe, you can do it alternate ways, but I found this was the best for me...:
This is a very simple procedure and really doesn't require any special tools or mechanical abilities, it takes about 1 hour.
I have listed a step by step procedure for those that are still hesitant...
NOTE: Make sure you have no MORE than 1 bar fuel on display (i rode 380 km from full tank the day prior to doing this repair) otherwise you will loose fuel and make a mess ,as well as a potential fire / explosion risk....
(remove the seats)
1) remove (2) 8 mm bolts at collar front of tank, remove 10 mm bolt that secures the tank hinge at the rear and remove the bolt and nut completly.
2) remove the seat height positioner (5 pc) 10 mm bolts
3) lift the tank and support with the tank strut support rod.
4) remove safety cable 10 mm nut
5) slide the tank backwards a bit, lift and support in (90 deg) vertical position with a cord, tied from the front collar hole to the rear grab rail.
6) from the left, rear of the tank, unclip the blue, fuel gauge connector and note how it is positioned behind the U shaped bracket.
7) carefully remove the vent pipes. use a blunt, small awl, or flat screwdriver to break the seal. Now use plastic pvc rubber hose pliers, to remove the vent / overflow rubber tubes, I marked the location of ea. rubber pipe, but they are each different inside diameters, so you cant get the mixed up.
9) mark the direction of the original old pipe on the inside (remember, its upside down) of the top fuel tank, so you know what angle it should be positioned when replacing.
also note, the larger diam hose for the top tanks stem and smaller for bottom. remove the old hose pipe from the top fuel tank and keep it as a spare for emergency in your tool kit.
Note: this is a great time to perform other service procedures or farkles if required, such as air filter service, 5 way plastic throttle body vaccum clean, monnometer starting valve synch (see my posts re these procedures)
10) I decided to re-use the hose clamps as they seemed to be in good condition. next time I will splurge another $10 for a pair of new clamps as they are shipped with metalic holders in clamped-open position. I placed the hose clamps in a sturdy bench vise and placed a sturdy cable tie round the prongs, to hold the clamps in an open compressed position.
11) place the compressed hose clamps over the ends of the rubber joint pipe, assemble the new rubber joint pipe onto the top fuel tank stem, noting the correct angle (you marked the direction before removing the old pipe, right...? ) snip the cable tie and flip the tank back onto the bike.
12) slide the joint pipe onto the lower fuel stem and snip the cable tie, connect the fuel gauge blue plug, seat height bracket, 3 vent overflow rubber pipes, rear hinge bolt, safety cable nut, collar bolts.
13) fill with fuel while engine is cold, check for leaks, have a beer your done!
hope this helps, better safe than sorry (or worse...)
Zev
Attachments
-
 148.3 KB Views: 18
 -
 162 KB Views: 28
 -
 165.2 KB Views: 30
 -
 163.6 KB Views: 30
 -
 98.2 KB Views: 32
Last edited: