ST11A u-joint suspected problem

STurgisSTeele

When did I become the "Old Man"!?
Joined
Feb 19, 2008
Messages
1,007
Age
56
Location
STurgis, MI
Bike
01 ST1100A (RIP)
STOC #
2667
With the increasing amount of vibration, I'm suspecting the u-joint is going. Took things apart until I got the lock nut on the pivot bolt.

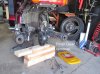
Here's a little run-down of how it went... of course it starts like this...
u-joint-start.jpg

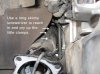
Remove the rear wheel. Be sure to suspend the brakes, and don't press on the rear brake lever while working on the bike. Especially when removing the right cover right there near the pedal. DAMHIK!
u-joint-rear-wheel.jpg

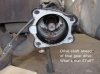
Support the Final Gear Drive and remove. Note: Make sure the nuts and the area right there are clean. I had problems getting a good bite on the nuts until I cleaned the area. You might need to be a little creative to get the right angle, but you'll figure it out. I also suspended the rear shock a little out of the way too.
u-joint-final-gear.jpg

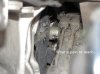
What's that stuff? Really don't know just yet. I haven't cleaned it out to see. Will determine what it is a little later.
u-joint-drive-shaft.jpg

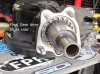
The Final Gear Drive looks pretty good. A bit dirty, crusty on the out edge. (It's laying on its side.)
u-joint-final-gear-drive.jpg

Remove the 8mm bolts (3 of them for ABS) to detach the brake lines. That bolt in the back (towards the front of the bike) was a bear to get at! Hope you have hands smaller than mine.
u-joint-8mm-bolt.jpg

If you have ABS, lift up on the little clamps to release the sensor wire from the swingarm.
u-joint-clamps.jpg

Here I have to stop for now. Waiting for my lock nut removal tool. I'll update this post when I continue with the project.
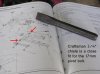
I did discover that a Craftsman 3/4" chisle will fit pretty good into the pivot bolt.
u-joint-chisle.jpg
 
Last edited:

John OoSTerhuis

Life Is Good!
Joined
May 10, 2005
Messages
5,224
Location
Bettendorf, Iowa
Bike
1991 SSMST1100
STOC #
1058
:popcorn

Be sure to pull the Driveshaft Joint out of the Final Drive and inspect for wear and lube, John.

How are you going to apply 76 ft lbs to the right pivot bolt using the cold chisel shaft? Or do you have that tool O/O also...?

John
 
Last edited:
Joined
Jul 30, 2014
Messages
28
Location
USA
I usually use a couple pieces of a paint stir stick to substitute for the brake disc when removing wheels. Put them in the caliper and give the pedal/lever a little push and they'll stay in place until ready for reassembly. Dave
 
OP
OP
STurgisSTeele

STurgisSTeele

When did I become the "Old Man"!?
Joined
Feb 19, 2008
Messages
1,007
Age
56
Location
STurgis, MI
Bike
01 ST1100A (RIP)
STOC #
2667
:popcorn

Be sure to pull the Driveshaft Joint out of the Final Drive and inspect for wear and lube, John.

How are you going to apply 76 ft lbs to the right pivot bolt using the cold chisel shaft? Or do you have that tool O/O also...?

John
Need to get a hold of a 17mm hex socket. I was thinking how the size of the chisel would allow holding of the left pivot bolt while torquing the left pivot bolt lock nut. But the proper tool will best all around.
 
OP
OP
STurgisSTeele

STurgisSTeele

When did I become the "Old Man"!?
Joined
Feb 19, 2008
Messages
1,007
Age
56
Location
STurgis, MI
Bike
01 ST1100A (RIP)
STOC #
2667
I usually use a couple pieces of a paint stir stick to substitute for the brake disc when removing wheels. Put them in the caliper and give the pedal/lever a little push and they'll stay in place until ready for reassembly. Dave
Thanks, Dave. I have some of those laying around.
 

John OoSTerhuis

Life Is Good!
Joined
May 10, 2005
Messages
5,224
Location
Bettendorf, Iowa
Bike
1991 SSMST1100
STOC #
1058
Need to get a hold of a 17mm hex socket. I was thinking how the size of the chisel would allow holding of the left pivot bolt while torquing the left pivot bolt lock nut. But the proper tool will best all around.
The most important torque value requiring a 17mm hex-bit socket is the 13 ft lbs (156 in lbs) of swingarm bearings preload applied at the left pivot bolt. I have a big honk'n S&K version in 1/2" drive. There's one in each of the alt upgrade loaner tool kits, BTW. Also made one in 3/8" drive by epoxying a chunk of 17mm hex hacksawed off a 17mm Allen wrench from Sears. Real handy for the lower torque value places, including the fork caps. FWIW

John

via iPhone 4S
 
Last edited:
OP
OP
STurgisSTeele

STurgisSTeele

When did I become the "Old Man"!?
Joined
Feb 19, 2008
Messages
1,007
Age
56
Location
STurgis, MI
Bike
01 ST1100A (RIP)
STOC #
2667
The most important torque value requiring a 17mm hex-bit socket is the 13 ft lbs (156 in lbs) of swingarm bearings preload applied at the left pivot bolt. I have a big honk'n S&K version in 1/2" drive. There's one in each of the alt upgrade loaner tool kits, BTW. Also made one in 3/8" drive by epoxying a chunk of 17mm hex hacksawed off a 17mm Allen wrench from Sears. Real handy for the lower torque value places, including the fork caps. FWIW

John

via iPhone 4S
Figured I'd just get the tools. I see that the right pivot bolt is gonna require 76 ft lbs., no problem there, but my torque wrench only goes down to 20 ft lbs. Is there a trick there or should I get another torque wrench?
 

John OoSTerhuis

Life Is Good!
Joined
May 10, 2005
Messages
5,224
Location
Bettendorf, Iowa
Bike
1991 SSMST1100
STOC #
1058
If you're going to do your own work on your ST you need another torque wrench that covers the lower torque values, like cam follower bolts (9 ft lbs). Those will be 3/8" drive type. Multiple the given ft lbs specs by 12 to get the in lbs setting normally used on these.

There's no single torque wrench that can accurately cover the entire range of required/spec'd values for the ST1100s (and ST1300s).

John
 
Last edited:
OP
OP
STurgisSTeele

STurgisSTeele

When did I become the "Old Man"!?
Joined
Feb 19, 2008
Messages
1,007
Age
56
Location
STurgis, MI
Bike
01 ST1100A (RIP)
STOC #
2667
If you're gong to do your own work on your ST you need another torque that covers the lower torque values, like cam follower bolts (9 ft lbs). Those will be 3/8" drive. Multiple the given ft lbs specs by 12 to get the in lbs setting normally used on these.

There's no single torque wrench that can accurately cover the entire range of required/spec'd values for the ST1100s (and ST1300s).

John
Sounds good. I'll get another TW. It'll be worth it's weight in gold then. I do intend to continue doing my own work.
 

ST1100Y

Site Supporter
Joined
Dec 4, 2012
Messages
5,031
Age
59
Location
Vienna, AuSTria
Bike
ST1100Y, ST1100R
STOC #
637
If you're going to do your own work on your ST you need another torque wrench that covers the lower torque values, like cam follower bolts (9 ft lbs). Those will be 3/8" drive type.
I got myself 3 different sized torque wrenches, the one for the "small stuff" is a Syntace 1/4" drive 1~20Nm (1.35~27.00 ft lbs) from a shop supplying tools for bicycles and mountain-bikes... ;-)
Very accurate at that low range, interestingly the most needed on the ST... calliper mounting bolts, valve covers, hub-damper cover, etc...
 
OP
OP
STurgisSTeele

STurgisSTeele

When did I become the "Old Man"!?
Joined
Feb 19, 2008
Messages
1,007
Age
56
Location
STurgis, MI
Bike
01 ST1100A (RIP)
STOC #
2667
Lock nut removal tool arrived yesterday. Hoping to drop the swingarm after work. But I'm working 12's and get out at 8pm. Bleh!
 

John OoSTerhuis

Life Is Good!
Joined
May 10, 2005
Messages
5,224
Location
Bettendorf, Iowa
Bike
1991 SSMST1100
STOC #
1058
Note: it's moly paste (>40%) on the trannie output shaft/driveshaft u-joint splines. And 3% moly grease on the driveshaft/driveshaft joint/pinion cup splines.

Tip: When you pull the driveshaft joint out of the final drive drive the end cap may have some wear from the nut at the bottom of the pinion cup. The cap can be tapped out and reversed. FWIW

John
via iPhone 4S
 
OP
OP
STurgisSTeele

STurgisSTeele

When did I become the "Old Man"!?
Joined
Feb 19, 2008
Messages
1,007
Age
56
Location
STurgis, MI
Bike
01 ST1100A (RIP)
STOC #
2667
Note: it's moly paste (>40%) on the trannie output shaft/driveshaft u-joint splines. And 3% moly grease on the driveshaft/driveshaft joint/pinion cup splines.

Tip: When you pull the driveshaft joint out of the final drive drive the end cap may have some wear from the nut at the bottom of the pinion cup. The cap can be tapped out and reversed. FWIW

John
via iPhone 4S
Thanks. Hmmm, I only have the 60% mp. I recall seeing that in the manual. Have to get some. Too bad I'm working 12's right now. Prolly be this Tuesday when I can get some.
Great tip, thanks!
 
OP
OP
STurgisSTeele

STurgisSTeele

When did I become the "Old Man"!?
Joined
Feb 19, 2008
Messages
1,007
Age
56
Location
STurgis, MI
Bike
01 ST1100A (RIP)
STOC #
2667
Okay, I removed the lock nut and pivot bolts and pushed the rubber boot off its lip. But the swingarm won't come off. I've wiggled and yanked, but no go. Did I over look something?
 

John OoSTerhuis

Life Is Good!
Joined
May 10, 2005
Messages
5,224
Location
Bettendorf, Iowa
Bike
1991 SSMST1100
STOC #
1058
Grab the end of the driveshaft with a rag and pull the u-joint off the trannie output shaft. Then the swingarm will clear the frame recess on the right side.

Edit: N.B. When you remove the swingarm be careful not to dump the driveshaft right out onto the floor!

John
 
Last edited:
OP
OP
STurgisSTeele

STurgisSTeele

When did I become the "Old Man"!?
Joined
Feb 19, 2008
Messages
1,007
Age
56
Location
STurgis, MI
Bike
01 ST1100A (RIP)
STOC #
2667
Ah, I see what you're saying. That must be the stop I'm hitting. I'll try what you mentioned after work tomorrow. Thanks!
 
OP
OP
STurgisSTeele

STurgisSTeele

When did I become the "Old Man"!?
Joined
Feb 19, 2008
Messages
1,007
Age
56
Location
STurgis, MI
Bike
01 ST1100A (RIP)
STOC #
2667
Tried pulling the driveshaft to remove it from the splines up front, but it won't move. Doesn't help I only have about an inch to get my fingers on! Saw in another thread the vibration might come from the splines being dry. Hmmm, maybe the u-joint is okay? I'll try to get it out again. If I put the trans in 1 st gear, I'll rotate back and forth while pulling. Hope the knocking will free it up enough to slide.
 
Top Bottom