Burt, I don’t have an ST1300 manual, Honda or aftermarket, nor will I download a digital version just to look at the swingarm procedure… so can’t comment on the two torque values you mention. That said, there have been a number of lengthy discussions on how to apply the torque to an offset tool and what value to use. On the ST1100, after listening to physics professors, I understood the ideal method was to have the torque wrench positioned at 90 degrees to the axis of the tool’s offset tang when arriving at the spec’d lock ring’s value (76 foot pounds).
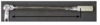
I do have swingarm bearing tools for both the ST1100 (two of them) and the ST1300. One of the ST1100s is in the alt upgrade kit and is OEM Honda. The other is an exact copy made and donated by a fellow STrider. BTW, I have a detailed
schematic* with dimensions/etc of the ST1100 tool available should one want to make their own. The ST1300 version is a commercial aftermarket version. All the tools are a free loan to STriders and come with the 17mm (ST1100) or 19mm (ST1300) hex-bit socket in 1/2” drive.
Edit: I see Tom poSTed while I was still keyboarding. Thanks.
*Edit 2:
http://www.st-riders.net/coppermine/displayimage.php?album=21&pid=1062#top_display_media
John
Thank you
@STRider, and
@John OoSTerhuis for both the article describing the torque calculation formula, and for the other info John!
John, any chance you have a schematic of the dimensions for the ST1300 swingarm locknut part? The part number for that one is 07ZMA-MCAA101.
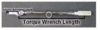
I'm thinking of making my own version of the Honda tool by cutting off the back side of the socket I already made, and then welding on an extension/offset tab! I just want to know what the exact distance I should make the center of the "pipe" portion of the tool (with the "teeth"), to the center of the square hole where the torque wrench will attach.
By rearranging the equation that
@STRider provided above, and using the torque spec listed in the ST1300 manual of 72ft lbs "indicated" (using the 72ftlbs instead of the 80 ft lbs in order to account for the added length of the offset tab/extension of the tool), I calculated that the distance from center to center on the ST1300 tool should be 2.0555555... inches, or roughly just a shade over 52mm, so slightly longer than the 47mm of the ST1100 version of the tool. So, I suppose I've figured out what the center to center distance SHOULD be in order to get the correct torque spec applied to the locknut with the Honda tool, but I would love to just cross-reference this calculation with an actual schematic of the tool's dimensions if anyone has the actual ST1300 tool!
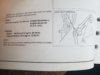
Also, I think I now realize the reason the Honda manual states two different torque values:
-If the torque wrench were to be mounted on the Honda tool IN-LINE with the tool's offset/extension tab, then you'd effectively change the center-to-center length, and as a result the "actual" torque being applied to the locknut would be more than 80 ft lbs. In order to avoid this issue, you'd set the torque wrench to 72ft lbs in order to ACTUALLY apply 80 ft lbs to the locking nut!
-Now, if you mount the torque wrench on the Honda tool at a 90-degree angle to the offset/extension tab of the tool, then you'd actually set the torque wrench to 80 ft lbs because you wouldn't be changing the actual center-to-center distance, and therefore it would actually be applying a proper 80 ft lbs to the lock nut!
That's why I used the 72ft lbs spec in the equation in order to figure out the ST1300's version of the tool's center-to-center distance--in order to account for the added center-to-center length if the torque wrench were attached to the Honda tool IN-LINE with the offset/extension tab portion of the tool!
So, if I'm not mistaken, to summarize, when using the Honda tool:
-set the torque wrench to 72 ft lbs if attaching the torque wrench to the tool IN-LINE with the offset/extension tab in order to get an actual proper 80 ft lbs on the swimgarm locknut. However, set the torque wrench to an actual 80 ft lbs if attaching the wrench at a 90 degree angle to the offset/extension tab of the Honda tool! This also now makes sense why they show in the illustration in the Honda manual the torque wrench being installed IN-LINE with the offset/extension tab of the tool, and why they list both torque values!
It's all clicking now--no pun intended!
Sorry to be a pain, lol, but I truly appreciate all of your help!
Thank you,
-Tanner