I am getting ready to change my bulbs and have the shims and new bulbs, my question is when I read the repair manual it says to remove the main fairing to change the bulbs, is this really the way to do that or is there an easier way to change out bulbs??? any help appreciated...

Changing the headlight bulbs....
- Thread starter ryterafan
- Start date
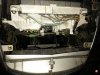
Can be reached from below without any plastic removal or you can remove windshield, 'garnish' and 'screen' for easier access from above.
No fairing removal.
No fairing removal.
ST1100Y
Site Supporter
When reaching in from below, removal of the triangular panel (two Philips bolts at the rear, held with two latches at the front) will increase access space.
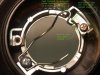
Pull off the connector, pull off the rubber boot (first pull outer rim from headlight casing, then get it off the bulb-base), detach the wire latch holding bulb in reflector (see pics in forum), insert new bulb, hold it in place with the tip of your index finger between the 3 prongs while flipping the wire back into the latch (again refer to the pictures and keep in mind that only minimal force is required; if you give it full push the thing won't latch...), rubber back on (observe the TOP marking and the small tongue on the bottom), connector on, triangular panel back in place... done on less the 5 minutes...
Removal of windscreen, garnish, etc... does not help much on an ABS model, the control unit is blocking access from the top.
Uncle Phil
Site Supporter
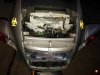
This might help. If you have an ABS model, you can't come in from the 'top', you have to come in from the bottom (ABS computer sits in the way).
Attachments
-
 46.1 KB Views: 45
Hi UP so that 'PGM' marked part in front of the clocks is the abs computer?held in place by two 10mm bolts?This might help. If you have an ABS model, you can't come in from the 'top', you have to come in from the bottom (ABS computer sits in the way).
I thought it was the 'brain' of the bike,judging by all the wires coming from it.
ST1100Y
Site Supporter
Yep, held in place by a special sub-bracket some folks order to safely install farkels there ;-)Hi UP so that 'PGM' marked part in front of the clocks is the abs computer? held in place by two 10mm bolts?
But besides ABS calculations that "PGM" box does talk to the engine when the TCS kicks in...
The normal ICU sits on the LHS vertical tube of the cowling stay, a bit smaller as a pack of cigarettes, in a shock absorbing rubber sleeving...I thought it was the 'brain' of the bike,judging by all the wires coming from it.
And, there's actually an INTEL inside...

Uncle Phil
Site Supporter
Broc - What Martin said ...
Thanks guys,my tachometer has stopped working so I was just taking a look in there,going to have to remove the clocks,I think a solder joint may have come loose behind the tacho.Yep, held in place by a special sub-bracket some folks order to safely install farkels there ;-)
But besides ABS calculations that "PGM" box does talk to the engine when the TCS kicks in...
The normal ICU sits on the LHS vertical tube of the cowling stay, a bit smaller as a pack of cigarettes, in a shock absorbing rubber sleeving...
And, there's actually an INTEL inside...
Regarding the bulbs I fitted both from below as far as I can remember,tight squeeze,but it's easier on the European bike because we don't have shims to fiddle with.
Uncle Phil
Site Supporter
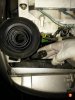
I've got a 'trashed' headlight assembly donated to me. One of these days I'm going to take the time and try to come up with a better headlight bulb retaining system to replace that infernal spring clip.
Uncle Phil
Site Supporter
... with small forearms and small hands. ;-)Hire a well trained monkey.
STurgisSTeele
When did I become the "Old Man"!?
+1 on the small hands. I just take everything off and work on it. Worth it to me.... with small forearms and small hands. ;-)
thepaleobiker
Paleo, Runner, Spiritual, Dancer
I did this a few months ago, and if its the first time you are changing it, I'd humbly suggest going via the front, if only so that you get to see what's all happening there! its quite beautiful
You can also see my pictures from this post --> https://www.st-owners.com/forums/showthread.php?17579-H4-Headlight-bulb-replacement-instructions-for-ST1100&p=1759001&viewfull=1#post1759001
Regards,
Vishnu
You can also see my pictures from this post --> https://www.st-owners.com/forums/showthread.php?17579-H4-Headlight-bulb-replacement-instructions-for-ST1100&p=1759001&viewfull=1#post1759001
Regards,
Vishnu
I am getting ready to change my bulbs and have the shims and new bulbs, my question is when I read the repair manual it says to remove the main fairing to change the bulbs, is this really the way to do that or is there an easier way to change out bulbs??? any help appreciated...
Uncle Phil
Site Supporter
Vishnu - But that doesn't work for ABS bikes - there's a ABS Computer right in the way ...
ST1100Y
Site Supporter
Guys, I have big paws (3XL gloves), and I do just fine from below...+1 on the small hands.
Less a matter of hand-size, more of groping blindly and ID-ing parts by touch... ;-)
Its just as easy (if not even easier) as in a <90ies car... (later models are an issue, removing bumper, grille, headlight assy, etc...)
Naughty girl Karen!Well then! Umm, do you charge admission to let others watch you change light bulbs? I have a few light bulbs that need changing!
ST1100Y
Site Supporter
Nah, just very observant... ;-)Naughty girl Karen!
STurgisSTeele
When did I become the "Old Man"!?
My instances with the light bulbs have been, umm, special. I had to take things off to correct, err, change the lights bulbs. (I don't mean to diss the previous owner!) What I found he didn't know had happened and there was no way I was going to change one of the bulbs without getting to it while it was all exposed. Since the problem has been fixed, I suppose I'll be able to change the bulbs from below now.Well then! Umm, do you charge admission to let others watch you change light bulbs? I have a few light bulbs that need changing!
thepaleobiker
Paleo, Runner, Spiritual, Dancer
Thank you uncle Phil!Vishnu - But that doesn't work for ABS bikes - there's a ABS Computer right in the way ...
I learn more about these beautiful bikes each day.Changed front bulbs today h4 from halfords for the first time today ,
took windscreen and the other bit that says honda on it away.
Iv 2001 abs model so I unscrewed the mounts for abs computer to push out of way and hold back with duck tape .
Pull rubber of take out connection to bulb and push pin in and out to release bulb .
Replace bulb ( sit in same way with triangle(connection) facing up )
With the pin I got it through trial and error , the bit that's released I just kept pushing it trying to get it to sit in locked position .
Then place the waterproof rubber on the back of the fitting ( note I tried for about an hour to pull the wire that connects to the light bulb through the rubber fitting because that's not what your meant to do it never fkn fit )
Now rubber sealant is on back of light fitting push the wire( connection ) in to the terminal .
I hope this helps someone
I'm not very mechanical minded but this might pick a few short cuts to a successful job .