
First let me apologize for not taking a bunch of pictures mid-build. I kept thinking I wasn't hiding anything with each weld/step, then when I was assembling it I realized that I hid everything at once but I didn't want to take it apart just for photos.
I anticipate I will be greasing it every year or so, maybe I can remember to take photos when I take it apart.
Someone at the BRG showed me a swivel similar to this, I just took it a step further with bearings rather than a bushing, so thanks to them for the inspiration.
Deciding the size was the first step. I started at 5/8" diameter because I thought a 5/8" bolt would be stronger than any acceleration or bending forces on the connection. I ordered two 5/8" thrust bearings to get me started, but when they arrived they just looked too small/delicate. So with the 5/8" in hand I decided I wanted to make this bearing as large diameter as I could so that in bending it wouldn't be pinched so much at the edges. I decided on 1.5" inside diameter. (THIS WAS A MISTAKE, IF YOU ARE COPYING ME, MAKE IT SMALLER OR USE LARGER TUBES)
I ordered all the hardware from McMaster-Carr. If the links don't work search for the part numbers.
http://www.mcmaster.com/#catalog/120/1169 5909K41 for shaft diameter 1.5" thrust bearing, $4.31 x 2
0.032" washers to go with it, 5909K54, $1.91 x 4
http://www.mcmaster.com/#catalog/120/3196 90640A420 nylon insert 1.5" dia locknut, $6.44 x 1
http://www.mcmaster.com/#catalog/120/3140 91283A436 1.5" x 3" hex bolt, $9.36
That's all I bought, about $35 with shipping. I used scrap 3/8" aluminum plate, a 10" long piece of 3x3x1/4" aluminum tubing, and welded to my existing 2x2x1/8" tube that was already bolted to my hitch.
Because I had chosen a 1.5" bolt, the flat to flat measurement was 2 3/16". This is bigger than my 2" tube, so I had to machine 3/32" slots in each plate to give room for the width of the nut. The slots still prevent the nut from turning which is ok on one side of the connection.
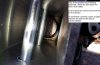
I welded the two slotted plates onto opposite faces of the existing 2x2 tube that the hitch is bolted to. And I welded a 3" square plate (with a 1.5"+ diameter hole) to the end of those two plates. So my locknut can rattle around for now, but it's trapped.
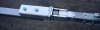
I welded the larger square plate on the end of the 3x3 tube, and now all I have to do is assemble the two pieces with a giant bolt.
I put washer, bearing, washer under the head of the bolt on the inside of the 3" tube, all greased.
I put washer, bearing, washer between the two plates with grease. There is no bearing between the lock nut and it's plate because it can't rotate anyway.
I tightened everything down which was not easy. I never imagined the amount of torque required to tighten a 1.5" bolt into a lock nut. There would be no tool that would fit inside the 3" tube and around the bolt. I had to grind the corners of the bolt down just to fit it inside. So when it came time to tighten, I had to jam a plate inside the tube to bind the bolt. This worked, but it squeezed the bolt to one side of the hole until it was tight. A better way to do this might be a larger version of what I did on the nut side. Larger so it could rotate, but only on 2 sides of the bolt so you could get a wrench around the bolt. Or go up on the tube even bigger so you could get a 2 3/16" socket in there?! Just make is smaller, I keep saying that.
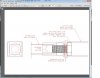
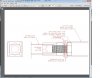
Full disclosure, I cnc milled a recess for the bearings on each plate. You can see where they are in the drawing, but not the photos. I think this was unnecessary in hindsight. I was worried the bearings could move around a bit without the slot, but there isn't much difference between the bolt thread and the ID of the bearings, so I think it was a waste of effort. If you're wondering how the to center plates are almost tight together, this is why. The bearing is recessed all but 0.03".

Attachments
-
 78.1 KB Views: 46