Changed Rear pads without complete brake flush afterwards

Joined
Jul 14, 2006
Messages
980
Location
Nova Scotia
Bike
'07STA
STOC #
7235
Been thinking about this for awhile. Just waiting for the brakes to wear out. I use EBC brakes. I did not try the front, that will be late next year.

I should have taken pictures along the way but i figured this way would not work.. I was wrong...

Remove both saddle bags..

1- lower both mufflers

2- remove brake pads

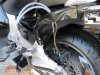
3- remove axle nut and remove the rear tire. remove the brake caliper from the bracket sub-assembly

3- cover the pipes and other surrounding areas with plastic. I used garbage bags. Clean the pistons with a tooth brush/scotch bright using brake fluid. Remove the bags carefully not to smear brake fluid around. Then flush the entire area with soapy water to remove the remaining brake fluid residue. I used a spray bottle with soap water.

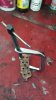
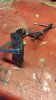
4- attach the modified clamp (see attached) to the caliper. (I had to turn the caliper 90 degrees to attach the clamp and screw inwards) Make sure the bolt of the clamp goes into the middle piston. Put 2-3 layers of small rags pieces under the swivel part of the clamp to stop marks from being made on the caliper. I used the hanger pin to hold the jig in place, just like real pads.

5- open both bleed screws 2 full turns, attach clear hoses on each of the bleed screws and run the plastic tubing into a bottle/can to catch the old fluid.

6- slowly very slowly turn in the clamp which will push the pistons back in. If you go too fast the old fluid will go back to the reservoir. Stop before bottoming out the clamp. Brake fluid will come out into the empty container

7- tighten the 2 bleed screws, Remove the attached hoses, release the clamp.. clean up the mess... don't askkkk

8- vacuum the rear brake reservoir, add new brake fluid

9- reattach the wheel and brake caliper

10- install new pads

11- open the middle bleed screw and attach a 1 way brake line bleeder. Using the foot pedal pump 8-9 pumps to remove any air. Tighten screw

12- bleed the back one doing the same method. Tighten screw. Make sure the reservoir does not run dry.

13- add fluid if needed, pump the foot brake to push out the pistons. Add fluid as needed.

14- attach pipes/bags

15-....... TEST DRIVE .. I went 20-30 km using the front and rear brakes more than usual. I got home, put the bike on the center stand and the rotor was barely warm, also the rear tire rotated with minimum drag


See attached clamps. I made 2 one for each side in front. The pads are opposite in front. I used a worn out pad and removed the remaining pad.

I tapped a hole where the middle piston is and used a 5 mm bolt.. The plate can easily rotate
 

Attachments

Last edited:
Joined
May 3, 2011
Messages
319
Location
Rochester, NY
Bike
2008 ST1300
STOC #
8441
Forgive me if I'm missing the point of your procedure?
FYI, the rear brake pads can be changed without doing your steps #1-9 :confused:

There's only one bolt that holds the pads in place. Only have to pull the left saddle bag, not the caliper or the wheel. Only need to keep an eye on the reservoir so it doesn't overflow when spreading the pistons, which can be done with wood shims or other non-marring tool.

Bleeding the lines should be done every 2 years. Nice to time with the pad change, but not necessary and no brake parts need to be removed to do it.

ps- There's a plethora of information on this site, just have to peek around!
 
Last edited:
OP
OP
Tdinova
Joined
Jul 14, 2006
Messages
980
Location
Nova Scotia
Bike
'07STA
STOC #
7235
Forgive me if I'm missing the point of your procedure?
FYI, the rear brake pads can be changed without doing your steps #1-9 :confused:

So true but I have seen lots of posts where the rear rotor is very hot and lots of drag on the rotor after the rear pads have been changed. My last pair was in June of 2011 and had one hell of a job until I did a complete bleed of the entire system. My latest method eliminated the old fluid being pushed back into the system. Maybe I done over kill but it made me very happy to have done it once. It's only a suggestion to a different way of doing things.
 

dduelin

Tune my heart to sing Thy grace
Site Supporter
Joined
Feb 11, 2006
Messages
9,681
Location
Jacksonville
Bike
GL1800 R1200RT NC700
2024 Miles
008131
STOC #
6651
So true but I have seen lots of posts where the rear rotor is very hot and lots of drag on the rotor after the rear pads have been changed. My last pair was in June of 2011 and had one hell of a job until I did a complete bleed of the entire system. My latest method eliminated the old fluid being pushed back into the system. Maybe I done over kill but it made me very happy to have done it once. It's only a suggestion to a different way of doing things.
Yes, but that method in post 1 leaves old fluid in the long SMC circuit that tends to cause problems. Without removing and tilting the LF caliper it does not purge the SMC.
 
Joined
Dec 27, 2004
Messages
829
Location
Medina, Tennessee
Bike
2021 Tracer 9GT
STOC #
375
So true but I have seen lots of posts where the rear rotor is very hot and lots of drag on the rotor after the rear pads have been changed. My last pair was in June of 2011 and had one hell of a job until I did a complete bleed of the entire system. My latest method eliminated the old fluid being pushed back into the system. Maybe I done over kill but it made me very happy to have done it once. It's only a suggestion to a different way of doing things.
The SMC malfunctioning can cause the hot disk syndrome, as well as other issues such as debris in the brake circuit. One thing I have experienced that causes this is dirty pistons that will not retract into the caliper. I have seen them so bad (coastal Florida) that they had to be removed and cleaned and new seals installed. Here in TN, I have found it sufficient to scrub them down with household cleaner and a toothbrush, and flush with water. I just put the old pads in as "padding" and use a baby prybar to push the pistons back in. I am still on the original seals, 93k miles.
 
Joined
Oct 4, 2015
Messages
18
Location
South UK
Bike
ST13 - 2004
I just replaced the rear pads on my 04 ST13 today.
Slighty daunting as I've not done any spannering work on this bike as I've only had it three weeks from the Honda dealer (so why do I need to swap out worn pads for a new set you may ask, if you want a job done properly best do it yourself) I shall be visiting the dealer with old worn out pads in hand to ask them why they were not changed before they sold the bike.

Anyway, it a little more work to change the rear pads on this bike than any other I've worked, but not so bad once done.

My brake fluid looks very clean, so after cleaning up the brake pistons with some clean but opened old brake fluid, white scotchbright pad and wide shoelaces. Pushed them back in with a wooden handle from a small brass brush, cleaned and regreased the sliders with red rubber grease, cleaned all the rest of the caliper and dabbed some copper grease on pad contact points, fitted new OE Honda pads with new location pin (had to swap the little O ring).
Popped it back together, all is well.
Took me about 2.5 easy hours including going out to by a 27mm socket for axle nut.
Job well done, as it should be.
And can I say, there is some meaty engineering on the rear of this bike, no wonder it weighs as much as it does.
\v/
 
Last edited:
Joined
Nov 3, 2011
Messages
63
Location
New Zealand
Bike
St1300 '11 (frm new)
I thought I was in need of new pads but it turned out not.
I replaced the rears anyway and just checked dusted and re-installed the front pads.

These pads are the easiest I've worked on.
Fronts I just removed the pins, checked, cleaned, then replaced

On the rears I removed the retaining pin and the old pads.
I put long hoses held up by tape onto the two bleed screws and loosened them a turn.
The pistons pushed back gently and easily.
Replaced with new pads locked down the bleed screws.
Pinched the hoses right down by the valve and pulled off with a rag handy, didn't even get a drop on the floor.
gave the pedal a pump and everything feels fine.

brakepads..jpg
 
Joined
Sep 4, 2013
Messages
8,177
Location
Cleveland
Bike
2010 ST1300
My auto mechanic always changes his customer's brake fluid when he changes pads. He said its cheap, quick, and prevents problems with corrosion and the master cylinder. I think its also a good idea, once you are that far into the brake system, it makes perfect sense to change the fluid. Of course, a professional mechanic has tools and procedures down pat that make the job a lot easier for him than for me, but whenever I do pads (or more) I change the fluid. And if the can of brake fluid on my shelf is more than 6 months old and was opened, I toss it (recycle it).

Btw, I think your clamp is a great idea. I've fought w/ c-clamps over the years, but having one that stays in place (the old brake pad plate) would make the job easier.
 
Joined
Nov 3, 2011
Messages
63
Location
New Zealand
Bike
St1300 '11 (frm new)
From the colour of that fluid, I would have flushed it.
I'm contemplating it, however the plastic tube is slightly cloudy which I imagine affects the look of the fluid.
The brakes are working fine without the need to bleed, but I agree with you that from a purely maintenance point a view a flush is advisable.
The current fluid is 4years old (smack my hand).
 
Joined
Jun 3, 2006
Messages
3,519
Location
British Columbia
Bike
2021 RE Meteor 350
I'm contemplating it, however the plastic tube is slightly cloudy which I imagine affects the look of the fluid.
The brakes are working fine without the need to bleed, but I agree with you that from a purely maintenance point a view a flush is advisable.
The current fluid is 4years old (smack my hand).
I'd recommend at least a two year cycle for the hydraulics flush. Brake fluid turning brownish indicates contamination with water, leading to corrosion within the system. Yours is long overdue. It's an easy job, especially after replacing your present bleed screws with "Speedbleeders". Google it.
 
Joined
Nov 3, 2011
Messages
63
Location
New Zealand
Bike
St1300 '11 (frm new)
I'd recommend at least a two year cycle for the hydraulics flush. Brake fluid turning brownish indicates contamination with water, leading to corrosion within the system. Yours is long overdue.
I feel right guilty now. I'll get on to it next weekend, especially as I'm heading off on a 4000km ride the next week.

Cheers
 
Top Bottom