Peculiar wiring problem

Joined
Nov 21, 2015
Messages
18
Location
Totnes
Good afternoon from sunny south Devon! This is my introductory post on what is clearly a very knowledgeable, useful and friendly forum. I am optimistic that someone will be able to help, given the nature of what I have already read. I used this post as my introduction, and a respondent suggested that I post it here, so here it is!

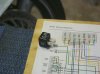
I have a UK spec1996 ST1100 ABS/TCS with a peculiar wiring issue, very similar to but not quite the same as that described by IXCELR8 last month. I had a problem starting the bike, which turned out to be the fuse in the main fuse box. I played with the handlebar switch, the relay wiring (bodged by a previous owner so no dedicated multi-plug ? just four exposed female connectors) and the fuse box. Once I had it going again, I had created a problem with the neutral light which had never previously occurred. It works in neutral, whether or not the side stand is down, so as it should. If I put the bike into gear, the neutral light comes on when the clutch lever switch is activated, ie when I pull the lever back. Under normal riding, therefore, the neutral light flashes every time I change gear. Somehow the neutral light has become linked to the clutch lever switch and is activated by it. If I put the bike into gear on the centre stand with the ignition on but engine not running, the side stand overrides the new clutch lever activation, ie the side stand light comes on and the neutral light goes off. The side stand switch still kills the ignition as it should (hence the testing without the engine running) and I still cannot start the bike if it is in gear without pulling in the clutch lever. Since this only started after I had been fiddling with those three components, I feel that it has to be something that I have just done. I had already spent a couple of hours the previous day fiddling with the switch (and the kill button) and nothing happened then in terms of the neutral light, so I feel like I can rule that part of the bike out. In all other respects the bike is absolutely fine, and rides perfectly, or at least as perfectly as a 19 year old bike might run since my local mechanic sorted out some gremlins.

This is a long post, but I wanted to explain as clearly as possible what happens, in what context and in what circumstances. If anyone is able to point me in the right direction, I should be most grateful.
 
OP
OP
Joined
Nov 21, 2015
Messages
18
Location
Totnes
Hi ST1100Y, thanks for taking the time to reply. I wasn't working near the netural switch itself, but I like the suggestion that I may inadvertently have disconnected the bullet connector. Are you able to describe roughly where that would be?
 
Joined
Jan 10, 2014
Messages
54
Location
Norwich UK
Bike
St1100, XV1600
I would go for the clutch diode located under the false petrol tank cover taped in the wiring loom on the left hand side, find a lump in the loom and unpick the tape, when the diode goes it plays havoc with the neutral light. a simple job.
 
OP
OP
Joined
Nov 21, 2015
Messages
18
Location
Totnes
I am extremely impressed at how quickly people have responded, and extremely grateful for the pointers in the answers. I am gardening tomorrow according to SWMBO (She Who Must Be Obeyed for our American friends who may not be so aware of Rumpole of the Bailey) but it gets dark early now, so I should have a chance to have a pop at this tomorrow evening. Many thanks to all you kind contributors.
 

John OoSTerhuis

Life Is Good!
Joined
May 10, 2005
Messages
5,221
Location
Bettendorf, Iowa
Bike
1991 SSMST1100
STOC #
1058
Clutch diode in situ:
image.jpg

Edit: diode on schematic:
image.jpg

The diode is easy to check with most any multimeter. HTH

John
via iPhone 6
 
Last edited:
Joined
Sep 10, 2011
Messages
2,210
Location
West Michigan
Bike
'98 ST1100
STOC #
8470
If you pop the cover off that "diode" pack, you can probably remove what's inside and install two single diodes inside and re-use the original package. Two garden variety 1 Amp diodes would probably work great, like a couple of 1N4004's.
 
Last edited:
OP
OP
Joined
Nov 21, 2015
Messages
18
Location
Totnes
I have not had a look at the bike over the last couple of days, but today I bought two diodes, costing the grand sum of 98p (about $1.50 for our friends on the other side of the pond) following the advice and links above (for which, I repeat, I am extremely grateful). I'm going to start with Jim Van's suggestion, and see if I can indeed prise open the diode box for a rummage around inside with my soldering iron. Retirement does not bring any extra time, but it does allow you to choose to a greater degree what to do with it. I'm looking forward to playing with this one, and will keep you all posted.
 
Joined
Aug 10, 2015
Messages
2,038
Location
Fort Worth, Texas
Bike
91 ST1100/06 ST1300
DevonHondaMan;1901212 Retirement does not bring any extra time said:
Amazing how that works. Thought I would have all sorts of time after retirement but my time is still split...bikes, travel (on and off the bikes), maintaining a house and half acre, family, target shooting, maintaining a house and half acre, model planes, volunteer work at the city library...did I mention maintaining the house and half acre?
 

John OoSTerhuis

Life Is Good!
Joined
May 10, 2005
Messages
5,221
Location
Bettendorf, Iowa
Bike
1991 SSMST1100
STOC #
1058
Please confirm that the OEM clutch diode has failed before you destroy it. Simple diode check... most multimeters have this function.

John
 
Last edited:
Joined
Sep 10, 2011
Messages
2,210
Location
West Michigan
Bike
'98 ST1100
STOC #
8470
Please confirm that the OEM clutch has failed before you destroy it. Simple diode check... most multimeters have this function.

John
+1 on above. When forward biased, you should get a reading of about 0.7 . You must use the " Diode Check " function on a digital meter because the standard resistance function on a digital meter does not provide enough voltage to break down the diode in the forward biased polarity. The 0.7 reading is actually 0.7 volts - the forward biased voltage for a silicon diode. Play around with the new diodes you bought to see what I am talking about - try both the "Diode Check" function and the standard resistance function. It's impossible to damage the new diodes in any way by doing the checks. Have fun !!

BTW, if you are using an old style VOM meter ( with the needle dial ) , it may put out enough voltage on the higher resistance range to break down the diode. My old Simpson 260 does, anyway. VOM's don't have a "Diode Check" function because of this.
 
OP
OP
Joined
Nov 21, 2015
Messages
18
Location
Totnes
I'm not fully retired, actually, and have spent today sorting out various issues with my University of Worcester students, so have still not looked at the (possibly) rogue diode. I am grateful to John and Jim for their follow-up posts immediately above, but confess that you are nearly leaving me behind now, although in principle I understand what you are saying in terms of checking the diodes in the box before blasting. I have an old meter with a dial (so I guess one of Jim's VOMs), and the resistance is achieved (I think ...) by turning the dial to one of the two green settings: OHM and either x10 or x1K. I use this as a continuity tester, and the unit is run by a standard AA 1.5 cell which lasts, quite literally, for years. Would I turn to one of those and stick the probes either side of the diode? If so, what would I expect to see? I hope you see what I mean by nearly leaving me behind. Whatever, I'll happily give anything a go, and it can't be any worse than it is now because it doesn't work!
 

John OoSTerhuis

Life Is Good!
Joined
May 10, 2005
Messages
5,221
Location
Bettendorf, Iowa
Bike
1991 SSMST1100
STOC #
1058
You can buy a digital multimeter that can check diodes for less than $10 USD. Here's one for $5: Amazon linky. I have one not much bigger than a credit card that I carry on the ST all the time.

The ST1100 Clutch Diode "plug" contains two 'one-way' DC circuit diodes with a common ground. Look at the picture I posted above. I marked the sides of the clutch diode to identify the spades. The common ground spade is the one that's pointed 90? relative to the other two, parallel spades.

Consult the manual that comes with the multimeter for details/confirmation, but generally, you simply plug the test leads into the appropriate holes in the multimeter, twist the selector dial to the diode test function and touch one lead to each side (spades in this case) of the circuit (the diode's in between them). Observe the reading and then reverse the leads and note that reading.

With my meter in diode check mode, I placed the red multimeter lead on the ST's clutch diode's G/R spade and the black lead to the G (ground) spade. The reading showed a positive value. When the leads were reversed there was no value shown: "OL". That showed that that side of the clutch diode was good. Checking the other side (the Light Green/Red spade) to the common ground spade (Green), the same way also showed it was good/functioned properly (current could only pass in one direction).

Three possibilities doing this check:
1. One reading shows a value and the other doesn't ("OL") - the diode is good.
2. Both readings show "OL" - the circuit is "open" (current can't pass either direction).
3. Both show very small values (or zero) - the circult is shorted.

I just took some pictures testing my spare clutch diode with my Sears multimeter. Will try to post them today...

HTH

John
 
Last edited:
Joined
Sep 10, 2011
Messages
2,210
Location
West Michigan
Bike
'98 ST1100
STOC #
8470
Nice Show & Tell, John !! Almost Perfect !! Except #2 should say "current can't pass in either direction".

DevonHondaMan :

I just checked the University of Worcester's website and it looks like it doesn't have an EE Engineering or Technology Program. I was going to suggest taking a walk over to one of those departments and ask them for assistance, but no cigar ..... so you get the opportunity to do it all yourself.

Your meter may work, but you may want to install a fresh battery. A 1.5 volt battery should break down the diode. As I said in one of my above posts, play around with one of your new diodes to get the hang of it. AND, ( important ) what is the number of the diodes you purchased ? It's possible the diodes you bought are "small signal " diodes and may not be able to handle the current requirement. A 1N4002 or 1N4004 is a "rectifier" diode and is rated at 1 amp - plenty for what you need.

Again, play around with one of the new diodes and your meter - you can't hurt them and you will get the hang of it. You should see the needle move with the leads connected one way, and when reversed see no deflection.
 
Last edited:
OP
OP
Joined
Nov 21, 2015
Messages
18
Location
Totnes
I can barely believe it. It took me longer to get the seat, panniers, side panels, dummy tank cover and air cleaner assembly off, and then cut some cable ties (loads of aftermarket wiring on this bad boy) than it did to make up the DIY diode pack, plug it in and try it. It worked! First time!! Every time!!! I am astonished and delighted. Just for my own piece of mind I'm going to phone the local Honda dealer to get a price on the original. It will be more than the 98p plus a bit of insulation tape, that's for sure.

I am just so hugely grateful to all who contributed to this successful little job. It was not particularly significant in the grand scheme of things, but a very annoying little niggle all the same, and to have cured it in less than 30 minutes is just remarkable. I love the fact that I more or less had someone holding my virtual hand, guiding me through it. I'll finish my profile, and then all on the site will know where to come for a friendly welcome when travelling in the south west. And it's Friday, so I can sink a couple of beers in celebration!

Well done, everyone! :policeST:

I just phoned the Honda man - it's over ?20, so I'm going to see how well I can tape this little baby up to keep it watertight. I love it!
 
Last edited:

John OoSTerhuis

Life Is Good!
Joined
May 10, 2005
Messages
5,221
Location
Bettendorf, Iowa
Bike
1991 SSMST1100
STOC #
1058
Thanks for the followup, Jeremy, always appreciated.

Pictures of your project, please!

Edit: just priced the Honda OEM part and our good on-line source wants $16.77 USD for it. That's a big increase since I bought mine from my dealer a few years ago.

John
via iPhone 6
 
Last edited:
OP
OP
Joined
Nov 21, 2015
Messages
18
Location
Totnes
I didn't think to chart my progress photographically, so can't oblige John (one of the prime contributors) right now, but the next time that I have the dummy tank off I'll take a pic of the wiring. If nothing else it might help the next one who needs the advice of The Learned Ones.

Best wishes and thanks again to all,

Jeremy
 
Top Bottom