My first rebuilt water pump

Joined
Sep 10, 2011
Messages
2,210
Location
West Michigan
Bike
'98 ST1100
STOC #
8470
Finally got the new water pump seal and the impeller out of the Honda Civic donor pump diameter turned down to 2.10 inches.

So I rebuilt my first ST1100 water pump. In April I plan to check for any interference of the new style cast iron impeller in my ST1100 . Then I am planning on rebuilding the water pump out of my ST1100 using a different style cast iron impeller and check it for interference. Then I'll install one of the rebuilts and check for proper operation.

Total cost was $50 for the Gates 41038 donor pump I bought from Rock Auto( bearing / shaft assy and impeller ) , new unitized seal, and labor to turn down the Civic impeller.

Here are some pics ( click on images for larger views ) :


170512

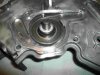
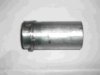
New Unitized Pump Seal. Installed using Locktite 680.
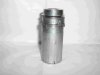
170513

Rebuilt Water Pump

170514

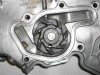
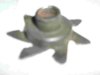
Closer view of 1.3L Civic turned-down Cast Iron Impeller


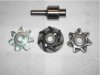
The below image shows the donor parts from three different water pumps. All three impellers have been trimmed to about 2.10 inches / 53.3 mm in diameter. The center impeller was turned down on a lathe, the diameter of the other two were reduced using hand tools.

The original diameter was about 60 mm.

The impeller on the left is from an Airtex AW9069 water pump ( '85 Honda Civic 1.3L ).

The middle impeller is from a Gates 41038 water pump ( '85 Honda Civic 1.3L ) and is my favorite choice.

The impeller on the right is from an Gates 41040 water pump ( '90 Honda Civic 1.3L )

I bought the three pumps from Rock Auto. I think it's hard to beat their prices including shipping.

All three pumps have the same bearing / shaft assy.

The Airtex impeller is closest to the OEM impeller.

From what I have read, cast iron is a superior material compared to stamped steel for an impeller.

Personally, I like the circular impeller the best. But it costs a few extra $$ to have it turned down. But it may be more efficient in pumping the antifreeze solution ( use less power and a smoother flow ?? ). But I think the other cast iron impeller will work just fine.


Click image for larger view.

170616


You can purchase an improved one-piece water pump seal from Kellogg Automotive in AZ. The seal PN is S2003 ML . It presses on a 12 mm shaft and has a 30 mm cup diameter. BTW, locating a source for the seal was the toughest task for this project. The actual rebuilding is a relatively easy job. You need a press - don't even think about pounding the new bearing / shaft assy to install it , or to even disassemble the old pump.

BTW, When disassembling the pump to be rebuilt, first remove the old impeller and drive pulley, and then press out the bearing / shaft assembly by pressing on the 12 mm end , not the 17 mm end. And you will need to fabricate a tool to install the seal properly. The Kellogg website has a diagram of the tool that they sell with dimensions. My home-brew tool doesn't look like the diagram, but it works exactly the same. I made mine out of two pieces of 1" galvanized pipe and a 12 mm fender washer spot welded together.

170622 170623

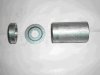
Parts Before Spot Welding and then after Spot Welding

The width of the small piece of 1" pipe is 0.35 inches. That's the required "installed" height of the seal. That will result in the proper preload of the spring that is part of the seal assy.

170624

New seal inserted into tool. The 30 mm "cup" of the seal is visible on top. The "cup" of the seal is what is pressed into the water pump.

Edit: After you receive the new seal, measure the cup diameter with a micrometer. There is also a 1 1/8 inch diameter seal available. Make certain you received the 30 mm diameter cup version. I got the wrong seal sent on the first shipment.

Send me a pm if you have any questions or post your questions here. This has been a fun project, and I have learned a bit about water pumps.
 
Last edited:
OP
OP
Jim Van
Joined
Sep 10, 2011
Messages
2,210
Location
West Michigan
Bike
'98 ST1100
STOC #
8470
Thanks again to Doug Walby for donating his old water pump so I could play around with it.

BTW, the impeller on his pump was missing all the vertical tangs on the impeller. Apparently they just rusted away. The seal was leaking and the shaft bearing was rusty and wasn't turning, also.

170518

Original Impeller
 
Last edited:
Joined
Mar 13, 2012
Messages
5,065
Location
soCal
Bike
'97 ST1100
STOC #
687
Thanks again to Doug Walby for donating his old water pump so I could play around with it.

BTW, the impeller on his pump was missing all the vertical tangs on the impeller. Apparently they just rusted away. The seal was leaking and the shaft bearing was rusty and wasn't turning, also.
The missing tangs were because I brain farted and forgot to change my coolant for a long time (8-10 years maybe, not really sure, I didn't write it down the previous time). The rest of the pump was more or less OK when I changed it out at timing belt change time (not leaking anyway, and the bearing turned by hand but seemed a little stiff). Then it sat for two years on the garage floor, and before I sent it to Jim I noticed the bearing no longer turned.
 
OP
OP
Jim Van
Joined
Sep 10, 2011
Messages
2,210
Location
West Michigan
Bike
'98 ST1100
STOC #
8470
It definitely was ready for a rebuild, Doug !! :)

BTW, The water pump seal "weep" hole was completely blocked with debris, too. I had to ream it out with a long drill bit.

EDIT :

And FYI : According to Kellogg Automotive ( water pump rebuilder ) it is normal for a water pump seal to "weep" somewhat. Not drip antifreeze, but weep antifreeze. That's the purpose of the weep hole. It prevents fluid build-up so the water pump bearing is not contaminated with fluid.

I remember that someone mentioned that this is also stated in the ST1300 service manual. So if you are ever checking or replacing your timing belt and notice some residue at the outlet of the weep hole don't be too concerned.
 
Last edited:
Joined
Feb 2, 2009
Messages
2,303
Location
Dahlonega, GA
Bike
2018 NC750X
STOC #
7666
Cool, Jim! Thanks for taking the time to post this informative tidbit! Maybe some more of us might brave the rebuild process in the future.
 
OP
OP
Jim Van
Joined
Sep 10, 2011
Messages
2,210
Location
West Michigan
Bike
'98 ST1100
STOC #
8470
BTW, I will have parts on hand to rebuild two more pumps , after I rebuild the pump off my ST1100.

And like I said in my original post, it's not that difficult of a job. You just need to know what you are doing.
 
Last edited:

ST1100Y

Site Supporter
Joined
Dec 4, 2012
Messages
5,031
Age
59
Location
Vienna, AuSTria
Bike
ST1100Y, ST1100R
STOC #
637
When disassembling the pump to be rebuilt, first remove the old impeller and drive pulley, and then press out the bearing / shaft assembly by pressing on the 12 mm end...
Did you have to just drill or actually cut the old impeller open?
 
OP
OP
Jim Van
Joined
Sep 10, 2011
Messages
2,210
Location
West Michigan
Bike
'98 ST1100
STOC #
8470
Did you have to just drill or actually cut the old impeller open?
I removed it using a press. It's pressed on the 12 mm end of the bearing / shaft . It doesn't take much force. I ground off the top of the old impeller so all the shaft diameter was visible. I just wedged a couple of pieces of thin steel plate under the old impeller. I imagine you could also cut a slit in the old impeller parallel to the shaft and then pry it off with a screwdriver. Take a look at my previous post above of the impeller off Doug's old water pump.
 
Last edited:

ST1100Y

Site Supporter
Joined
Dec 4, 2012
Messages
5,031
Age
59
Location
Vienna, AuSTria
Bike
ST1100Y, ST1100R
STOC #
637
I ground off the top of the old impeller so all the shaft diameter was visible.
That's the info required... :wink:
I recall the impeller being a "closed cup", with inly a tiny bore in the centre...
I assume that you'd the new impeller "shrunk" onto the shaft?
 
OP
OP
Jim Van
Joined
Sep 10, 2011
Messages
2,210
Location
West Michigan
Bike
'98 ST1100
STOC #
8470
ST1100Y :

If your impeller is in good shape and want to re-use it , you could always use a short length of hardened small diameter material to place between the press and the 12 mm end on the shaft - like a cut off piece of an Allen wrench.

But I prefer a cast iron impeller. So grinding the end off the original impeller wasn't an issue for me.

No, I didn't "shrink" the new impeller on. The interference fit was enough to make sure it is a tight enough fit ( if that's what you were implying ). Some green Locktite will help keep it in place, too.
 
Last edited:

JPKalishek

Armadillo Kicker
Joined
Jun 17, 2011
Messages
510
Location
Menominee, Michigan
Bike
2 '91 ST 1100
You might find a bit of heat helps when pressing out/in the bearing. Mild heating in an oven or careful use of a torch. Especially going in, you can stick the bearing in the freezer and heat the housing and it presses easier. Years ago, I had a 73 Dodge Colt GT with a non-balance shaft 2.0 that had the pump go bad. No one had the correct pump to replace it and I used a late model pump and pressed out the bearing and seal pack then rebuilt my old one and took every precaution I could think of putting it back together(cracking the housing would have killed the engine until I learned later one is available from Mitsubishi Fork Lift dealers).
I put over 100,000 miles on that pump afterward.

The full Gates impeller should be best and there is a trick with the stamped ones riveting or welding on a plate or washer to make it more efficient.
The third impeller looks like a horrible design, and I'd rather the stamped with an added washer than it.

Weep holes ... The Oldsmobile Quad Four had its design set up so it weeped/leaked into the oil ... so you often found someone needed a full rebuild even if they caught the leaking water pump before it over heated the engine. Even better if the bearing went bad, the design drove the impeller into the housing so that it spread metal shaving throughout the cooling as well as sending water now with shavings into the oil.
Glad we don't have that issue!

Once I get moved, I hope to have enough work shop area to set up a small lathe and mill (press, drill press etc. etc. etc.) and be able to do stuff like this. When I lived in Louisiana, I used to have enough connections I could borrow what was needed to do that (like for the Colt), but here, while I have the room, an understanding landlady, I lack the tooling, and have not gathered the connections.
Soon I'll be up north, and hope to get a place with a big garage and workshop space. Heated, of course.
 
OP
OP
Jim Van
Joined
Sep 10, 2011
Messages
2,210
Location
West Michigan
Bike
'98 ST1100
STOC #
8470
Quote :

"The full Gates impeller should be best and there is a trick with the stamped ones riveting or welding on a plate or washer to make it more efficient.
The third impeller looks like a horrible design, and I'd rather the stamped with an added washer than it. "

That's sounds like a great idea. Actually, a plate could be added to the other cast iron ( third ) impeller. There is plenty of "meat" to drill & tap 4 or 5 small 4/40 holes to attach the plate and use some "red" locktite to keep them in place over the life of the rebuilt pump.
 

ST1100Y

Site Supporter
Joined
Dec 4, 2012
Messages
5,031
Age
59
Location
Vienna, AuSTria
Bike
ST1100Y, ST1100R
STOC #
637
The full Gates impeller should be best and there is a trick with the stamped ones riveting or welding on a plate or washer to make it more efficient.
And how to get such a creation fine-balanced? Any vibration will impact durability of seal and bearings...
Jim's cast impeller appears as a more precise component there...
 
OP
OP
Jim Van
Joined
Sep 10, 2011
Messages
2,210
Location
West Michigan
Bike
'98 ST1100
STOC #
8470
You could spin it on a well greased piece of rod and see if it stops spinning at random positions. Besides, the effect of any amount of any out-of-balance will be negligible because the impeller is so small in diameter ( look at the formulas for moment of inertia; they all depend on length ) . Any imbalance wouldn't make any practical difference, in my opinion.
 

JPKalishek

Armadillo Kicker
Joined
Jun 17, 2011
Messages
510
Location
Menominee, Michigan
Bike
2 '91 ST 1100
And how to get such a creation fine-balanced? Any vibration will impact durability of seal and bearings...
Jim's cast impeller appears as a more precise component there...
You could spin it on a well greased piece of rod and see if it stops spinning at random positions. Besides, the effect of any amount of any out-of-balance will be negligible because the impeller is so small in diameter ( look at the formulas for moment of inertia; they all depend on length ) . Any imbalance wouldn't make any practical difference, in my opinion.
If you look closely at those cast impellers, they are not fine balanced, but the fully backed one is the preferred style even though it is likely less balanced than the stamped.
It was an old racers trick on Chevy engines to rivet a plate onto the backside of the impeller. I've seen them spot welded onto other brands . Now if one welds horribly stick with rivets, and still the imbalance is likely going to be negligible and in the range of that cast impeller and the drilled holes in it being in differing thicknesses and contours. Who knows how far off that other cast abomination is.
Regardless, avoid that by using that center Gates impeller.
 
OP
OP
Jim Van
Joined
Sep 10, 2011
Messages
2,210
Location
West Michigan
Bike
'98 ST1100
STOC #
8470
I finally got my ST1100 running after installing the rebuilt water pump and installing some big LED spotlights and doing some other work.

The turned down round cast impeller seems to be working great. I see a lot of circulation with the radiator cap off, when blipping the throttle on the center stand. And incidentally, the timing belt hasn't disintegrated with the extra cam gear timing belt guide plate installed on the right camshaft pulley.

I'll have to take the old girl out on the slab to see what my temp gauge reads at 75 mph with the 190 degree thermostat installed. It took a long time on the center stand for the temp gauge to reach the "12 o'clock" position and for the fan to kick-in at that point. And then the fan only ran for less than 10 seconds before it cut-off. But it was only about 45 degrees yesterday.

So I'm just about all set for this riding season. I have four IBA Rides planned, including a Great Lakes SS3K.

Next spring, I'm planning on doing more PM work; grease the swing arm bearings, and replace the u-joint and transmission output shaft seal. Got the parts already. I can hardly wait.
 
Last edited:

Joseph/TX

R.I.P. - 2016/11/13
Rest In Peace
Joined
Feb 20, 2015
Messages
115
Location
Magnolia, TX
Bike
1994 ST-1100A
Just read this, with great interest. Only had my 1100 for about a year and it's still got less than 40K, so haven't had to deal with cooling issues yet, other than the overflow tank hose. Also, this is my first liquid cooled bike. So...I've gotta ask..do you guys rebuild these pumps because the Honda pumps are not just outrageously expensive, but extremely outrageously expensive? Is it because they're no longer available? Or do you all just really love wrenching on your bikes?
Don't get me wrong; I'm impressed. Just not looking forward to having to fabricate parts to keep my bike running...
 
Joined
Aug 10, 2015
Messages
2,034
Location
Fort Worth, Texas
Bike
91 ST1100/06 ST1300
Just read this, with great interest. Only had my 1100 for about a year and it's still got less than 40K, so haven't had to deal with cooling issues yet, other than the overflow tank hose. Also, this is my first liquid cooled bike. So...I've gotta ask..do you guys rebuild these pumps because the Honda pumps are not just outrageously expensive, but extremely outrageously expensive? Is it because they're no longer available? Or do you all just really love wrenching on your bikes?
Don't get me wrong; I'm impressed. Just not looking forward to having to fabricate parts to keep my bike running...
New water pumps are available for around $240. Not that out of line compared with many automotive pumps.
Rebuilding something like this is more like a challenge. Great sense of accomplishment when you are successful at it.
 
OP
OP
Jim Van
Joined
Sep 10, 2011
Messages
2,210
Location
West Michigan
Bike
'98 ST1100
STOC #
8470
Most auto water pumps are a lot less than $240. I just bought a new Gates pump for my Jeep from Rock Auto for about $30 plus shipping.

It's not that hard to rebuild the ST1100 water pump, if you have a two or three jaw puller and a press and feel a bit adventurous and are cheap, like me. You will need to source the seal. I got mine from Kellogg Automotive in Arizona.
 
Last edited:
Top Bottom