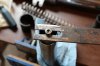
Hey everyone. My name is Raybonz and I ride an 04 1300. While I put the front tire on after a change, I saw crud at the top of both forks. I've never done a fork of any kind before, but I'm going to do this one. Does Honda make an all inclusive seal kit with everything needed or do I look for individual parts? And, how hard is this? I have a Honda service manual and I have changed the head gasket on my 1100 in the past. Any and all help is much apperciated!!

ST1300 fork seal replacement
- Thread starter raybonz
- Start date
I believe all the parts are sold individually. Here is a link to an article that may help guide you through the process.
- Joined
- Jan 3, 2006
- Messages
- 973
- Location
- Cow Head, Newfoundland, Canada
- Bike
- ST1300A '05
- STOC #
- 5967
I've been meaning to put together a video on when I replaced my fork seals last summer... have not gotten around to the editing.
I'm riding an '05 with 150,000 km on it.
It is a relatively straight forward job although it does take up a wee bit of time. I consider myself moderately mechanically inclined and managed to do it in a puttering sort of day with many coffee breaks.
Since I was going to have the forks apart, I decided to put in heavier springs. I am very pleased with them.
I got all the parts from Race Tech. http://www.racetech.com/
This is a video that I found helpful when I was contemplating the work... https://www.youtube.com/watch?v=vrmYJgcGX30
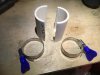
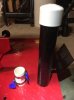
I did not buy any specialized tools but did make a seal seating device from PVC pipe similar to what Delboy shows and I also made a spring suppressor out of some metal flatstock I had around.
I'm riding an '05 with 150,000 km on it.
It is a relatively straight forward job although it does take up a wee bit of time. I consider myself moderately mechanically inclined and managed to do it in a puttering sort of day with many coffee breaks.
Since I was going to have the forks apart, I decided to put in heavier springs. I am very pleased with them.
I got all the parts from Race Tech. http://www.racetech.com/
This is a video that I found helpful when I was contemplating the work... https://www.youtube.com/watch?v=vrmYJgcGX30
I did not buy any specialized tools but did make a seal seating device from PVC pipe similar to what Delboy shows and I also made a spring suppressor out of some metal flatstock I had around.
sky.high
Site Supporter
Just done a racetech upgrade on my forks including seals see my other posts, it's pretty straight forward to do the seals make sure they are the right way up, use a plastic bag to protect the new seal, make sure the bushing is fully seated before fitting the seal, use a heat gun to remove andand replace the dust collar
Why notnot fit stiffer springs at the same time and improve the sag?
Why notnot fit stiffer springs at the same time and improve the sag?
Just finished mine recently. I am not mechanically inclined so I had a couple of forum members come over to help out. A great resource if you happen to have any forum folks near you.
I used an All Balls kit but for some reason the dust collar provided did not seat. So I used the one that was on there to begin with and it works just fine. In hindsight I'd probably just use OEM all the way around.
+1 on the homemade pvc driver, using the old seal at the bottom to drive in the new one. I did have to replace the slider bushings as they were worn out. They are fairly inexpensive but none of my local shops had them in stock. This set my project back a few days waiting for them to arrive. If you haven't done so already, I would also print the Tupperware Worksheet from the forum Home page. Very helpful to keep track of the bits.
 On making sure you install the seal the "right way" . The seal "lips" go "down".
Thanks for all the useful info everyone. I do have some questions though. Mostly about springs. If I replace them, which ones are best for solo riding? Spending $500 for suspension parts when I no longer ride aggressively doesn't make sense to me but neither do I want to go cheesey. What kind of fork oil? As usual, there are always lots of solutions to an ST issue!
I used Honda SS-8 10W suspension fluid. I didn't replace springs as the OEM setup works just fine for me.
I'm sure more opinions to follow...
I'm sure more opinions to follow...
- Joined
- Feb 11, 2006
- Messages
- 9,681
- Location
- Jacksonville
- Bike
- GL1800 R1200RT NC700
- 2024 Miles
- 008131
- STOC #
- 6651
What is your riding weight and riding style? Spring rate is dependent on these.Thanks for all the useful info everyone. I do have some questions though. Mostly about springs. If I replace them, which ones are best for solo riding? Spending $500 for suspension parts when I no longer ride aggressively doesn't make sense to me but neither do I want to go cheesey. What kind of fork oil? As usual, there are always lots of solutions to an ST issue!
dmulk
Dan Mulkiewicz
If you want to save time....I found a 1 1/2in ABS coupler fit PERFECTLY as a seal driver. About a buck at Lowes.
STmark1300
Ron
The Delroy clip is for a ST1100. The ST1300 is different, has an extra spacer before putting the end nut on. Is the compression the same? Or is a different compression technique? Do you have to have a compression tool made like the one below the video?
Kevcules
Site Supporter
Dave (dduelin) helped me a lot with my front suspension. That's why he's asking you about your weight and riding style.
I went with a 7 weight oil which made a big difference in the shock spring reaction. I can feel the shock working when hitting bumps. now. I also made a longer spacer to get the proper front sag as per Dave and others. I still think my front springs don't have the nice up and down fluid motion that they should ,so my bushings are probably bad. If you're going in there, it's not a bad idea to at least inspect them.
I found I didn't need a tool when putting the nut back on the internal shock assembly. There is certainly some spring tension to overcome on re-assembly.
Hello everyone,
I am getting ready to "replace my seals in my forks" on my '07 ST1300- (Never been done and Left is leaking) I have the parts ordered but after looking at the service manual- I forgot to order the "special 8mm sealing washers" that go on the bottom bolt of the fork. Is everyone replacing these washers or just using the old ones?
Thanks.
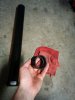
I had a very small leak on my left tube. Someone, somewhere on this page suggested using a device like the seal saver made of old camera film negative. I cleaned and polished my fork tubes on the bike, squirted a little WD-40 at the top of the dust seal and got the film inside the fork seal pretty easily. Spun it around there three times, no more leak.I would try a "seal mate" type fix first- Has worked for me several times. You can buy from the site, or make your own out of a water bottle.
STmark1300
Ron
There is a reason the Manuel suggests this. The washer is copper and not reusable. I wouldn't take the chance. Also order the 4 bushings. Choose your fork fluid carefully. You will need to measure the springs in metric.
I've had the forks apart several times on my 1100 and never replaced those washers. Never replaced them on any other bike I've owned either. The manual says to use a new one for the 1100 also, so I doubt there's any difference between the 1100 and 1300.I forgot to order the "special 8mm sealing washers" that go on the bottom bolt of the fork. Is everyone replacing these washers or just using the old ones?
Last edited:
I'm on the fence on the question of sealing washer replacement, as I have happily re-used washers with no issues, but have also had one or two develop a weep. If you have the time, get new washers, if not take then note of the orientation as you remove the old ones and return them to the same side/placement. Also carefully clean the sealing faces to get rid of any grit.
If you have access to it, use an impact driver to rattle the hex-head bolts loose at the bottom of the fork. Quite often these little blighters are stuck hard with threadlock, and the part they bolt into inside the fork can spin when you really want it to stay still...I always attempt to loosen them while the fork cap/spring are still applying tension inside the fork.
If you have access to it, use an impact driver to rattle the hex-head bolts loose at the bottom of the fork. Quite often these little blighters are stuck hard with threadlock, and the part they bolt into inside the fork can spin when you really want it to stay still...I always attempt to loosen them while the fork cap/spring are still applying tension inside the fork.