Hello,
I've just finished putting on new tires and new brake pads. Everything has gone really well except the last final bolt. Typical.
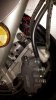
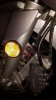
Thanks for looking, I've attached a picture to help indicate the bolt. It's on the left caliper and the bolt at the top. It's the bolt that's different to the other three used on the two front calipers. It's 8mm x 1.25 it has a shoulder sleeve at the top of the bolt.
The bolt came out O.K. but on re-install it stopped at the shoulder, backed it out and checked it was the right one and that it would fit. Looked good so tried again, got to the shoulder and again it stopped. Used a bit of elbow grease and got it in a bit further, but then it felt as though it was threading. Backed it out with it not felling too bad. I got a 8mm x 1.25 nut and tried the bolt in there, the bolt had some red thread lock at the end. Cleaned it up and tried with the nut to see if the bolt was good, it was. Got a 8mm x 1.25 tap and re-threaded the grooves to the caliper brace, which went well. But still the same problem, it gets to the last part and just won't fully tighten, it just spins a little. The caliper can be moved at the top side to side by a mm or two and not how I think it should be. Got a fresh 8mm x 1.25 bolt which is maybe 2 mm shorter, I can get it all the way in and tight, but still the caliper can be moved a mm or two by hand.
I'm assuming this isn't correct and the caliper should have no free play whatsoever, but I'm stuck as to what to try next and don't want to try the new tires and brake pads without thinking it's 100% as it should be.
Thanks for taking the time, I appreciate it. Thanks in advance for any ideas.
Rossi
I've just finished putting on new tires and new brake pads. Everything has gone really well except the last final bolt. Typical.
Thanks for looking, I've attached a picture to help indicate the bolt. It's on the left caliper and the bolt at the top. It's the bolt that's different to the other three used on the two front calipers. It's 8mm x 1.25 it has a shoulder sleeve at the top of the bolt.
The bolt came out O.K. but on re-install it stopped at the shoulder, backed it out and checked it was the right one and that it would fit. Looked good so tried again, got to the shoulder and again it stopped. Used a bit of elbow grease and got it in a bit further, but then it felt as though it was threading. Backed it out with it not felling too bad. I got a 8mm x 1.25 nut and tried the bolt in there, the bolt had some red thread lock at the end. Cleaned it up and tried with the nut to see if the bolt was good, it was. Got a 8mm x 1.25 tap and re-threaded the grooves to the caliper brace, which went well. But still the same problem, it gets to the last part and just won't fully tighten, it just spins a little. The caliper can be moved at the top side to side by a mm or two and not how I think it should be. Got a fresh 8mm x 1.25 bolt which is maybe 2 mm shorter, I can get it all the way in and tight, but still the caliper can be moved a mm or two by hand.
I'm assuming this isn't correct and the caliper should have no free play whatsoever, but I'm stuck as to what to try next and don't want to try the new tires and brake pads without thinking it's 100% as it should be.
Thanks for taking the time, I appreciate it. Thanks in advance for any ideas.
Rossi
Attachments
-
 104.2 KB Views: 106