Another 40A alternator alternative solution - verified after running...

Joined
May 30, 2016
Messages
25
Location
livingston, UK
Bike
The Pan
Hi, Ive just fixed a really annoying issue with my st1100 - so thought i would post the results.


When I bought the bike second hand 2 years ago the owner had just spent more than ?600 on replacing the alternator.
A few months into ownership I had battery charging issues, and 1 new battery later and some debug discovered that the alternator was faulty. When I removed it turned out the rotor coils were open-circuit. After researching the options from ?650 for a new alt, too the bandit fix, to refurb, I noticed on this forum that someone had noticed that yam denso alts are superficially similar.
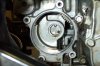
I bought one and the extruded lip is the right diameter, and the rotor shaft has the required 18T spline fitting.
The honda has its lugs (when viewed from the rear with the alt removed) at roughly 10 , 12 and 5 o'clock.
The standard denso alt is part number 101211-1570.
The yamaha denso part is 100211-4930.
I bought the 100211 part from a re-seller/breaker for just ?30 - they're a lot more plentiful and much cheaper than the st1100 part.
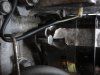
Minor lug hole filing is required but its now fitted and running and charging fine.
The 100211 part needs all 3 lugs filed to widen the 8mm hole to make a 8mm slot/oval.
Only 2-3 mm filing is required - for 2 if the lugs.
The 10 and 12 oclock lugs fit with a 2.5mm washer to compensate for the 100211 part having a slightly deeper lip.
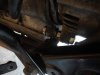
The 100211 part then has a lug at about 7 o'clock - a long way from the engine case hole however it can be used using a 2/3mm steel strap suitably shaped, but I didn't because there is an unused 8mm taped lug on the engine casing in exactly the right place.
This unused lug will be dirty so I ran a 8mm tap through it before using it to hold a bolt (or set-screw in my case), to secure the last alt lug.
The unused lug is not in the same plane as the machined holes in the engine case - so a 7-7.5mm spacer is required.
I'll post up some pictures, and more info as I continue testing it.
I needed 3 M8 set screws cut to length (20mm thread goes into the engine case holes), a couple of nuts and washers (2.5mm).
Seems to be running without any issues and producing a good charging voltage.

regards,
Alastair
 
Last edited:
OP
OP
Joined
May 30, 2016
Messages
25
Location
livingston, UK
Bike
The Pan
Completed 700 miles testing. No issues - its still working!
I'll upload pics soon.
To be clear the (Nippon-) Denso alternator I used as from a Yamaha, part number 100211-4930 as used in FZR1000's, some FJ's and (probably) others.
The alternator connections from the 100211-4930 don't match the existing pan-euro connectors but they can be modified!
 
Joined
Oct 17, 2015
Messages
1,959
Location
near Harrow, Ontario, Canada
Bike
'83 BMW R100RS
STOC #
8870
Well done Alastair! The fact is that many external "bolt-on" components like alternators, voltage regulators, electrical connectors, fuel injection parts etc. are manufactured by just a few companies for all of the OEMs (both car and motorcycle) and parts can often be adapted with a little creative filing and gluing. The key characteristics are usually things like spline shaft sizes and amperage ratings (assuming everything automotive and motorcycle is 12v these days) and so building up a listing of applicable parts that can fit is very worthwhile and can make it much easier to keep older machinery running at a manageable price.

I know that my 1994 Miata had a well documented noisy valve lifter problem and those thieves at Mazda wanted $58 EACH for the 16 lifters (that's almost 960 buckeroos plus tax for the engine set) but it turns out that the folks at Kia use PRECISELY the same part for their 1.8l engine and they only wanted $5.45 CAD each - a saving of over $53 per lifter or more than $875 for the set.

That saved me enough dough to buy sufficient beer to get through the entire job of changing the danged lifters and still have money left over for a bag of chips!

Anyhow, great info for the ST1100 clan!

Pete
 
Joined
Oct 8, 2015
Messages
2
Location
San Diego, CA
STOC #
008
I'm also extremely interested in hearing more about this! My '93 ST1100 just lost it's 28A alternator! First time my ST has been on a tow truck in the 23 years I've owned it. Sooo, I've been burrowing through all of the 40A Alternator upgrade info available on this site and others (building my list of needed parts, procedures, etc.), and getting myself mentally ready to begin the process in the near future. Any updated info is very welcome!
 

wjbertrand

Ventura Highway
Joined
Feb 8, 2005
Messages
4,410
Location
Ventura, CA
I'm in the middle of rebuilding the alternator on my ST1300. I was originally intending to just replace the brushes but after all the work required to access it, decided to replace the regulator and rectifier components while I was in there. Honda wants $260 and $184 respectively for these parts. I found the exact ND replacements at an automotive alternator and parts supplier on-line for $29.95 and $39.95 respectively.


-Jeff
 
OP
OP
Joined
May 30, 2016
Messages
25
Location
livingston, UK
Bike
The Pan
HI stbahn (sorry I don't know your name), Yes in principle it will work on the pre96 MY models fitted with the 28Amper. I not completely familiar with the 28a to 40a conversion process, but as i understand it, you remove the 28a alt along with the drive gear mechanism, then separate the mechanism from the alt and put the drive mechanism back in. Then fit the 40amp alt, and modify your wiring to remove the external rectifier and regulator. If that's right then yes the yam Denso part will fit once you've modified the lug hole sizes. BUT one caveat would be the the pre-96 MY engine may not have the 'unused' engine case lug that i found was fortuitously was in exactly the right place for me. Its not essential that its there but it makes it easier - otherwise you would have to fashion a steel strap and bolt one end to the alt and the other to the existing engine case lug hole. I'm due to post up some pic's anyway so take a look before your decide. I was lucky in the sense that I had a whole day of fun in the workshop to work out how to do it - and saving ?600 to motivate me. I got the hang of quickly inserting the alt, seeing where i need to file next, removing it, fiiling/measuring, and back in again - about 10 times at least i think. I'm thinking i need to make a cad/technical drawing to actually show how to modify it - its not easy to describe!, though if your a keen workshop/metalworker/mechanical engineer I'm sure it would be easy.

- al
 
OP
OP
Joined
May 30, 2016
Messages
25
Location
livingston, UK
Bike
The Pan
Pete - thanks for the kind reply, good point about OEM's creating so many near identical commodity parts, and yes it is satisfying finding a cunning solution to an expensive problem (and helping others too...).

Jeff - thanks for the post, I take it from the '...all the work required to access it..', that Honda didn't fix the horrendous access issue with the 1300 then!!!! :)
Have you put a post on the st1300 alternator topic with your findings re OEM and Honda part numbers? I'm sure people would find it useful.
 

John OoSTerhuis

Life Is Good!
Joined
May 10, 2005
Messages
5,222
Location
Bettendorf, Iowa
Bike
1991 SSMST1100
STOC #
1058
Hi Alastair,

Your description of the 28amp to 40amp alternator upgrade procedure is basically correct: http://www.st-riders.net/index.php?topic=942
A few 40amper alternator shaft assembly parts have to be obtained and then most of the individual parts on the 28amper's alt shaft assy are removed and transferred onto those select 40amper parts to make a now operational 40amp alt shaft assy:

p_17-21.gif

I'm assuming from my read of your posts that your ST1100 had the 40amp, air-cooled alternator system OEM to it; which failed. What year of manufacture is your ST1100?

What is the amp rating of the Yamaha alternator you have adapted to the ST1100?

I am looking forward to your pictures!!!

Here is a picture (thanks, Gunnar Reed, STOC 44) of the rear of the engine on a USA 1991 ST1100, showing the recess for the 28amp, oil-cooled alternator and its 4 bolt holes/threaded-lugs.


eng-rear-alt hole-GReed.jpg

I don't know for sure if the 4th bolt hole is present on USA production models' engines with the 40amp air-cooled system (1996-2002). HTH

John
 
Last edited:

wjbertrand

Ventura Highway
Joined
Feb 8, 2005
Messages
4,410
Location
Ventura, CA
Pete - thanks for the kind reply, good point about OEM's creating so many near identical commodity parts, and yes it is satisfying finding a cunning solution to an expensive problem (and helping others too...).

Jeff - thanks for the post, I take it from the '...all the work required to access it..', that Honda didn't fix the horrendous access issue with the 1300 then!!!! :)
Have you put a post on the st1300 alternator topic with your findings re OEM and Honda part numbers? I'm sure people would find it useful.
I did post the information under the "Ignition Problem?" thread I started. Turns out the rectifier I bought was the wrong part but I was able to get the original one tested and confirmed good. In the end I only installed the regulator and new brushes. Still in the reassembly phase though so won't know the outcome for a while.
 
OP
OP
Joined
May 30, 2016
Messages
25
Location
livingston, UK
Bike
The Pan
Hi Alastair,
I'm assuming from my read of your posts that your ST1100 had the 40amp, air-cooled alternator system OEM to it; which failed. What year of manufacture is your ST1100?
What is the amp rating of the Yamaha alternator you have adapted to the ST1100?
John
Hi, Ive got a ST1100PY which is a MY 2000 , but was registered first in 2003 (I've heard they continued to make the old 1100 even after the 1300 was introduced....)
Yes it has 40amp as standard, but it was replaced by the previous owner, and then it failed on me a couple of months into ownership.
Re the Yam Denso, I've checked online sources but can't find the amp rating (or wattage). It would be in the Haynes or Klymer manual.
Re the snapshot you included of the rear view with alt and gear drive out - and the 4th threaded hole at 7 o'clock (roughly) - that could be the one I found which is unused (normally) by the Honda denso 40 amp part, but is used by the 28A part. Looks like it.

Pics being uploaded now (if it works...)
 
Last edited:
OP
OP
Joined
May 30, 2016
Messages
25
Location
livingston, UK
Bike
The Pan
This is the yam denso in-situ - its the lug at 10 oclock position. Note the 2.5mm washer as a spacer.
A spare o-ring (as used in the extruded lip), can be used to sDSC03945.jpgeal the 2.5mm gap - not shown in this photo.
 
OP
OP
Joined
May 30, 2016
Messages
25
Location
livingston, UK
Bike
The Pan
This is the previously unused engine lug at 7 oclock position.
I used a set screw - the head end is on the left , its screwed into the 'unused' lug, then through a spacer (I used a nut), then through the alt lug and another nut is used for the final fixing.
You'll notice the nut in the middle is tightened against the alt lug not the engine casing - that's deliberate.
You'll notice the gap between the nut and the engine lug - I didn't have a suitable washer of the right width! It doesn't matter because the set screw is firmly located into the thread of the engine case lug, and the spacer nut as I mentioned before is tightened into the alt lug. I hope that makes sense.


DSC03947.jpg

Note also that the offset between the unused lug face and the normal 3 lug faces is added to the 2.5 offset - which must be the same for all bolts, otherwise the alt would not sit perpendicular to the machined face on the engine casing and the splined inner race of the bearing it locates into.
 
Last edited:
OP
OP
Joined
May 30, 2016
Messages
25
Location
livingston, UK
Bike
The Pan
Lastly the 12 oclock lug bolt.
The 8mm hole needs filed inward towards the axle centre by 2mm (as do all the lugs), but this one also needed filing to the left (downward in this pic).
I was concerned the left hand side of the lug would be only left with 1-2 mm wall thickness, so might crack and cause a stress fracture - so it removed about 6mm of the left hand side. Leaving a '?' hook shaped lug. Not pretty, and with hindsight I should have filed to a wall thickness of 2mm or so then adjusted the other 2 to allow the alt to rotate anti-clock wise a little more than I finally planned. This pic looks like the bolt is well off but I hadn't finished, the alt was then rotated anti-clockwise a little, so by the time I'd finished adjustments it was okay. I added a steel plate about 15 by 20 mm between the head of the bolt and the alt lug and curved the edges in a vice to fit around the lug and to spread the force. and tightened firmly. No pic though but I can get one next time the tank is out....

DSC03950A.jpg


I re-checked the bolt torques after about 100 miles running and they were all as I set them.
Note the masking tape is just to give me an 'up' mark for inserting the alt.
 
Last edited:
Joined
Oct 17, 2015
Messages
1,959
Location
near Harrow, Ontario, Canada
Bike
'83 BMW R100RS
STOC #
8870
I'm in the middle of rebuilding the alternator on my ST1300. I was originally intending to just replace the brushes but after all the work required to access it, decided to replace the regulator and rectifier components while I was in there. Honda wants $260 and $184 respectively for these parts. I found the exact ND replacements at an automotive alternator and parts supplier on-line for $29.95 and $39.95 respectively.


-Jeff
Jeff: this great info for 1300 people! Can you provide part numbers for the low cost replacements?

Pete
 
Top Bottom