
Hello everyone,
I just though I would post a few pictures and info on what NOT to do, to help others speed up the process and highlight a few things. I got the idea from this link
https://www.st-owners.com/forums/showthread.php?132655-Saddlebag-protection-bars
dduelin posted pictures and others added info, but I feel some things were left out and need explaining.
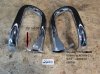
First of, the bars fit really well after you get them on the ST1300")
If you decide to get the bars from e-bay I can honestly recommend these guys. http://www.ebay.ca/usr/kdcycleparts?_trksid=p2047675.l2559 Super fast delivery and absolutely hassle free shipping to Canada :bow1:
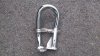
So let's get in to the meat of thing. The bars mounting holes will need to be widened (reamed out), the mounting holes are further apart on the GL1800, so you will need to bend the bar ends closer together to get the holes to line up. That's it. Not quite
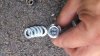
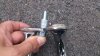
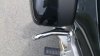
As mentioned in the link above the best way to do it is by using a vice and squeezing the bar ends together until the desired center to center spacing of the ST1300 mounting holes is achieved. The center to center on the ST1300 is 40mm which converts to 1.57" or 1 9/16" if I did the math right. The GL1800 holes are about 60mm or 2 3/8" apart. You will also need to zip cut the appendage with the little hole off in order to be able to squeeze the bars together far enough. See picture.
So once you have the appendage cut off and the existing holes reamed out to about 8/16" or what ever is close in imperial (or standard for my friends South of the 49th parallel) you can start putting them in a vice to squeeze the ends together. You will notice that as the ends come together, the areas with the holes will not look flush fitting anymore, but that's not a problem, because where they are to mount on the ST1300 isn't flush either. Once you have the holes squeezed to 40mm or about 1 9/16" (center to center of hole), you will need a 2 1/2 - 3 1/2" hose clamp to hold them in place. NOTE :attentio: I initially tried to use the hose clamp to just tighten it up and squeeze the ends together, but eventually the tension in the bar becomes so strong, that the hose clamp adjustment screw will start stripping / skipping. So do yourself a favor and use the vice and save yourself the headache.
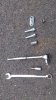
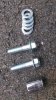
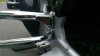
Now that you have your tip-over / crash-bar in place, you are ready to start the installation. :grin: This is where I though it would've been helpful to have detailed instructions in order to avoid a few unpleasant surprises. You will need a wrench with a 14mm socket & standard 9/16 or 14mm wrench, a large allen / hex key for the ST1300 bolts that need removing, 4 10mm x 40mm bolts with 1.25 pitch and approx. 16 washers that fit inside the frame cutout on the ST1300.
The bolts on the ST1300 will have to be removed of course, but don't take them both out.
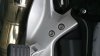
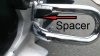
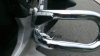
Take the top one out and install the bar with the washers as pictured. This way the outside aluminum frame and the interior steel tube frame of the ST1300 won't separate and give you grieve with alignment. Once you have the top bolt in (don't tighten all the way yet, you'll need to swing down the bar for the lower bolt) you can remove the lower bolt.
The lower bolt doesn't need the washers, but you can certainly install them in that cutout too. It takes approx 7-8 washers to fill that cutout.
Once your swing down the bar and install the lower bolt you will notice that the washers in the top hole help align the uneven mounting surfaces.
So that's it. you are done. I didn't use loctite on the bolts, because the tension in the frame parts and the tip-over bar will not allow them to move. I will check the tightness during regular maintenance, but I don't expect any surprises.
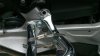
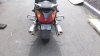
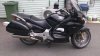
Here is the finished look
I hope this little write up will help someone and make things go smoother than my first attempt.
Cheers from Nova Scotia :CanFlag1:
Chris
I just though I would post a few pictures and info on what NOT to do, to help others speed up the process and highlight a few things. I got the idea from this link
https://www.st-owners.com/forums/showthread.php?132655-Saddlebag-protection-bars
dduelin posted pictures and others added info, but I feel some things were left out and need explaining.
First of, the bars fit really well after you get them on the ST1300
If you decide to get the bars from e-bay I can honestly recommend these guys. http://www.ebay.ca/usr/kdcycleparts?_trksid=p2047675.l2559 Super fast delivery and absolutely hassle free shipping to Canada :bow1:
So let's get in to the meat of thing. The bars mounting holes will need to be widened (reamed out), the mounting holes are further apart on the GL1800, so you will need to bend the bar ends closer together to get the holes to line up. That's it. Not quite
As mentioned in the link above the best way to do it is by using a vice and squeezing the bar ends together until the desired center to center spacing of the ST1300 mounting holes is achieved. The center to center on the ST1300 is 40mm which converts to 1.57" or 1 9/16" if I did the math right. The GL1800 holes are about 60mm or 2 3/8" apart. You will also need to zip cut the appendage with the little hole off in order to be able to squeeze the bars together far enough. See picture.
So once you have the appendage cut off and the existing holes reamed out to about 8/16" or what ever is close in imperial (or standard for my friends South of the 49th parallel) you can start putting them in a vice to squeeze the ends together. You will notice that as the ends come together, the areas with the holes will not look flush fitting anymore, but that's not a problem, because where they are to mount on the ST1300 isn't flush either. Once you have the holes squeezed to 40mm or about 1 9/16" (center to center of hole), you will need a 2 1/2 - 3 1/2" hose clamp to hold them in place. NOTE :attentio: I initially tried to use the hose clamp to just tighten it up and squeeze the ends together, but eventually the tension in the bar becomes so strong, that the hose clamp adjustment screw will start stripping / skipping. So do yourself a favor and use the vice and save yourself the headache.
Now that you have your tip-over / crash-bar in place, you are ready to start the installation. :grin: This is where I though it would've been helpful to have detailed instructions in order to avoid a few unpleasant surprises. You will need a wrench with a 14mm socket & standard 9/16 or 14mm wrench, a large allen / hex key for the ST1300 bolts that need removing, 4 10mm x 40mm bolts with 1.25 pitch and approx. 16 washers that fit inside the frame cutout on the ST1300.
The bolts on the ST1300 will have to be removed of course, but don't take them both out.
Take the top one out and install the bar with the washers as pictured. This way the outside aluminum frame and the interior steel tube frame of the ST1300 won't separate and give you grieve with alignment. Once you have the top bolt in (don't tighten all the way yet, you'll need to swing down the bar for the lower bolt) you can remove the lower bolt.
The lower bolt doesn't need the washers, but you can certainly install them in that cutout too. It takes approx 7-8 washers to fill that cutout.
Once your swing down the bar and install the lower bolt you will notice that the washers in the top hole help align the uneven mounting surfaces.
So that's it. you are done. I didn't use loctite on the bolts, because the tension in the frame parts and the tip-over bar will not allow them to move. I will check the tightness during regular maintenance, but I don't expect any surprises.
Here is the finished look
I hope this little write up will help someone and make things go smoother than my first attempt.
Cheers from Nova Scotia :CanFlag1:
Chris
Attachments
-
 23.4 KB Views: 184
Last edited: