Thanks, You were right. Once that bolt was loose, it came right out. I used a short extension with a 1/4 inch socket.

Has anyone pulled an ST1300 alternator?
- Thread starter wjbertrand
- Start date
I just finished pulling mine, used a 3/8 12mm swivel socket on a short extension and attached that to a longer wobble extension to get the ratchet up and out of the V. Testing showed my rotor is done, so I;m searching for a complete replacement unit, anyone found an aftermarket source for rebuilds or upgrades? I was hoping it was the regulator or summat with the wiring, I didn't get that lucky. Unfortunately I depleted the moto fund repairing the heat pump in the guest house, so it'll be a while..........Thanks, You were right. Once that bolt was loose, it came right out. I used a short extension with a 1/4 inch socket.
- Joined
- Feb 11, 2006
- Messages
- 9,684
- Location
- Jacksonville
- Bike
- GL1800 R1200RT NC700
- 2024 Miles
- 008131
- STOC #
- 6651
You do not have to remove alternator to change brushes.just done mine with no fuss!!
- Joined
- Dec 21, 2004
- Messages
- 4,348
- Age
- 69
- Location
- Ledgewood, NJ 07852
- Bike
- 03&04 ST1300
- STOC #
- 5079
That's why removing the radiator makes getting at that bolt a bit easier still not easy.
Great advice from everyone... However what was the final analysis? I read all and it appears a few have been able to remove without pulling radiator? They simply had to remove the 3 bolts on alternator cover and oil pressure switch to slide it out. But by dduelin recommendation be sure to put all three cover bolts back on when reinstalled no matter how hard it seems. That bolt is important.
I have to install a new alternator and by all means do not wont to pull the whole cooling system is I dont have too.
Does anyone else have new update or suggestions whether it is possible to install an ST1300 alternator without radiator removal?
Thank Everyone and everyone be safe out their ^_^" CXL
ANY ONE ?Great advice from everyone... However what was the final analysis? I read all and it appears a few have been able to remove without pulling radiator? They simply had to remove the 3 bolts on alternator cover and oil pressure switch to slide it out. But recommendation be sure to put all three cover bolts back on when reinstalled no matter how hard it seems. That bolt is important.
I have to install a new alternator and by all means do not wont to pull the whole cooling system is I dont have too.
Does anyone else have new update or suggestions whether it is possible to install an ST1300 alternator without radiator removal?
Thank Everyone and everyone be safe out their ^_^" CXL
Removing the radiator and t-stat housing, and working at it from the front is a whole lot easier and less work than trying to remove the throttle bodies etc.
A Snap On or SK 1/4 inch drive ratchet set with long extensions and swivel sockets will be your friends.
A Snap On or SK 1/4 inch drive ratchet set with long extensions and swivel sockets will be your friends.
The radiator is an easy removal.
THANKS... Thats a good point.... I am so dreading ! Dumping fluid and pulling radiator especially, "if hard". However thats a very good point if easy enough and the benefit of doing the job right. Back to being tarn doing it myself and taking into shop.The radiator is an easy removal.
Changing the AF is more mess than difficult. I pulled the front fender and wheel, then had complete access to the radiator. You will need a tiny screw driver to pop those fan connectors loose, then after removing the radiator bolts and hoses, pivot it forward at the bottom using the top hanger as your pivot point. The radiator will slip off the top bracket easy as pie. If you don't swing the bottom edge forward, inclining the radiator, it will not come off that top bracket, said bracket is bent that way to prevent the rad from sliding off. Then remove the cross bracket in front of the stat housing (two bolts). Removing the stat housing is interesting, there are hoses attached to cast pipes/spigots on the back of the housing. Not sure how you reach those, but it is doable - enough guys have done so already. Consider replacing the radiator hose clamps w/ constant tension clamps and never have a drip again. Maybe replace some rubber while you are in there.
Thanks and point on, about the Throttle body! I am at that point now and wondering how the hell that thing comes off?Removing the radiator and t-stat housing, and working at it from the front is a whole lot easier and less work than trying to remove the throttle bodies etc.
A Snap On or SK 1/4 inch drive ratchet set with long extensions and swivel sockets will be your friends.
But do you not have to take it off pulling it out through top, where whole throttle body has to be removed?
Are you saying theirs a way to take it off through bottom front simply by removing radiator ?
Good info, including 1/4 extensions socket friend ^_^" LoL ...... I have this longe flexible ratchet adapter that worked very well getting to carb boots. TY Again ^_^"
humm, I thought I seen an altanator under the throttle body at the rear part of the engine. I took the radiator off in front of the engine. maybe I'm mistaken!Does the radiator have to come out? All the photos in the service manual show the radiator and t-stat housing already removed. Any tips? Thanks
It can be removed/replaced (although not easily) through the front, with only the radiator, t-stat housing, and 2 water pipe elbows removed, if you have the right tools.Thanks and point on, about the Throttle body! I am at that point now and wondering how the hell that thing comes off?
But do you not have to take it off pulling it out through top, where whole throttle body has to be removed?
Are you saying theirs a way to take it off through bottom front simply by removing radiator ?
Good info, including 1/4 extensions socket friend ^_^" LoL ...... I have this longe flexible ratchet adapter that worked very well getting to carb boots. TY Again ^_^"
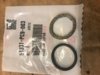
You will need new o-rings for the water pipe elbows if you do this.
as far as removing the TB assembly, do NOT pry with any force, or against the fuel rails, or casting points, or you can/will/may damage the assembly beyond repair.
Search the forum on how this assembly is removed carefully if you decide to go that route.
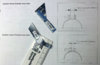
Also, when you go to replace the assembly, do NOT tighten down the band clamps! You only snug them down, carefully measuring the distance between the flats of the clamps, and not tight like you would a normal worm clamp. Not doing this, will guarantee you air leaks and further issues after you have it all back together.
I think Michael has some pictures of measuring tools he made for this job, I'll try and find them for you.
- Joined
- Feb 11, 2006
- Messages
- 9,684
- Location
- Jacksonville
- Bike
- GL1800 R1200RT NC700
- 2024 Miles
- 008131
- STOC #
- 6651
This job is not that hard only time consuming. I took about 10 hours over several days to R & R my alternator.
Short cuts to save time are for the experienced but for the inexperienced a single mistake such as dropping a fastener at the wrong time or not having the correct wobble socket means having to remove the throttle body anyway. Presumably one is doing this job DIY to save money and has the time necessary to do the job. What's an extra hour or two of your time to make the job flow smoothly along? I don't know about you but in my past are many times I spend more time in the end making up for the time I tried to save with a short cut. I can help with the prep of removing the radiator and associated hoses with a step by step tutorial of radiator removal/coolant replacement. Send me an email address if you want it.
Short cuts to save time are for the experienced but for the inexperienced a single mistake such as dropping a fastener at the wrong time or not having the correct wobble socket means having to remove the throttle body anyway. Presumably one is doing this job DIY to save money and has the time necessary to do the job. What's an extra hour or two of your time to make the job flow smoothly along? I don't know about you but in my past are many times I spend more time in the end making up for the time I tried to save with a short cut. I can help with the prep of removing the radiator and associated hoses with a step by step tutorial of radiator removal/coolant replacement. Send me an email address if you want it.
Last edited:
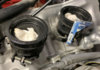
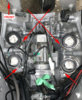
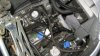
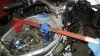
Please note, all you alternator removal folks, the pictures @Igofar posted (#34 above) are NOT representative of what you will find. The oily, dirty, gunk laden 'V' area of the engine pictured in an earlier link complete with dead bugs, maybe mice, certainly a few nuts and bolts and the errant 9mm round is more likely to be found.
If you do replace the throttle bodies, make sure you read other posts on that subject and pay close attention to the condition of the rubber boots. Our bikes are not spring chickens and those boots are more often than not pretty hard. This makes removal more difficult; consider replacing them.
If you do replace the throttle bodies, make sure you read other posts on that subject and pay close attention to the condition of the rubber boots. Our bikes are not spring chickens and those boots are more often than not pretty hard. This makes removal more difficult; consider replacing them.
My alternator died yesterday, so I am putting together a parts list and thought I would share it for review and for others in the future. I will be removing the radiator only to replace the alternator and therefore won't be messing with the throttle body boots. I am not sure if the last two items are needed or accessible (R & L Water Hose)
Thanks all and hope this is helpful.
| Part # | Description | Quantity |
| 31100-MCS-013 | Alternator | 1 |
| 91331-MCP-900 | O-RING (21.2X2.4) for Thermostat and Water Joint housing | 3 |
| 91361-MCS-A10 | O-RING (43.5X2) for Thermostat | 1 |
| 19501-MCS-G00 | HOSE, RADIATOR (UPPER) | 1 |
| 19502-MCS-G00 | HOSE, RADIATOR (LOWER) | 1 |
| 19504-MCS-010 | HOSE, R. WATER | 1 |
| 19506-MCS-010 | HOSE, L. WATER | 1 |
Thanks all and hope this is helpful.
OP
OP
wjbertrand
Ventura Highway
I will be interested if you can actually remove the alternator without removing the throttle bodies. Has that actually been done before?
YesI will be interested if you can actually remove the alternator without removing the throttle bodies. Has that actually been done before?

- Joined
- Feb 11, 2006
- Messages
- 9,684
- Location
- Jacksonville
- Bike
- GL1800 R1200RT NC700
- 2024 Miles
- 008131
- STOC #
- 6651
Why call and keep it off line? To keep it safely away from questions and comments from the forum's body of knowledge? Knowledge for all lives in the light of day for all to read and learn.