
Be careful what you ask for...Don't forget to take pictures while you are working on it!
INNOVV K1 2-channel Video Camera Installation
As promised, my experience with installing the INNOVV K1 2-channel video camera. There are lots of pictures, mostly annotated; I'll try to keep the narrative part relatively brief.
Background
On paper at least, this is exactly the video system I've been waiting for. It has all the features I want and at a price that makes it affordable.
Judging by the number of comments on this thread, evidently there's some pent-up interest from others as well. This post will describe the basic installation as I experienced it, plus a few other notes. I expect to write a full review of the product itself after I've had a chance to use it for a while.
Ordering, Shipping, and Receiving
INNOVV is located in China. I ordered directly from the website and, after a couple of emails to provide a phone number for DHL's records, the dingus was on its way to me. The order was placed on a Saturday; the unit arrived the following Friday. Not altogether bad considering it traversed half the globe in the process. Also, in addition to the automated confirmations of ordering and shipping, the CEO / main guy took the time to write me personally and encourage me to share my experiences with others. They are trying to build a community of users, somewhat like the ST-Owners except without the forum (or Mellow).
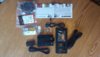
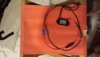
The thing was well-wrapped and arrived in excellent condition.
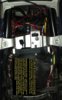
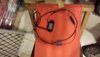
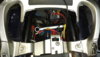
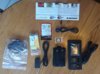
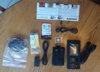
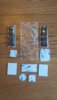
My first view of the product left a favorable impression of tidiness and careful thought.
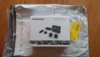
Digging more deeply, all the bits seemed to be in place.
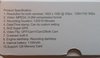
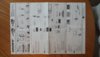
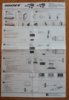
I need to dig more deeply to see if there's any more extensive user's guide- the one-page Quick Start doesn't fully get the job done. [EDIT: Nope- that was it.]
It seemed as though there were a LOT of cables but, by jingo, every one of them has a purpose.
Getting Down To It
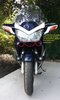
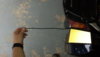
I started the installation process itself with some recon, looking for suitable places to put all the bits. First off, of course, was where the cameras would be located. At the front, I wanted something out of the way, visually unobstructed, and partially sheltered. I don't ask for much, do I?
After some hemming and hawing I settled on a spot just off the center line and just behind the point of the front fairing. It's not clear to me that this is really the optimum location due to possible whackage against the front fender but it had all the other attributes I was looking for and I was getting impatient. Time to break out some tools, and what better place to start than with the set I keep on the bike for emergency purposes? It has an assortment of sockets, a very compact drive for them, various screw driver and Torx bits, box end and open end wrenches ; everything a body needs, right? [EDIT: this turned out to be a bad choice for two reasons. 1-- the double-sided adhesive strip wasn't up to the task. 2-- the camera did actually make contact with the top of the front fender, leaving a bunch of scratches... argh.]
Signal cable routing
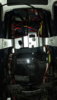
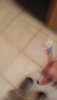
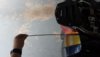
I started by raising the upper fuel tank (8, 10 mm sockets plus driver and extension, 10 mm open end wrench) to expose the frame and show where the wire might run without getting broiled on the engine or pinched somewhere along the way back. The route came through the forks, under the projection that holds the fairing in place, and so on aft. It quickly became apparent that I was going to need the fish tape. Trip #1 down to the tool storage area to root around in the gigantic debris field...
The fish tape did the trick and the signal cable was duly routed. I left plenty of slack at the front, so that I’d have maximum flexibility when it came time to actually place the camera.
(LATER)
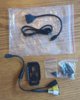
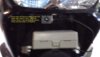
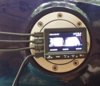
The next task was to actually mount the camera. As I mentioned, the target was somewhere near the centerline and just back from the nose of the fairing. There are no holes or existing bolts in that area to use for piggybacking the L bracket onto, but I was not interested in using the adhesive mounts directly onto the camera body because that would leave zero adjustment. (TIP: as soon as the recorder gets power it starts, so if you have something with a USB port bring it with you and plug the DVR in so that you can actually see the picture you will be getting while you are setting up.)
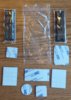
The thing does not come with any extra mounting brackets or screws or anything by way of mounting hardware- just the two L brackets and a pair of very stubby 4 mm hex head bolts (plus washers) to go with them. Those bolts connect the camera to the mount but it’s totally on you to find a way to attach the whole shebang to the bike. If you have an assortment of modest-sized nuts, bolts, nylocks, lock washers, flat washers, and Loctite lying around bring it with you to the installation site. The slots on the L brackets will accept a 4mm bolt but not a 5.
There are threaded holes on three sides of the camera housing, giving you lots of options in terms of what orientation you want the camera and where the signal cable points. No need to worry about which way is up- the DVR is supposed to be able to translate the image as needed (though I have not yet found the secret for doing that).
Some rubbing alcohol and a paper towel cleaned the underside of the fairing, then the adhesive pad went into place right on the centerline. There’s a nice flat area there so that the camera will mount level. [EDIT: THIS IS A BAD PLACEMENT...]

It looks (I hope) like there is enough clearance to avoid getting into space trouble on anything other than a huge impact.
The instructions say the adhesive needs 24 hours to really cure; I hope it holds. [EDIT: NOPE. It didn't hold, and it dinged up the top of my front fender to boot.
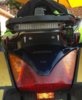
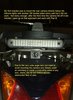
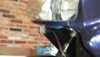
Having got the front camera placed, it was time to change ends. There is a lot of open area available and I considered several options. My bike has a GIVI mount and also an Admore light bar right underneath it. The first thought was to stick the camera right under the light bar.
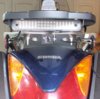
But, while I was working on getting the DVR sited and connected the camera fell off three times in ten minutes; clearly an alternate strategy was required. Re-inspecting the area I realized that the mount for the Admore has open slots right out in the open and easily accessible; all that was needed was some junk box hardware to attach it. I’ll put some blue Loctite on that bolt when I’m wrapping up.
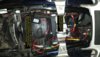
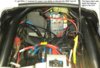
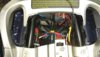
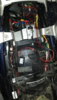
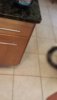
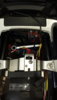
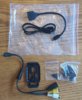
With both cameras in place it was time to move on to the DVR and power converter placement. That in turn meant connecting the signal leads to establish the reach. There is plenty of length so you will have lots of options, even if you snake the front along the frame and through the square seat supports then under the grab rail as I did.
Two winters ago I installed a fuse block and ground strip, along with the usual 30A relay triggered from a tap into a switched circuit, giving me exactly what was needed to bring power to the DVR. However, the power converter comes with ring terminals as shipped so it took some minor surgery to swap those out for one spade connector and one flat Y connector.
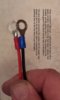
Since I had them on hand, I used a couple Posi-Lock connectors and added about a foot of wire to the leads. This was not because I really needed it but it preserves the maximum length of OEM lead. A bit of heat shrink tubing should eliminate any chance of trouble from moisture, although truth to tell there better not ever be any moisture in that area, ever, or I have more serious problems.
Even with all the stuff I have crammed in there, there is plenty of space in the tail for both the power converter and the DVR in its pouch. (Mine is a non-ABS model; I think the ABS control unit eats into this space if you have it but it’s probably still sufficient.)
Spanky Lives
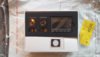
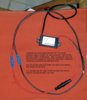
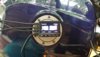
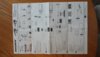
Making the connections to the DVR is very simple. Each incoming cable is labeled and there is a very clear diagram in the instructions that shows schematically where they go and how they connect. The hardest part is actually reading the labels printed on the DVR itself but you almost don’t need them because the instructions are so clear.
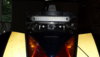
I wanted to see some results so I connected everything and fired up the bike. Spanky lives!
Finally, it was time to locate the GPS/speaker and wired “remote” DVR control. After a lot of fiddling around and holding the units up to get a visual, I stuck the GPS on the right side of the top of the dash, in the protected area right behind the windshield. The control unit went next to the buttons on the left side of the dash that control the clock and fuel readouts.
I’ll use the supplied cable routing clips liberally to secure the wires along the route, particularly on the dash area and as they pass between the frame and the air box (I’ll get to raise the tank again to run them; oh joy).
I ran the incoming cables through the straps on the back of the pouch then up to the DVR. Close up the flap on the pouch, tuck everything away, and presto! the install is complete except for final cable routing and tie ups from the GPS and control. Overall, the install was a pretty easy task and not a wrestling match. There is no need to remove any Tupperware, drill any holes, or do anything else dramatic.
Wrap-up
It took longer than it needed for me to do this, since I was feeling my way at every step and pondering what to do. Handier, more clever people such as yourselves will take only an hour or two, probably, especially since you will not make umpty-ump trips between the work area and your tool storage.
Tools
Since I do not have a moto-accessible workshop or garage I have to bring the tools to the bike, which I inevitably seem to do one at a time. When everything was said and done I had about half the workshop up there, or so it seemed. The list included:
- fish tape
- 1/4" socket driver
- Assorted sockets (specifically 8, 10 mm) and extensions
- 4/5/6 mm "Y" style hex head wrench with Bondhus (rounded) tips
- razor knife
- small jeweler's tool set
- pliers
- 8, 10 mm open end and box end wrenches (part of what I keep on the bike)
- #1 Phillips head screw driver
- Assortment of nuts, bolts, and washers
- heat gun
- wire cutters
- wire strippers
- needle nose pliers
- channel lock pliers
- probably some other stuff I forgot about
Attachments
-
 109.3 KB Views: 33
 -
 58.6 KB Views: 34
 -
 101.9 KB Views: 35
 -
 155.3 KB Views: 36
 -
 95.1 KB Views: 31
 -
 109.7 KB Views: 31
 -
 121.8 KB Views: 30
 -
 77.4 KB Views: 30
 -
 80.2 KB Views: 29
 -
 38.5 KB Views: 27
 -
 47.2 KB Views: 26
 -
 36.2 KB Views: 26
 -
 46.4 KB Views: 26
 -
 100 KB Views: 26
 -
 63.6 KB Views: 30
 -
 70.5 KB Views: 29
 -
 69 KB Views: 29
 -
 58.1 KB Views: 29
 -
 79.8 KB Views: 29
 -
 80.4 KB Views: 34
 -
 97.3 KB Views: 36
 -
 85.2 KB Views: 35
 -
 125.7 KB Views: 28
 -
 93.7 KB Views: 26
 -
 148 KB Views: 29
 -
 98.9 KB Views: 29
 -
 151.5 KB Views: 28
 -
 154.5 KB Views: 29
 -
 81.1 KB Views: 28
 -
 61.6 KB Views: 26
 -
 78.3 KB Views: 24
 -
 74.9 KB Views: 24
 -
 84.6 KB Views: 24
Last edited:
