I want to repair this alternator for an ST1100 and your're invited

OP
OP
moddy

moddy

the mod
Joined
Dec 2, 2011
Messages
836
Location
Seymour, IN
Bike
05 ST1300
STOC #
8843
Disassembled and tested, all parameters passed. That's the short version(pun alert).
The long version is from section 17 of the Honda manual with a voltmeter:

Continuity between all yellow ac leads at the stator. They are supposed to be one continuous wire, after one group of 3 leads are soldered together. At the other end, the set of 3 wires extend to the p2 and p3 connector from the stator.

Continuity between the white and black wire at connections on the cap.
2.9 ohms between the white and black wire with a parameter of no more than 4 ohms
.4 ohms between all of the yellow wires from the stator with a parameter of no more than 1 ohm.
In conclusion, this is a viable unit with a need for replacing the external wires from the cap to the p2 and p3 connector.
And now, some pictures.
IMG_20161011_124205.jpgIMG_20161011_124251.jpgIMG_20161011_131903.jpg

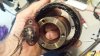
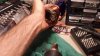
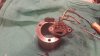
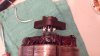
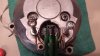
First picture-Do support it like this for removal after the 3 screws have been removed under the resin. It is all connected as a unit shown in the 2nd picture.
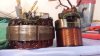
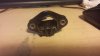
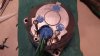
If you accidentally fumble what you're holding, like I did, two of the three solder leads will break away for you as shown in picture 3. The black tube is quite heavy and shouldn't be set down without supporting it's weight from inside the stator. It will flex at it's connection. (like it did when I fumbled it.)
Fortunately, they broke away nicely and will only need to be soldered again for reassembly.

I also forgot to mention from the time I pulled the cap off of the back of the alternator, revealing the stator wires, I would place it on a towel when not handling it. The enamel of the wire has a protective coating baked on to prevent the wires from chaffing under vibration and causing a short, so you don't want the enamel to come off.
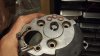
Lastly, rewiring. The only perceivable way of doing this is to the tabs in the back, that come out of the cap because the black, copper-wound tube is connected directly to the plastic housing where the stator wires come out.
Careful what you decided you'll clean out the resin with as the housing the resin is stuck to is plastic. It is no wonder, at this stage, why this alternator wasn't designed to be opened again. The thought of winding this stator for the reward if it's lower output compared to '96 and later models could only be perceived if there wasn't another stator available on this planet.
 
Last edited:
OP
OP
moddy

moddy

the mod
Joined
Dec 2, 2011
Messages
836
Location
Seymour, IN
Bike
05 ST1300
STOC #
8843
I used a propane torch set to about 1 inch of blue flame and carefully heated the cap to remove the resin. In retrospect, I could have heated it before I used an engraver to chisel out enough resin to remove the screws.
It made it a lot lighter work just holding the cap and heating the remaining resin. Pictured below is what part of the resin remained before I heated it out of each hole, there's a copper washer for each screw. I was able to hold the part bare handed to accomplish this, a glove would have been more comfortable, but it speaks of it not taking a lot of heat to loosen the resin. A metal pick made short work of removing it mechanically after it was warmed up.
IMG_20161011_153155.jpg

Next up, cleaning out the infernal epoxy where the wires will come from the cap to the p2 and p3 connector. Heat isn't a likely option so I don't completely destroy the plastic housing.
Ordering a new plastic connector isn't an option because the black copper-wound tube is attached to it. Will probably be using the engraver.
 
Last edited:
OP
OP
moddy

moddy

the mod
Joined
Dec 2, 2011
Messages
836
Location
Seymour, IN
Bike
05 ST1300
STOC #
8843
It's getting exciting in the world of alternator DIY with a little luck. I made a lot better progress on the resin filled plastic where the wires come through the stator. I thought since I was able to hand hold (barely) the cap while I was heating it with a torch that I could probably use a hot air gun, for it to be hot enough. Not only did that work and I'm close to soldering brand new wires, someone responded to my request for a 40A alternator, with a faulty rotor wire I'll try to repair. Good news is, there's already information available http://www.st-riders.net/index.php?topic=4505.0
Not to mention a thread on bearing replacement since the alternator had 90k miles.
https://www.st-owners.com/forums/showthread.php?55159-Alternator-bearing-replacement

IMG_20161011_163114.jpgIMG_20161011_165146.jpg
The one thing I would have done differently is allow more time for the component to warm up. Once I was able to begin removing resin, I noticed the plastic housing that's attach to field coil (aka black copper-wound tube) started to become loose. Luckily, the leads coming through the plastic housing are connected to the field coil with the field coil wires soldered to them. So once you remove enough resin the plastic housing will slip right over those tabs as long as the wires soldered to them don't prevent housing removal.
 
Last edited:
OP
OP
moddy

moddy

the mod
Joined
Dec 2, 2011
Messages
836
Location
Seymour, IN
Bike
05 ST1300
STOC #
8843
Well I'm done, with the prep work anyway. I don't have a source for the resin, probably not hard to find. I'll also clean the leads "really well" to solder the wires to all of the leads. The last thing I'll need is a short in wires I poorly solder. I'm also not too worried about the p connectors since wires can be soldered to the voltage regulator wires for a better connection.
IMG_20161011_193137.jpg
I finally upgraded to a leather work glove, not quite welding quality but enough to withstand the heat coming out of the hot air gun. Took about 15 minutes, it's necessary to let it warm through and really heat up the resin you're trying to remove.
I heated up my soldering iron to removed the last bit of soldered wire, by lightly trapping the piece in my vice to hold it, while I was tugging on the wire with needle nose pliers.
 

ST1100Y

Site Supporter
Joined
Dec 4, 2012
Messages
5,031
Age
59
Location
Vienna, AuSTria
Bike
ST1100Y, ST1100R
STOC #
637
...I don't have a source for the resin, probably not hard to find...
Should be avail (in all colors) at (RC-/scale) model suppliers, they do all kinds of stuff like molding parts with it.

Thanx for the efforts BTW, now we all know (what I'd suspected) how the 26A unit could be dismantled for winding repairs.

One theory of mine (supported by your pics):
inside the wiring exit, where the resin seals the casing, the cable-insulation was removed to provide fully working oil seal.
Otherwise the engine oil will wick itself up along the strands inside the wire insulation.
 
Last edited:
OP
OP
moddy

moddy

the mod
Joined
Dec 2, 2011
Messages
836
Location
Seymour, IN
Bike
05 ST1300
STOC #
8843
One theory of mine (supported by your pics):
inside the wiring exit, where the resin seals the casing, the cable-insulation was removed to provide fully working oil seal.
Otherwise the engine oil will wick itself up along the strands inside the wire insulation.
Yes, makes sense that it would prevent the oil from wicking up the wires. What I would like to find out is the best way to reinstall the plastic housing in the cap. I could use Permatex Motoseal, suggestions are welcome. There might be an alternative you know about.
 
Last edited:
OP
OP
moddy

moddy

the mod
Joined
Dec 2, 2011
Messages
836
Location
Seymour, IN
Bike
05 ST1300
STOC #
8843
So what am I up to? I had a few days to wait for some more input. More time to research and a chance to stop in some businesses to find out what I replace the resin with. Turns out, I have felt compelled to use the very stuff I was recommended to place the plastic conduit with, Permatex Motoseal. Why not? It's sealing a component in the back of the alternator for oil and fuel resistance. So why not see if it would fill in where the wires come out and the assembly bolts for the field coil.
Instead of just barging right in and using the stuff on the job, I decided to use an extra socket with painters tape behind it and fill the square with a test plug. Once the Motoseal cures I will be able to test its durability for making that seal after the field coil is assembled.
I also haven't worked with this type of Permatex before so a test after it's cured was due anyway.
It was also attractive use this as it remains flexible after it cures.IMG_20161018_122148.jpg
 
OP
OP
moddy

moddy

the mod
Joined
Dec 2, 2011
Messages
836
Location
Seymour, IN
Bike
05 ST1300
STOC #
8843
Instead of just barging right in and using the stuff on the job, I decided to use an extra socket with painters tape behind it and fill the square with a test plug. Once the Motoseal cures I will be able to test its durability for making that seal after the field coil is assembled.
I also haven't worked with this type of Permatex before so a test after it's cured was due anyway.
It was also attractive use this as it remains flexible after it cures.
All I can say is good thing for testing. Unlike JB Weld, for those of you who have used it, this doesn't cure anything like it and appears to require the thin layer, per directions, for it to work.
10 hours later a skin layer cured inside the socket, having taped the back of it. Under the tape hadn't cured at all. This makes sense because solvent needs to evaporate for it to cure, the tape seal was virtually air tight.
At this point, not selecting Motoseal to be the sole source of assembling the stator, I'm still in a holding pattern for assembling the stator without a resin replacement.
 
Last edited:
OP
OP
moddy

moddy

the mod
Joined
Dec 2, 2011
Messages
836
Location
Seymour, IN
Bike
05 ST1300
STOC #
8843
UPDATE

After a few days of needing to get a few other things done in this life, I have used Permatex Motoseal to assemble the plastic insert in the cap.
Before I do that, because it would be impossible to solder the 3 leads from the stator, I needed to assemble this first, before I Motosealed the insert in place.
20161024_114745.jpg
I can't emphasize enough not to rush properly soldering this. Prep, flux, proper heat setting on the soldering iron. Obviously, if this isn't connected properly, a short in 1 of the 5 wires would not work properly. So, from here on out, you're at your best, fingers still crossed.
20161024_120258.jpg
This shows the plastic insert with Motoseal. Not having the proper installation screws, as they are still holding this piece on the alternator installed in my bike, the nut is tightened back down on the cap, to supply pressure to the plastic housing to cap until the Motoseal cures.
I have progressed to applying Motoseal where the field coil leads come through the housing as well. Having secured the 3 screws that were covered by the resin is what is holding the field coil in place while Motoseal cures.
It is worth mentioning at this point I am not assembling it the way it disassembled. When it was originally put together, there was no seal where the field coil leads mate with the plastic housing. When they used resin on the wires exiting the plastic insert is what is supposed to hold the oil in and where I believe oil leaks from. Choosing to use Motoseal on both of these surfaces may well keep it from leaking oil. I need a solution for the wires coming from the cap, resin was previously used for the wires and the mounting screws. I'm thinking about gas tank repair for the screws and some kind of RTV for the wires to keep the solder joints from weather.
 
OP
OP
moddy

moddy

the mod
Joined
Dec 2, 2011
Messages
836
Location
Seymour, IN
Bike
05 ST1300
STOC #
8843
Soldered. But wait, why are they that color?! I used wires on hand, as long as they were equal to or larger than the original wires. Dark green, white, the black one black, three lighter green wires, AC, done.
IMG_20161024_133743.jpg
You can see the Motoseal around the field coil assembly (two wires) and around the entire plastic housing, hopefully this keeps oil from coming through. If oil does come through, I will likely move on to fixing the broken field coil wire in a 40amp alternator I was recently offered and install that one instead. I like this stuff, I hope this works.
 
Last edited:
OP
OP
moddy

moddy

the mod
Joined
Dec 2, 2011
Messages
836
Location
Seymour, IN
Bike
05 ST1300
STOC #
8843
Ready to install, well almost. Ken Heming, an alternator rebuilder in northern Indiana told me he used Ultra Blue Permatex, excellent oil barrier, what I was looking for. Not to mention I was considering protecting the solder joints as well.
I also knew the repair was larger than a normal bead for gasket making, so I used my heat gun to warm up the part to help it cure. Normally, per instructions, you don't return this repair to service until 24 hours. It cures by solvent evaporation. So, since it cured slower with it being cooler, I warmed it up for it to set throughly.
Throughout this entire process I have been careful not to cause damage to solder joints, stator wire integrity and have tested for ohms and ground between the appropriate wires. Should be good for the stator swap.
In the mean time, I have a 40A donor alternator I can work on repairing the field coil wire. One of these days I'll have repaired so many things I'll repair something that isn't the first time.
IMG_20161025_103838.jpg
 
Last edited:
OP
OP
moddy

moddy

the mod
Joined
Dec 2, 2011
Messages
836
Location
Seymour, IN
Bike
05 ST1300
STOC #
8843
Thank you. Couldn't have done it without Dave's stator.
Seeing 14.2 volts at idle will be all the gratification I need. I will likely just post a picture of the voltmeter.
 
OP
OP
moddy

moddy

the mod
Joined
Dec 2, 2011
Messages
836
Location
Seymour, IN
Bike
05 ST1300
STOC #
8843
Well sports fans, it's time for an update, you've waited long enough. I showed up at Gary's (GreenZR's) place a little after 9 on Monday and not long after that, so did HR Cole.
What began soon after was a 2 and half hour event to remove the necessary components to gain access to the stator, rear tire, swing arm, drive shaft and various side plates and tupperware.
Got it placed, tightened down, started, celebrated 13 volts at idle and also celebrated a healthy oil leak, drip drip drip. Pretty tough blow for spending a few hours to get down to it, take the stator off, replace it, then find out I wouldn't be going anywhere.
My wife was warned she might need to pick me up if I broke something, but Gary offered to give me a ride home, I know that was appreciated by my wife, for sure.
Read the label on the Motoseal I used and Ultra Blue to find that I had rushed the process and not allowed an appropriate time to cure before tightening the parts on the stator together.
Lucky for me, Gary has a 28A stator (that doesn't leak) that should go on Thursday. I will attempt to repair the leak in the stator that was given to me and actually test it for leaks before an attempt to install. How will I do this? The same way I wish I would have come up with before the 7 total hour adventure on Monday only to reveal my stator would leak, by putting oil in it and allowing it to drip in a bowl if it doesn't leak.
We had a good time, I learned a lot, don't we always. mod
 
OP
OP
moddy

moddy

the mod
Joined
Dec 2, 2011
Messages
836
Location
Seymour, IN
Bike
05 ST1300
STOC #
8843
Bummer! I would have rode down if I knew there was going to be a mini tech day! :)
Well if I would have freakin known to extend the invitation it have been nice to see you since it's been almost 4 years.

Idle, with headlights on.
IMG_20161103_140029.jpg
 
Last edited:

ST1100Y

Site Supporter
Joined
Dec 4, 2012
Messages
5,031
Age
59
Location
Vienna, AuSTria
Bike
ST1100Y, ST1100R
STOC #
637
Well, live and learn...
Technically it worked, the issue with engine sealer curing should be rated as accident... a common D&D thing...

At least the world now knows that and how that thing can be taken apart, thus how to fix it if required; and that's a big chip in my bill :cool:
 
OP
OP
moddy

moddy

the mod
Joined
Dec 2, 2011
Messages
836
Location
Seymour, IN
Bike
05 ST1300
STOC #
8843
Well, live and learn...
Technically it worked, the issue with engine sealer curing should be rated as accident... a common D&D thing...

At least the world now knows that and how that thing can be taken apart, thus how to fix it if required; and that's a big chip in my bill :cool:
Thank you. It was a lot of effort and time, but a lot of good things happened like learning things. Will attempt to reseal the alternator that leaked. Now that my original stator that failed is off, I will see if I can't deduce what's wrong with that one. Having a working stator that doesn't leak will aid in someone being able to get back on the road sooner if they don't do a 40 amp upgrade.
 

ST1100Y

Site Supporter
Joined
Dec 4, 2012
Messages
5,031
Age
59
Location
Vienna, AuSTria
Bike
ST1100Y, ST1100R
STOC #
637
Now that my original stator that failed is off, I will see if I can't deduce what's wrong with that one.
Yes, it would be interesting to see if there is like an epidemic failure, a particular spot on the winding prone for some damage, or if its a simple issue of overheating due to too high loads/consumers.
 
OP
OP
moddy

moddy

the mod
Joined
Dec 2, 2011
Messages
836
Location
Seymour, IN
Bike
05 ST1300
STOC #
8843
Agreed, I will be looking at the stator for the mechanical failure, easy to spot. My hypothesis before I even get started with it is the wires are shorting on the outside of the resin just where elements from the weather and time would fray the wires like I got started with this stator I put in that ended up leaking.
To not lose sight of which stator is which, the one I was given that I repaired leak after we installed it. Where we were installing it, at Gary's, GreenZR, had one that was free and installed it 3 days later.
Gary is very nice person, I'd like to have more like him as a friend and these are his words. "If we go back in there again I would prefer it to be a 40 amp alternator, I don't want to do it with a 28 amp alternator again"
This is absolutely true. It is not that expensive to put a 40 amp alternator in its place, here's why. Ken Heming, an alternator rebuilder in Northern Indiana offered me a high output alternator with trade in for $300. Or I should say $300!!
With the added expense of the base plate, even new from Partzilla $45, means you'll be well on your way for another 100000+ miles without your alternator slowing you down.
 
Top Bottom