Hi All:
OK, well, it looks like I am one of the lucky ducks who has a problem with the clutch slave cylinder (we'll refer to it as the
CSC) on my 2007 ST1300.
The symptoms of a leaking or failed clutch slave cylinder are:
- little or no resistance on the clutch lever (only if the fluid level is low - see #2);
- fluid level in the master cylinder drops over a short time (you'll see it in the sight glass);
- NO external leak under the bike (at least not initially - and this is important, so read-on);
- EDIT: the clutch is OK when cold, but the lever goes soft and gears are hard to shift when it is warmed up.
If those things (especially #1 or #2
AND #3 or #4) are happening to you - it is likely that you have a clutch slave cylinder problem and you definitely need to fix it.
NOTE: the CSC layout on the
ST1100 is
completely different from that on the ST1300. The ST1100 CSC is mounted on the
front of the engine on the clutch housing itself and so servicing it is quite simple because access is pretty good - except for working around an exhaust header on some bikes. Nonetheless, the symptoms of the problem and basic repair scheme are identical - only the access to the CSC differs between the two bikes.
The ST1300 clutch slave cylinder is mounted on the rear engine casing about 6-8 inches above the bottom of the bike (see the photo below in the
article). Access to the three 6 mm bolts that fasten it to the case and to the hydraulic fittings that are mounted on it, is
really tight due to the proximity of the front edge of the swing arm, the lower fuel tank, speed sensor, oil filter, gear shift linkage and a bunch of hoses, and God-only-knows what else down in there. The failure mode of the CSC is that the piston seal leaks and allows clutch fluid (
which is DOT4 brake fluid) to leak into a cavity in the rear engine casing where the CSC is mounted. That cavity is reasonably large and so a fair bit of fluid can leak into it before it is filled, at which point the excess clutch fluid will dribble out of a weep-hole in the engine case casting and eventually wind up on the floor under the bike.
NOTE: it could take some time and several fillings of the clutch master cylinder for any clutch fluid to leak externally and that is why I stated that you may not see an external leak -
at least initially.
Let me state for the record that I
HAVE bled the clutch hydraulic system and it is all good (
no air in the system), except that all of symptoms #1, #2
and #3 have occurred
AFTER the bleeding operation and the fluid level continued to drop, albeit slowly,
AFTER bleeding. When my CSC began leaking in the fall of 2016, I found that as long as I topped-up the fluid level in the master cylinder, the clutch worked just fine. However, city riding (i.e. lots of clutch use) caused the level to drop noticeably over a few hundred KM - and that is definitely
not supposed to happen. Also, after the second time I added fluid to the master cylinder, there was a small puddle under the bike from the weep-hole in the slave cylinder - so, as noted above, the fluid eventually does go somewhere other than into the engine itself.
TEMPORARY FIXES - or - JUST SKIPPING THE CSC REPAIR ALTOGETHER
As a temporary fix, you might be tempted to plug the weep-hole with something like
JB Weld -
but don't.
Plugging the weep-hole is definitely
not a good idea and will
not keep your bike on the road any longer. The weep-hole is there to stop clutch fluid from being forced into the engine crankcase and contaminating the engine oil. If you plug the hole, you risk damaging the engine because the leak will continue with the fluid being forced into the engine. Engine coolant pumps also have weep-holes for exactly the same reason: to keep antifreeze out of the engine oil. So, while you
can keep the bike going for some time by simply topping-up the clutch master cylinder as the fluid leaks out, the CSC seal will eventually
really fail - and then your bike will be disabled with
no clutch function (
...and this will undoubtedly happen late at night, with a passenger, in the middle of nowhere, in the rain).
If you develop a CSC leak on the road, my advice is to buy a new bottle of clean DOT4 brake fluid and keep a close eye on the clutch master cylinder fluid level. Check it and top it up as necessary - and repair it as soon as possible. Don't let the fluid level drop too low or you will introduce air into the hydraulic line - and that would be a big PITA to fix on the road.
ST OWNERS REPAIR METHOD versus THE HONDA WAY....
The
Honda ST1300 Service Manual provides the dealer-approved method of removing and replacing the clutch slave cylinder and at first, it doesn't sound too bad. The three main steps in the Honda-approved repair method are as follows:
1) drain clutch fluid.
2) remove engine from frame.
3) etc. etc. etc.
It all sounds OK, until you get to Step 2...for which I was recently quoted the princely sum of
$1273 in labour by a local Honda dealer (
parts and taxes extra).
As a mechanical engineer who specializes in vehicles, I have to say that a repair scheme requiring removal of a vehicle engine to replace a small, externally-mounted $75 part held on by three small bolts, is simply stupid and is clear evidence of a lack of planning and good engineering practice on the part of the OEM. To me, this confirms that the ST1300 was designed by a team - and then simply "
plopped" onto the market without any further development. You can easily see that: the first 2003 ST1300 is virtually identical to the very last over-priced 2014 models that have been sitting unsold in showrooms around the world for several years. Don't get me wrong - I love my big ST bike - but
Honda Engineering abandoned this design right after they completed it in around mid-2001 as a replacement for the highly successful ST1100. With the ST1300, they created a great new bike with more power, less weight, fuel injection, better handling and some cool new features like the electric windshield and upgraded electrical system - but they did pretty crummy job on serviceability. I have seen this before in large OEMs: the
Product & Development Engineering people essentially "
throw the drawings over the wall" (and that is
precisely the term used in industry) to the
Manufacturing people, and then they just walk away chuckling.
Anyhow, being a frugal lad, I wasn't going to pay upwards of $1500 to have such a small simple component replaced and so I did a pretty extensive web search on this topic and corresponded with several people. I found in fact, that several ST Owners Forum members
have done this repair
without removing the engine - and you can too. It takes a few special tools (
costing less than $100) and a bit of agility to get access - but the job is doable in a couple of hours and it will save you a great deal of money -
like well over $1000 and possibly much more, depending on the labour rates in your locale. The other thing is that the Honda repair scheme represents a major risk of causing other damage to your bike because it basically requires tearing the entire motorcycle apart and manhandling that big ST1300 engine out of the bike. Once the engine
is out of the bike, I would guess that the actual CSC repair would take about 15 minutes (
really!!) - it is that simple a task.
NOTE: while a bike hoist is a great tool - I think that this is one job where
a hoist will not likely help. To get access to the CSC, you need to get
UNDER the middle of the bike and in my view, a hoist would make this more difficult. You will likely want a pad or a piece of thick carpet to lie on while you access the CSC from under the
right hand side of the bike (see the photos below).
Anyhow, I have assembled the required parts (and courage) to take on this task but ANY assistance / advice / visits with BEvERages, etc...would be very much appreciated.
Kind regards,
Pete
ARTICLE (written on Feb. 18-2017 & revised since then):
Today (Feb. 18-2017) was a beautiful 21C (nearly 70 deg. F) and it was a big day in the Disaster Central Workshop. A friend and I replaced the clutch slave cylinder (CSC) on my 2007 ST1300. The big problem is access and how the heck to get tools on the CSC and the hydraulic fitting that is attached to it - and which tools will fit in that tight space. This is because the danged thing is mounted up on the backside of the rear engine case and is crowded with the oil filter, the gear shift linkage, a bunch of hoses and the front edge of the swing arm - and there isn't an easy way to even see what you're doing - let alone do it.
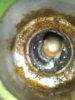
The photo below is from an eBay "for sale" posting and it shows an ST1300 rear engine case. The greenish area in the lower centre of the case with three bolt holes and large depression in the centre is where the CSC goes. The hole with the big bearing on the upper right is where the drive shaft housing attaches and way down below it at the lower right hand corner is the hole for the gear shifter shaft. The smaller hole between the shifter and the CSC is where the speed sensor mounts. The large silvery hole on the lower left is for the oil filter. You can easily see that the clutch slave cylinder mounting is pretty tangled up with everything else. I suppose Uncle Soichiro could have made the CSC harder to get at - but I think he is saving that improvement for the ST1600, which I am told is coming soon. ")
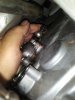
 The next photo shows a clutch slave cylinder held in position by three small hex-head bolts on the rear engine case - with the oil filter in place to its left. The hydraulic banjo-bolt fitting has been removed from the CSC in the photo NOTE: The big splined gearbox output shaft is in the extreme upper right hand corner of the photo below.
 All of the parts needed for the job are listed in the text below. I ordered them from my local Honda dealer and they were delivered within a few days. The total cost was around $95 CDN in Oct. 2016:
- clutch slave cylinder - $75.81
- gasket - $5.22 and,
- the crush washers were (a ridiculous) $4.49 each - you need three of them).
Given the modest cost of a new clutch slave cylinder and the challenging nature of the repair task, I didn't even think of trying to rebuild it. Getting in there is just too difficult along with getting the old CSC out and the new one back in - to risk having a dud rebuild. Besides, the parts to rebuild a CSC are somewhere around $50-60 - so you wouldn't even save that much.
After the preliminaries of getting the lower belly fairings off, removing the brake fluid from the clutch hydraulic system with a vacuum bleeder and arranging access to the underside of the bike, the actual R&R job on the CSC only took about an hour or so.
PRELIMINARIES
Take the bike to a car-wash to hose off the underside and rear of the engine and the area around the front end of the swing arm. This will make the job much easier and more pleasant and it will reduce the risk of crud getting into the clutch hydraulic system.
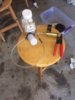
Assemble all of the tools and other stuff shown in the photo below. Here is a list:
- a garbage bag to drape the fuel tank and fairing to protect them from brake fluid spills;
- a good bright shop light to illuminate the dark corners of the underside of the bike;
- a new engine oil filter of your favourite brand plus half a litre of new engine oil;
- a little bottle of typewriter correction fluid (we call it Wite-Out) to mark the position of the gear shift linkage on the splined shifter shaft that sticks out of the rear engine case;
- an Allen key (5 mm as I recall) to remove the fairing belly panels;
- a strap wrench to remove the oil filter (plus a little drain pan for the small amount of oil you will lose);
- flex ring ratchet wrenches - 8, 10 and 12 mm.
NOTE: You want really good ring ratchet wrenches that are fairly long (NOT stubbies) with ratchets that have a lot of pawls so that they will work even if only moved through a few degrees of rotation ( I treated myself to some nice ones off the local Snap-On truck;
- a 1/4" drive ratchet (also with fine rotation pawls) with a fairly long handle and an 8 mm hex socket to match;
- a blade tool of some type to scrape off the old gasket from between the CSC and the engine case (we also used a little brass brush);
- a little jar of Vaseline petroleum jelly (the stuff you use on baby's bums);
- a tube of high-temp silicone grease for the socket in the CSC that engages the clutch push-rod;
- a good JIS screwdriver to remove the clutch master cylinder lid (you do not want to strip those delicate little screws);
- a new, unopened container of DOT4 brake fluid (this stuff soaks up water and you do not want any of that in your hydraulic system);
- a vacuum brake bleeder tool;
- a short (say...3-6 inch long) piece of clear 6 mm ID plastic tubing (fuel line etc.) to fit on the clutch fluid bleeder nipple;
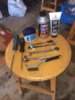 Above: tools & supplies needed to remove and replace an ST1300 clutch slave cylinder including the 12 mm ring-ratchet wrench and the 8 and 10 mm flex ring ratchet wrenches you'll need. Be sure to buy long wrenches (not stubbies) and get ones with small rotation pawls that will still "ratchet" even if moved only through a few degrees of rotation. These are standard items from Snap-On tools.
 Above: inexpensive manual vacuum brake bleeder and custom made brake fluid drain reservoir. I got the bleeder at Princess Automotive (equiv. to Harbor Fright in the US) and it worked like a charm. It is normally $70 CDN but I got it on sale for half that and it is well worth the full price IMO. Note the fluid in the Heinz ketchup bottle - that is all we got from the clutch hydraulic system.
GETTING ACCESS - STAGE 1
- start with the bike on the centre stand;
- drape the fuel tank & fairing area with a garbage bag to protect it from the inevitable spill of brake fluid;
- disconnect the battery (you do NOT want a helper to hit the starter during this job);
- remove black belly fairing panels (no other fairing panels or exhaust parts need to be removed) - requires a 5 mm Allen key;
- remove the oil filter - you will lose about half a litre of engine oil, so you'll need a drain pan to catch the oil;
- remove the speed sensor (I didn't do this, but Forum member Igofar suggested it and I think its a good idea for better access);
- use the vacuum brake bleeder to drain the clutch hydraulic system (you'll be surprised at how little fluid comes out) - requires a 10 mm ring ratchet wrench for the bleeder nipple;
GETTING ACCESS - STAGE 2
- now put the bike on the side stand - access is not great, but its OK;
NOTE: a hoist would NOT help IMHO and laying the bike right down on its left side, as several people have done, might make things easier, but we did OK on the side stand;
- mark the position of the gearshift link on its splined shaft (SEE NOTE BELOW - added on Feb. 22) I used a little stripe of typewriter correction fluid painted across the shaft and link to mark the correct position);
- remove the pinch bolt that secures the gear shift link to the transmission shift-shaft and remove the link itself - requires a 10 mm flex ring ratchet wrench;
- let the gear shift linkage dangle out of the way (DO NOT disassemble the other end of the linkage that connects to the shifter pedal on the LH side of the bike - just let it dangle);
- NOTE: now would be a good time to clean and lubricate that linkage. They are prone to seizing and that makes shifting gears nearly impossible.
- there are 3-4 small drain hoses held within a sheet metal bale that is bolted to the rear case of the engine - slip those hoses out of the bale and lash them up out of the way (you can see the sheet metal bale in one of the photos below);
 Above: accessing the CSC from the right hand side - while bike is on the sidestand. The nice warm sun made it a little more bearable.
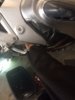 Above: we found that working with one hand above the right hand side exhaust pipes and the other below the pipes seemed to work OK. You can see that the banjo bolt and the three (3) crush washers have been removed and are in the magnetic-bottom parts pan.
 Above: access is not great - but its OK. My helper's hand is on the CSC and you can see the oil filter mounting boss, sheet metal hose bale and the gear shift linkage dangling down (note the Iron Ring - he's a Canadian engineer).
MARKING the POSITION OF THE GEAR SHIFT LINK on the SHIFTER SHAFT
Above: access is not great - but its OK. My helper's hand is on the CSC and you can see the oil filter mounting boss, sheet metal hose bale and the gear shift linkage dangling down (note the Iron Ring - he's a Canadian engineer).
MARKING the POSITION OF THE GEAR SHIFT LINK on the SHIFTER SHAFT
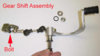
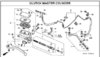
This is an exploded schematic of the gearshift mechanism from an ST1100 (the ST1300 mechanism is very similar). Note the component marked "Bolt" - that is the fastener that must be
completely removed.
 Here are the steps to marking the splined shifter shaft:
With the bike on the
side-stand: wiggle under the bike from the
RIGHT HAND side and look straight up just inboard of the right hand exhaust pipes. You will see a little link with a Heim joint and a rod that goes right across the bike and connects to the gear shift pedal. That link is mounted on a splined shaft that sticks out of the rear engine case (see the photo of where that shaft is located) - this is the transmission shifter shaft. There is a 6 mm pinch bolt that secures the link to the splined shifter shaft and
AFTER you mark the position of the link - you will
remove that pinch bolt with a 10 mm hex socket or open end wrench. You may need to use a slot screwdriver to
gently pry open the gap in the link to enable it to slide off the shifter shaft.
NOTE: the pinch bolt
must be
completely removed to get the link off the shaft.
It is necessary to mark the position of that link on the splined shaft so that you can put it back onto the same spline. I marked it by painting a little stripe of typewriter correction fluid (
Wite-Out) across the end of the shaft and the link (
sorry - I don't have a photo of that step). If you don't mark the correct position, you may reassemble the link onto the wrong spline and your gear shift pedal will be either much too high or too low. Being off even one spline tooth makes a big difference to the position of the shift pedal.
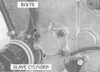
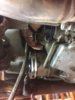
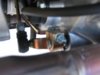
The photo below shows a view of the pinch bolt (
it is the silver hex-head bolt in the middle of the first photo) on the link as you are sitting on the floor looking in just over the RH exhaust pipe. The second photo (
lost for some reason) shows the linkage from below. Put a bit of
Wite-Out on the link
and on the end of the splined shaft to mark the correct position.
 REMOVAL of the CLUTCH SLAVE CYLINDER
NOTE: some brake fluid may drip down in the next few steps so keep a rag handy and be careful to keep it out of your eyes!
- first loosen the banjo bolt which secures the two hydraulic fittings to the top of the CSC and pull it straight up and out - requires the 12 mm flex ring ratchet wrench;
- remove the three (3) crush washers from between the fittings;
NOTE: one washer goes between the lower hydraulic fitting and the CSC, the second goes between the two fittings and the third goes between the banjo bolt head and the top of the upper fitting (the banjo-bolt is part no. 22 in the schematic below and the crush washers are parts no. 25 (there are 3 of them are in the assembly on top of the CSC).
 DO NOT REUSE the CRUSH WASHERS (they are cheap, so buy some extras when you order your parts)
;
- remove the three 6 mm hex-head bolts that secure the clutch slave cylinder to the engine case - requires the 8 mm 1/4" drive socket & ratchet;
NOTE: now some brake fluid will likely dribble out - that is the fluid that has leaked past the seal in the CSC and the reason you're having all this fun!);
- clean the area around the CSC mounting pad and inside the cavity in the engine case - particularly the end of the clutch push rod which will be poking into the cavity;
- be sure to remove all of the old gasket - this can be a bit laborious;
INSTALL the NEW CLUTCH SLAVE CYLINDER (Note - all of the relevant Honda part numbers are included in the text below)
- test that the banjo bolt threads nicely into the hydraulic port in the new CSC - NOW is the time to confirm that the threads start easily (don`t ask me how I know this);
- put the new gasket (Honda p/n 22862-MGJ-D00) on the new clutch slave cylinder (Honda p/n 22860-MCS-000);
NOTE: there are two hollow locating dowels (Honda p/n 94301-08100 -
Pin Knock 8x10) in the CSC body that align the assembly with the cavity in the engine case:
be sure both of them are in place before inserting the three 6 mm bolts;
- put a small dab of high temp silicone grease into the little socket in the CSC piston - this socket engages the spherical end of the clutch push rod;
- install the new CSC with three 6 mm bolts (Honda p/n 96001-0602200 - Bolt Flange, 6x22) - and tighten - requires the 8 mm 1/4" drive socket & ratchet;
- put a small dab of Vaseline on a NEW crush washer (Honda p/n 90545-300-000 - Washer - Oil Bolt) and insert it between the lower of the two hydraulic fittings and the CSC and repeat for a second crush washer, placing it between the lower and upper hydraulic fittings and finally, repeat again for the third crush washer and thread that washer onto the banjo bolt - and slide the bolt down through the washer-hydraulic fitting assembly;
NOTE: this task is a
heck of a lot easier to say than it is to do -
but work methodically, use Vaseline to stick the washers in place, and you'll get it;
Don't worry about the Vaseline contaminating the brake fluid. You are only going to use a little bit of Vaseline and beside, you will flush it all out during the bleeding operation.
NOTE: BE SURE that the banjo bolt thread starts properly into the hydraulic port of the CSC before you start to tighten it with the wrench.
- tighten the banjo bolt-hydraulic fitting-crush washer assembly - requires the 12 mm ring ratchet wrench (a flex version of the 12 mm may be better here);
WRAPPING UP
- re-install the gear shift linkage- being sure to get it on the correct spline on the shifter shaft (aren't you glad you used the typewriter correction fluid to mark it?);
- re-install the drain hoses into the sheet metal bale and be sure they are not pinched;
Now put the bike back up on the
centre stand for the remainder of the job.
- re-install the oil filter (I suggest using a new one);
- check oil level: it will likely be at the bottom of the safe range as you will have lost about 1/2 litre when you removed the oil filter - add to correct level;
- bleed the clutch hydraulic system (and don't spill any brake fluid on anything you care about) - requires the 10 mm ring ratchet wrench and the vacuum bleeder tool;
NOTE: the bleed nipple on the clutch hydraulic system is quite small (
and fairly well hidden just aft of the coolant overflow bottle above the side stand pivot point).
I had to search around to find some clear
6 mm ID fuel line tubing to use on the clutch bleeder nipple, but once I had that - using the vacuum bleeder made the task very easy.
- re-install the black belly fairings;
- re-connect the battery;
- start the bike and test the function of the clutch and observe for leaks;
That's it - you're done! Its now time for a tastey BEvERage, I would say.
I don't think I have forgotten anything but if I have, please point it out in a PM and I will correct the post. I wish I had more photos, but frankly, it is so tight in there that taking them wasn't really feasible.
ACKNOWLEDGEMENTS
I want to thank all the folks who have offered encouragement on this journey and most especially, to those who have given specific advice on this challenging, but totally manageable task. I also want to thank my friend Craig who helped with a lot of the under-bike fun and ST Owners Forum member MikeDo, who stopped by just as final assembly was done and got roped into helping me bleed the hydraulic system.
One final note on that task: the vacuum bleeder really was a huge help. While you can bleed the air out of a filled system in other ways, getting the fluid out of the system in the first place without a vacuum bleeder really would be a bit of a challenge.
Cheers,
Pete