Occasional Gas/Crankcase Smells

Reginald

cyclepoke
Joined
Jan 5, 2008
Messages
727
Location
Georgetown, Tx
Bike
ST1300
STOC #
8898
I am getting an occasional gas/crankcase smell under certain conditions. Not at all sure what's causing it.

Got a little frustrated with with another problem with the ST1300 this summer while on on my RockSTOC vacation. When the temps were high and riding at real low, crawling traffic speeds, the ST would "belch" a strong gas/crankcase smell, not a raw gas smell. First time it happened was outside Taos and I pulled over to check it out. No leaking gasoline, no leaking oil. That evening I pulled the right side cowl off and could find nothing. It happened several more times during the trip. I also noted a low rough idle when it happened. I haven't been able to repeat it since I got home, but then I'm frustrated and haven't ridden it far.

Well, I'm checking it out now. Road it 67 miles to drain the gas tank, but didn't get the smell.
1. Oil is clean and hasn't dropped, coolant is good and is full.
2. All the vacuum hoses are on tight, but some 3.5 mm hoses from the evap canister to the throttle bodies are corroding, but not cracked. (edit: 4.5 mm, 3.5 won't fit 5-way T)
3. All the fuel lines are in good shape.
4. No oil or fuel traces on the engine casing.
5. Pair Solenoid Valve resistance in tolerance.
6. Purge Control Solenoid Valve in tolerance.
7. Crankcase breather hose in good shape and tight.
8. Secondary breather hoses in good shape and tight.
What I did find:
1. I did find the drain hose from the evap canister was plugged and blew it clear. Got some sand from the road out of it. Can't see this as the cause, but....?
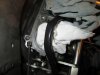
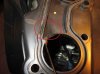
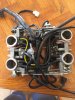
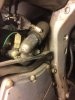
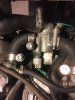
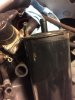
2. After removing the airbox I found some oily residue around the third cylinder throttle body and air box connection. Something is leaking here but not a lot. (see pics 1 and 2).

Throttle Body Cylinder 3.jpg

Air Box leak.jpg

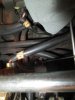
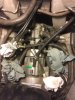
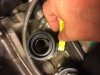
3. A breather/vacuum hose (3.5 mm) from the evap canister to the throttle body is badly kinked. Hmm? (see pic 3)

Kinked Vacuum Hose.jpg

What I'm going to do:
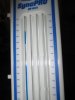
I'm going to have to remove the throttle bodies to get at those lower vacuum hoses for replacement. I can't get the kink out of the one hose; it's old and snaps right back to the kink. Placing the crush washers, clamps, and what not on order for reassembly. I'll also going to get a motion pro carb tune to sync the throttle bodies.

Questions: I'm not sure I'm fixing the problem; though, what I plan needs to be done. Does anyone have any thoughts about what could be causing the third cylinder leak at the airbox-throttle body? Back pressure? Could this be the cause of the smell, and if not what could cause it?
 
Last edited:
OP
OP
Reginald

Reginald

cyclepoke
Joined
Jan 5, 2008
Messages
727
Location
Georgetown, Tx
Bike
ST1300
STOC #
8898
Think I probably found another part of the fuel/crankcase smell puzzle. The evap canister does not have free flowing air between the small intake pipe (from gas tank) to the large pipe (to purge control solenoid valve). It's clogged! Checking google, all the testing demonstrations showed free flowing air passing through the canisters, mine did not. Additionally, the smell from the canister was similar. At Honda direct replacement costs $150, ouch!

Don't see how this could be the cause of the 3rd cylinder leak at the airbox-throttle body though. I'm hoping that leak is caused by a throttle body synchronization issue.

Any thoughts on why there would be a leak between the throttle body and airbox? I'd rather not have to open all this up again doing trial and error methods.
 

Mellow

Joe
Admin
Joined
Dec 1, 2004
Messages
18,865
Age
60
Bike
'21 BMW R1250RT
2024 Miles
000540
Any thoughts on why there would be a leak between the throttle body and airbox? I'd rather not have to open all this up again doing trial and error methods.
Could simply be the seal from airbox to TB wasn't good. I'd clean it up good and put it back together.. the evap canister stuff kinked and blocked is definitely a good catch.
 
Joined
Apr 9, 2011
Messages
1,027
Location
Canton, GA
Bike
2006 ST1300
I don't know if this will help, but I was experiencing something similar, a strong gas/petrol smell when I parked the ST in the garage, and of course it started to worry me. I blew air through the evap canister hoses, to make sure they were clear, and checked everywhere for a leak, but found none. I finally came to the conclusion that, like many people, I was overfilling the tank, in order to get more miles between fill-ups, and was flooding the charcoal evap canister. Thanks to a lister on here, I found that the way to get around this is to fill the bike on the side stand INSTEAD of the centerstand, and only fill it to the bottom ring or the supports inside the tank. Filling it on the sidestand makes it hard to overfill. I started on this, and found that a few tanks later, the smell had gone away, and I was back to a clean smelling bike. It has not returned.
 
OP
OP
Reginald

Reginald

cyclepoke
Joined
Jan 5, 2008
Messages
727
Location
Georgetown, Tx
Bike
ST1300
STOC #
8898
I don't know if this will help, but I was experiencing something similar, a strong gas/petrol smell when I parked the ST in the garage, and of course it started to worry me. I blew air through the evap canister hoses, to make sure they were clear, and checked everywhere for a leak, but found none. I finally came to the conclusion that, like many people, I was overfilling the tank, in order to get more miles between fill-ups, and was flooding the charcoal evap canister. Thanks to a lister on here, I found that the way to get around this is to fill the bike on the side stand INSTEAD of the centerstand, and only fill it to the bottom ring or the supports inside the tank. Filling it on the sidestand makes it hard to overfill. I started on this, and found that a few tanks later, the smell had gone away, and I was back to a clean smelling bike. It has not returned.
Unfortunately air will not blow through my evap canister, so it's toast. I have one on order and will replace. I'll follow your advice on fill ups, don't want to clog up another pricey canister!
 
OP
OP
Reginald

Reginald

cyclepoke
Joined
Jan 5, 2008
Messages
727
Location
Georgetown, Tx
Bike
ST1300
STOC #
8898
Since I'm replacing all the small rubber hoses, including all coolant hoses, would it be a good idea to replace the thermostat? I'm thinking the thermostat is all right but all the entries on failures give me some concern. PS this will be my 4th coolant change which is roughly every 2 years.

Still waiting on parts to finish this up.
 
OP
OP
Reginald

Reginald

cyclepoke
Joined
Jan 5, 2008
Messages
727
Location
Georgetown, Tx
Bike
ST1300
STOC #
8898
Got this done yesterday.

Pulling those throttle bodies was a bear. Literately broke a rope tied under the frame near the #4 throttle body. At first I was using a two foot pry bar to lever them off, but had to resort to a 3 1/2 foot cheater bar. I had sprayed some PB blaster between the rubber insulator and throttle body which I'm sure helped. Thought I was going to break the things. Pic below shows bottom of throttle bodies with routing of rope in red.

I replaced the evap breather hoses with bulk fuel line. Since the vacuum hoses were 3.5 mm I bought a few feet of 3.5 mm bulk fuel hose, but it wouldn't fit on the evap 5-way T. Ended up with 4.5 mm which was very, very tight on the T and snug on the throttle body tubes.

I've seen some folks use silicone hose for these which will probably work but it's not approved and can fail some state inspections (should some diligent mechanic pull everything to look). For vacuum or air silicone is fine. For oil or fuel vapors (PCV/ EVAP) silicone is not approved. Get fuel hose or Targon hose the evap to throttle bodies.

For the evap line going to the #3 throttle body, I rerouted the line around the SE Thermal Valve so it wouldn't kink. This is close to the routing in the manual. Good old shop had routed the hose in front of the valve kinking the hose. The old hose had cracked in the kink. Pic below shows routing of new #3 hose in yellow.

Thottle BDY.jpg
 

SupraSabre

48 Years of SoCal Lane Splitting/Commuting-Retired
Site Supporter
Joined
Nov 20, 2005
Messages
9,512
Location
Cedar City, Utah
Bike
12/04 ST 1300s
2024 Miles
000148
STOC #
5901
Got this done yesterday.

Pulling those throttle bodies was a bear. Literately broke a rope tied under the frame near the #4 throttle body. At first I was using a two foot pry bar to lever them off, but had to resort to a 3 1/2 foot cheater bar. I had sprayed some PB blaster between the rubber insulator and throttle body which I'm sure helped. Thought I was going to break the things. Pic below shows bottom of throttle bodies with routing of rope in red.

I replaced the evap breather hoses with bulk fuel line. Since the vacuum hoses were 3.5 mm I bought a few feet of 3.5 mm bulk fuel hose, but it wouldn't fit on the evap 5-way T. Ended up with 4.5 mm which was very, very tight on the T and snug on the throttle body tubes.

I've seen some folks use silicone hose for these which will probably work but it's not approved and can fail some state inspections (should some diligent mechanic pull everything to look). For vacuum or air silicone is fine. For oil or fuel vapors (PCV/ EVAP) silicone is not approved. Get fuel hose or Targon hose the evap to throttle bodies.

For the evap line going to the #3 throttle body, I rerouted the line around the SE Thermal Valve so it wouldn't kink. This is close to the routing in the manual. Good old shop had routed the hose in front of the valve kinking the hose. The old hose had cracked in the kink. Pic below shows routing of new #3 hose in yellow.

Thottle BDY.jpg
One trick I found was to remove the two rear right bolts from the throttlebody/rear brace first, then use my prybar, usually just pop right off. Be sure to have the two bolts back in before putting the throttlebody back on. They don't like to line up, once the throttlebody is back in place!

Working on my 2004 No2
 
Last edited:
OP
OP
Reginald

Reginald

cyclepoke
Joined
Jan 5, 2008
Messages
727
Location
Georgetown, Tx
Bike
ST1300
STOC #
8898
Not part of my gas smell problem but since I'm in there thought I'd replace the large water hoses. The water hose on the lower right side of the radiator seemed spongy and belled up around the radiator connection.

Noticed a lot of coolant leak corrosion. Didn't think it was this bad, but I guess a cup or so a year can add up (pics 1 & 2).
Front of thermistat.jpg
Top of Thermistat.jpg

That ECT ground was badly corroded. Don't see how it was working. The thermostat housing bolts were corroded too (pic 3).
ECT and bolt.jpg

Put on new hoses and breeze clamps torqued to 45 in-lb. Interesting that when I installed the smaller hose on the top left first to the thermostat housing then to the crank case, everything lined up. When I installed the right side I installed the hose to the crank case and then to the thermostat housing, but couldn't get the breeze clamp lined up on the housing part of the hose. The clamp kept trying to rise up to the lip bump on the housing pipe, which would have caused a leak. Reversed the install on the right and everything lined up, huh.

Couldn't get the CT-9412 clamp to fit on the hose to the radiator. The band came out of the clamp when I loosened it up enough to get it on. Fortunately, I had ordered 4 CT-9420 clamps (range 13/16 - 1 3/4 inch) of which the radiator hose is in the middle of its range.
Hoses and Clamps.jpg

Thanks to Kevcules for the thermostat housing (NOT flange) torque values, 108 in-ft.

Also cleaning up all the electrical connectors as I go with CRC Contact Cleaner. I'm using pipe cleaners to get down into the female connectors.

I'll clean up the front of the engine then put on the radiator this afternoon.

Can't get the throttle bodies on tomorrow. Need to take care of and visit Mom tomorrow.
 

Blrfl

Natural Rider Enhancement
Joined
Aug 24, 2005
Messages
5,602
Age
55
Location
Northern Virginia
Bike
Fast Blue One
STOC #
4837
That ECT ground was badly corroded. Don't see how it was working.
The ECT gets its ground through the wiring harness. The ground wire on the housing is to keep it at the same potential as the rest of the bike.

--Mark
 
OP
OP
Reginald

Reginald

cyclepoke
Joined
Jan 5, 2008
Messages
727
Location
Georgetown, Tx
Bike
ST1300
STOC #
8898
The ECT gets its ground through the wiring harness. The ground wire on the housing is to keep it at the same potential as the rest of the bike.
Thanks for the info. I found it on the wiring diagram and it looked connected to the ECT. I guess keeping everything at the same potential is like wearing a ground wire while working on computer parts. Maybe it helps reduce electrolysis in the cooling system. I got it cleaned up so it should help now. Everything I learn about this bike helps me keep it on the road.
 
OP
OP
Reginald

Reginald

cyclepoke
Joined
Jan 5, 2008
Messages
727
Location
Georgetown, Tx
Bike
ST1300
STOC #
8898
Well I've gotten the throttle bodies and new evap canister on. The old evap canister breather hole was plugged with charcoal (see pic below). I'm sure this was the cause of the smells.

Evap Canister.jpg

Put on new insulators. Picture shows how I measured how tight the bands were. I made another for he throttle body connections.

Measuring.jpg

The #4 and #3 thottle bodies went on easily. #2 went on with a little more pressure. Couldn't get #1 flush with the insulator until I started tapping it with a rubber mallet. Couldn't get to the #3 throttle body band measurement location so I checked the part of the bolt that stuck out from the nut. The lengths of all others matched so I'm sure it's good.

Final task for the throttle bodies was to sync them. I got a Motion Pro Carb Sync tool to perform the task. The left tube had a bubble in it that took over an hour and a half to shake out, of course split up by several beer breaks. (see bubble pic below) Man, that thing did not want to come out. Of course I induced the bubble but I'll not tell you the dumb thing I did to do it. :eek::

Bubble.jpg

Here's the sync result. :D Even after I hammered, well tapped, the thing on! Couldn't hear any leaks from the insulators.

Finnally.jpg

Time to put the gas tank on.
 

Igofar

Site Supporter
Joined
Jan 8, 2011
Messages
7,103
Location
Arizona
Bike
2023 Honda CT125A
By the looks of your clutch fluid in the picture, you are in need of a flush and bleed in the clutch system too.
.02
 
OP
OP
Reginald

Reginald

cyclepoke
Joined
Jan 5, 2008
Messages
727
Location
Georgetown, Tx
Bike
ST1300
STOC #
8898
By the looks of your clutch fluid in the picture, you are in need of a flush and bleed in the clutch system too.
.02
On the list. What you see in the window is clouding. The fluid is actually at the top of the window and is not especially dirty just a bit yellow like 2 year old brake fluid gets. Not sure how to clean out the clouding from that window though.

Going to do the brakes too.
 

Igofar

Site Supporter
Joined
Jan 8, 2011
Messages
7,103
Location
Arizona
Bike
2023 Honda CT125A
On the list. What you see in the window is clouding. The fluid is actually at the top of the window and is not especially dirty just a bit yellow like 2 year old brake fluid gets. Not sure how to clean out the clouding from that window though.

Going to do the brakes too.
Don't trust the window, open the unit up and check for moisture on the rubber, and sludge laying on the bottom. If the window has faded over the years, you can't do anything about that, however, you can get yourself a cotton pipe cleaner and slip it into one of the holes between the glass and the chrome plate and scrub the plate like new again.
 
OP
OP
Reginald

Reginald

cyclepoke
Joined
Jan 5, 2008
Messages
727
Location
Georgetown, Tx
Bike
ST1300
STOC #
8898
Don't trust the window, open the unit up and check for moisture on the rubber, and sludge laying on the bottom.
That's exactly what I did, that's how I new the color of the fluid. No moisture, no sludge, just that dirty window. Still in need of flush. Thanks for the tip with the pipe cleaner.
 
OP
OP
Reginald

Reginald

cyclepoke
Joined
Jan 5, 2008
Messages
727
Location
Georgetown, Tx
Bike
ST1300
STOC #
8898
A 7mm open-end wrench works for that, too.
Only problem was with that was the #3 body band. Couldn't get to it, its hidden right under the edge of the throttle body casing, with a bunch of unmovable stuff in front of it. Ended up using the piece of plastic to measure the bolt from the end of the nut and comparing to the other three. #1, #2, and #4 bolt ends matched in length when tightened, so I felt safe with the method. So if #3 is a mm shorter or longer, I'm still good.
 
Top Bottom