Finding a Tire Leak

Joined
May 6, 2016
Messages
21
Location
Oakhurst CA
Bike
2003 Silver ST 1300
STOC #
8917
I installed new valves on both tires. I used a spray bottle with soapy water to check for leaks.
They looked like they were holding air. I remounted the tires. A few days later I checked the
pressure in the rear and it was down a few pounds. I thought I did not tighten the nut on the
valve properly or it was leaking around the bead because I did not know to clean them before
resetting the bead.
I was not confident with using a spray bottle to find a slow leak. I came up with this tire trough.
I used it without removing the tire. It worked beautifully, and it was easy to make and use.
The height is 7 inches. Tall enough to get the valves completely submerged.
The size of the storage bin was perfect. Also very important that the container be fairly flexible
so it doesn't crack while you're trying to wedge it under the tire.
Obviously, use the center stand so the rear wheel is off the ground. Add some weight on the
back to lift and check the front tire. I did not find an obvious leak. I tightened and loosened
and re-tightened the valve core and the tire is holding air fine now.


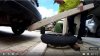
Also this method to break the bead works great. I used some clamps to keep the tire out of the way so I could install
the new valves. The bead breaking pic is from this very useful YouTube Vid.

https://www.youtube.com/watch?v=DmhwHqRWe_M
 

Attachments

Last edited:
Joined
Sep 4, 2013
Messages
8,180
Location
Cleveland
Bike
2010 ST1300
The wire tie method of collapsing the tire does not work to well on some rigid carcass tires like the Pirelli Angel GT or the Michelin PR4 (so I've been told for the latter). These tires are so hard to flex that you would need to be a gorilla to get the beads together. I tried this on my rear Angel and was unable to budge it by hand.
 

Mellow

Joe
Admin
Joined
Dec 1, 2004
Messages
18,880
Age
60
Bike
'21 BMW R1250RT
2024 Miles
000540
The wire tie method of collapsing the tire does not work to well on some rigid carcass tires like the Pirelli Angel GT or the Michelin PR4 (so I've been told for the latter). These tires are so hard to flex that you would need to be a gorilla to get the beads together. I tried this on my rear Angel and was unable to budge it by hand.
If that's the case then you'd need 3 gorillas for the Bridgestone Battleaxe tires ... lol... even with a tire changer those sidewalls are a hassle...
 
Joined
Sep 4, 2013
Messages
8,180
Location
Cleveland
Bike
2010 ST1300
If that's the case then you'd need 3 gorillas for the Bridgestone Battleaxe tires ... lol... even with a tire changer those sidewalls are a hassle...
Ok, so we have three tires that do not flex easily permitting the wire tie method of mounting. Just out of curiosity, what tires lend themselves to this method (i.e. using the wire ties to compress the tire and allow easy mounting)?

I'm not about to select a tire based on ease of mounting when handling and wet pavement performance are paramount, but that video makes tire changing look so easy...it makes me pause.
 
OP
OP
todddra
Joined
May 6, 2016
Messages
21
Location
Oakhurst CA
Bike
2003 Silver ST 1300
STOC #
8917
The tire he is mounting in the video is a PR4 GT. I have not used the Zip Tie method to remove or install a tire from a rim. I can imagine I may need to use a clamp to squeeze the 2 beads together before tightening a Zip Tie around the tire.
I may ultimately be unsuccessful doing this, but I will certainly take a shot at it. I did use the balancing method shown in the video. I believe it worked to balance the tire. Obviously, you need a
good size level to set the rails that the tire sits on.
 
Last edited:

Reginald

cyclepoke
Joined
Jan 5, 2008
Messages
727
Location
Georgetown, Tx
Bike
ST1300
STOC #
8898
Michelin PR4 (so I've been told for the latter)
Actually, I have no problem with the PR4 GT using the zip tie method. Somewhere in the forum I've posted PICS. My problem is scratching the rim getting them off! Putting them on is easy, I squeeze beads together by hand. Gives me a chance to really clean up the inside of the rim and helps hold air longer. The shops don't clean the inside so well and I had to add air every other day when they put the tire on. When I put the tire on it holds for 6 days; but, I also have BikeMaster metal valve stems which helps.
 
Joined
May 30, 2007
Messages
1,386
Age
72
Location
Grand Junction, Colo.
Bike
92 ST1100
The tire he is mounting in the video is a PR4 GT. I have not used the Zip Tie method to remove or install a tire from a rim. I can imagine I may need to use a clamp to squeeze the 2 beads together before tightening a Zip Tie around the tire.
I may ultimately be unsuccessful doing this, but I will certainly take a shot at it. I did use the balancing method shown in the video. I believe it worked to balance the tire. Obviously, you need a
good size level to set the rails the tire sits on.
Imagine that'll work, but better yet, go to a local motorcycle dealer and buy an 8oz. bottle of Ride-On. With bead seated from airing up, remove valve stem and add 4oz. each to front and back. Air tire up, go ride and forget about it;). Actually, Ride-On balances tire, plugs any leak immediately, and causes tire to run cooler. Majority of bike shops use it instead of weights. Have seen it demonstrated locally, with a long 1"x6" full of nails the full length, a sport bike run over it the full length with several punctures. After completing the demo. test, tire pressure had only dropped 2psi! Myself, have been totally impressed with balance results, so when I had new tires installed on both my ST and Yammy XS1100Venturer, this product was used. After any tire removal, just wipe it out of tire with a rag. Just an option for all to seriously consider, as bike shops have been using this instead of weight balancing for some 7+yrs. now;):).
 
Last edited:
Joined
Jul 28, 2007
Messages
3,142
Location
finger lakes ny
Bike
1999 ST1100
STOC #
7959
Go to a local motorcycle dealer and buy an 8oz. bottle of Ride-On. Just an option for all to seriously consider, as bike shops have been using this instead of weight balancing for some 7+yrs. now
Not anywhere around here Brant. Most have never heard of it.

I've used it for my big trips, as an 'insurance policy' when I'm a couple thousand miles from home.
 
Joined
May 30, 2007
Messages
1,386
Age
72
Location
Grand Junction, Colo.
Bike
92 ST1100
Not anywhere around here Brant. Most have never heard of it.

I've used it for my big trips, as an 'insurance policy' when I'm a couple thousand miles from home.
Interesting to hear Dean. Good that your at least aware of it....and yes, awesome insurance!.......specially when 200mi. from nowhere, or heaven forbid, an instant flat on front tire while rollin' at 80mph cross country on the interstate:eek:! BTW, VERY commomly used out my direction and all the way west to Caly:).
 
Last edited:
Joined
Sep 4, 2013
Messages
8,180
Location
Cleveland
Bike
2010 ST1300
Actually, I have no problem with the PR4 GT using the zip tie method.
I posted a comment in another thread about how stiff my Angel GT rear tire was last summer, and I thought someone responded and said the PR4 was also a very stiff* tire. I must have mis-remembered.

*Meaning I could not compress the beads together to mount on the rim using the zip tie method.
 

BakerBoy

It's all small stuff.
Joined
Jan 31, 2008
Messages
5,446
Location
Golden, Colorado
STOC #
1408
In my experience, the Michelin PR's are the easiest tire to mount of any brand/model as they've the most flexible carcass (which probably gives a hint as to why they can cup easily if pressure isn't maintained).

But back to Todd's 1st post ... did you find a leak with the water bath method?
 
OP
OP
todddra
Joined
May 6, 2016
Messages
21
Location
Oakhurst CA
Bike
2003 Silver ST 1300
STOC #
8917
Imagine that'll work, but better yet, go to a local motorcycle dealer and buy an 8oz. bottle of Ride-On. With bead seated from airing up, remove valve stem and add 4oz. each to front and back. Air tire up, go ride and forget about it;). Actually, Ride-On balances tire, plugs any leak immediately, and causes tire to run cooler. Majority of bike shops use it instead of weights. Have seen it demonstrated locally, with a long 1"x6" full of nails the full length, a sport bike run over it the full length with several punctures. After completing the demo. test, tire pressure had only dropped 2psi! Myself, have been totally impressed with balance results, so when I had new tires installed on both my ST and Yammy XS1100Venturer, this product was used. After any tire removal, just wipe it out of tire with a rag. Just an option for all to seriously consider, as bike shops have been using this instead of weight balancing for some 7+yrs. now;):).
I've heard of the goop to put in tires to seal punctures. I used it on my inner tubes on my bike as a kid. I thought it was messy and sometimes did not work.
I've been looking into Ride-on and have heard good things about it. I did not know the goop balances the tire also. If it will prevent a flat/puncture in the contact
area of the tire, that is certainly worth a try. Thanks for mentioning it.
 
Last edited:
OP
OP
todddra
Joined
May 6, 2016
Messages
21
Location
Oakhurst CA
Bike
2003 Silver ST 1300
STOC #
8917
In my experience, the Michelin PR's are the easiest tire to mount of any brand/model as they've the most flexible carcass (which probably gives a hint as to why they can cup easily if pressure isn't maintained).

But back to Todd's 1st post ... did you find a leak with the water bath method?
Well. sort of....Is there such a thing as a leak happening only when you ride while the tires are hot and the pressure goes up?
In my case I did not see any bubbles with the tire in the water. When I took the valve cap off a couple bubbles came out, so I
loosened and then tightened the core and that seems to have stopped abnormal air loss.
 

BakerBoy

It's all small stuff.
Joined
Jan 31, 2008
Messages
5,446
Location
Golden, Colorado
STOC #
1408
Well. sort of....Is there such a thing as a leak happening only when you ride while the tires are hot and the pressure goes up?
In my case I did not see any bubbles with the tire in the water. When I took the valve cap off a couple bubbles came out, so I
loosened and then tightened the core and that seems to have stopped abnormal air loss.
Any poor-sealed bead should mostly seal up with some riding and warmth. When warmed up and flexed slightly (during riding), the rubber will become more pliant and better/almost seal a spot around the rim that may have been slowly seeping air. Best practice is to ensure clean rim bead areas before mounting any tire. I use scotchbrite pads on the rim where the rubber meets rim--it is always amazing how much tire goo, rubber scale, and 'dirt' comes off (of course, I don't scrub so hard as to remove rim paint).

Good catch on the valve core ... I've been surprised a number of times by leaky valve stems. A good valve cap helps slow down the leak and it can take days or weeks to see just a couple psi drop in the tire.

I see from your pictures in post #1 that you're using the Arriette-type 90* valve stems. From my personal experience, these more easily leak around the core. There's something not quite right about their internal machining which allows the core to be inserted too far without feeling appropriate resistance when threading it in--mine did that frequently enough that I learned to stop turning in the core when the core 'tip' was flush with the exposed end of the valve stem. I always checked them with soapy water over the end of the valve stem once the core was inserted--some still leaked and required a new valve core to stop the air leak.
 

Reginald

cyclepoke
Joined
Jan 5, 2008
Messages
727
Location
Georgetown, Tx
Bike
ST1300
STOC #
8898
I posted a comment in another thread about how stiff my Angel GT rear tire was last summer, and I thought someone responded and said the PR4 was also a very stiff* tire. I must have mis-remembered.
You probably remember right. Some folks have trouble getting the beads together. Depends on the the hand grip. The PR4 is one of the easier tires to zip tie onto a rim. I have a BT and wouldn't even try it. I was offering an alternative view point so the user could decide for himself.

I see a real advantage in being able to get the inside of those rims clean. My tires hold air for 6 day's (< 85F), except when I ride in very hot (near or above 100's) weather, then it's 3 day's. All the shops I have ever used left some built up black stuff on the rims that would slowly seep air. My last experience I had to add air daily!
 

Reginald

cyclepoke
Joined
Jan 5, 2008
Messages
727
Location
Georgetown, Tx
Bike
ST1300
STOC #
8898
Best practice is to ensure clean rim bead areas before mounting any tire. I use scotchbrite pads on the rim where the rubber meets rim--it is always amazing how much tire goo, rubber scale, and 'dirt' comes off (of course, I don't scrub so hard as to remove rim paint).
:plus1:

I see from your pictures in post #1 that you're using the Arriette-type 90* valve stems. From my personal experience, these more easily leak around the core.
+1 I installed the Arriette-type and it leaked badly. I've since installed the BikeMaster valve stems which have been solid. https://www.revzilla.com/motorcycle/bike-master-90-degree-valve-stems
 
OP
OP
todddra
Joined
May 6, 2016
Messages
21
Location
Oakhurst CA
Bike
2003 Silver ST 1300
STOC #
8917
Any poor-sealed bead should mostly seal up with some riding and warmth. When warmed up and flexed slightly (during riding), the rubber will become more pliant and better/almost seal a spot around the rim that may have been slowly seeping air. Best practice is to ensure clean rim bead areas before mounting any tire. I use scotchbrite pads on the rim where the rubber meets rim--it is always amazing how much tire goo, rubber scale, and 'dirt' comes off (of course, I don't scrub so hard as to remove rim paint).

Good catch on the valve core ... I've been surprised a number of times by leaky valve stems. A good valve cap helps slow down the leak and it can take days or weeks to see just a couple psi drop in the tire.

I see from your pictures in post #1 that you're using the Arriette-type 90* valve stems. From my personal experience, these more easily leak around the core. There's something not quite right about their internal machining which allows the core to be inserted too far without feeling appropriate resistance when threading it in--mine did that frequently enough that I learned to stop turning in the core when the core 'tip' was flush with the exposed end of the valve stem. I always checked them with soapy water over the end of the valve stem once the core was inserted--some still leaked and required a new valve core to stop the air leak.

Thanks for the heads up and the confirmation about the Ariete valves. I bought them because "everyone" said they were the best. I thought they were made in Italy by artisan craftsmen who devoted their lives to producing a few perfect valves!
 
Last edited:
Joined
Sep 4, 2013
Messages
8,180
Location
Cleveland
Bike
2010 ST1300
Thanks for the heads up and the confirmation about the Ariete valves. I bought them because "everyone" said they were the best. I thought they were made in Italy by artisan craftsmen who devoted their lives to producing
a few perfect valves!
Lol. Give us a break*. Very very few things are made today by artisan craftsmen who devote their lives to producing a few perfect anythings. Do I detect a hair of cynicism? And yes, I'm very skeptical of most things. The few craftsmen out there today are custom knifemakers who have not gone over to mass production and some gunsmiths in the same position. Artisan jewelry makers too. Many artists, as well as crafts people, though not all. You have to find someone who, in the words of a late friend, "defines himself (or herself) by their work".

*Don't misunderstand, I'm not dunning your comment.
 
Top Bottom