
- Joined
- Mar 18, 2006
- Messages
- 2,824
- Age
- 70
- Location
- Ilkley, W Yorkshire, UK
- Bike
- 2013 ST1300 A9
- 2024 Miles
- 000679
- STOC #
- 2570
There were quite a few modifications made to the ST1300 with the introduction of the 2008 model. One of the most exciting of these was the change in the design of the front brake callipers. On pre-2006 bikes, the pad pins had a hex socket which required an allen key to insert and remove the pin. The manual indicated a torque of 18Nm or 13ft/lb, and these pins seemed to tighten with time and the metal seemed to soften. Use a pad pin more than once, and there was a real danger that the hex socket would round off. The simple job of replacing a set of pads instantly became a nightmare. I always had spare new pad pins in stock. Any sign of rounding of the hex socket, I'd fit a new one.
So looking over a new 2009 model, I spotted the new pad pins which have a protruding hex bolt head fitting rather than a sunken hex socket. Much better. So, could these new pad pins be used on my older ST1300A6, and could they also be used on the rear? All ST1300s have the same older style hex socket on the rear calliper.
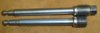
The picture shows the two styles of pad pin laid side by side. The top pin is the version for 2008 and later front calipers - this is part number 45215-MBT-D51.
Below it is the pin for the ST1300A6 part number 45215-MAJ-G41.
Would the new variety fit in all three 3 calipers of my ST1300A6 ?
Well the answer is - sort of - but they are not quite right.
Normally, the pin is tightened against the shoulder next to the thread . The narrow end simply passes through a larger hole and is supported by the rubber o-ring, which fits in that groove at the narrow end and which prevents the end of the pin from oscillating.
The issue with using the new pin in the older style calipers is that the shoulder near to the thread never gets to locate properly in the caliper. This is because the shoulder at the narrow end of the pin meets the other side of the caliper first.
See the photo below showing the shoulder in both halves of a brake calliper that has been separated.
As the pad pin is tightened, the shoulder near the thread never touches bottom. The shoulder at the other end tries to push the two halves of the caliper apart. See the photo below which shows the two halves of the calliper without the joining bolts in place. As the pad pin is tightened, the narrow shoulder hits bottom first. As i continue tightening until the shoulder near to the thread seats, the opposite half of the caliper is pushed away leaving a considerable gap.
But with the caliper joining bolts in place, you wouldn't know that this was happening. The end that is supposed to be properly seated is simply free to rattle around in its thread.

So I experimented further with a new pin. I ground down the shoulder at the narrow end until it was in the same position as the one on the old pin. I did a test fit in the rear calliper and discovered that it would be much easier to remove the pin with my socket set - without having to swing the exhaust out of the way. When fitted, the end of the pin (with the rubber seal on it) protrudes a tiny fraction, but this appeared to be of no consequence that I could see. The rubber ring still sealed and supported the end of the pin. And the pin seated properly on the shoulder near the thread without trying to separate the two halves of the calliper.
It seems to be a good solution - but this is a safety critical component - although it carries very little load, it keeps the pads in the callipers. Do I understand the mechanics of this well enough to risk replacing my old style with my modified new style ? Have I heat-hardened the pin by grinding it, for example ? I don't think so, but I am no expert..
All I can say for certain is that to put an unmodified newer style pin into an older style calliper is probably not a good idea, as the pin does will not seat properly.
But I carried out this experiment in 2012. I modified 3 pad pins for my ST1300 A6 and fitted them. When I sold the A6 I replaced the original pins.
My new ST1300A9 had the new style of pad pins fitted at the front. The rear was the old style, so I replaced it with one of my modified pins. 10 years and 56,000 miles later, the same pin is still in use and still looks to be in good shape. I continue to use the recommended torque settings - and I have a socket and torque wrench which just fits in the gap between pad pin and the racket supporting the exhaust.
Not a recommendation or advice. Just my observations.
So looking over a new 2009 model, I spotted the new pad pins which have a protruding hex bolt head fitting rather than a sunken hex socket. Much better. So, could these new pad pins be used on my older ST1300A6, and could they also be used on the rear? All ST1300s have the same older style hex socket on the rear calliper.
The picture shows the two styles of pad pin laid side by side. The top pin is the version for 2008 and later front calipers - this is part number 45215-MBT-D51.
Below it is the pin for the ST1300A6 part number 45215-MAJ-G41.
Would the new variety fit in all three 3 calipers of my ST1300A6 ?
Well the answer is - sort of - but they are not quite right.
Normally, the pin is tightened against the shoulder next to the thread . The narrow end simply passes through a larger hole and is supported by the rubber o-ring, which fits in that groove at the narrow end and which prevents the end of the pin from oscillating.
The issue with using the new pin in the older style calipers is that the shoulder near to the thread never gets to locate properly in the caliper. This is because the shoulder at the narrow end of the pin meets the other side of the caliper first.
See the photo below showing the shoulder in both halves of a brake calliper that has been separated.
As the pad pin is tightened, the shoulder near the thread never touches bottom. The shoulder at the other end tries to push the two halves of the caliper apart. See the photo below which shows the two halves of the calliper without the joining bolts in place. As the pad pin is tightened, the narrow shoulder hits bottom first. As i continue tightening until the shoulder near to the thread seats, the opposite half of the caliper is pushed away leaving a considerable gap.
But with the caliper joining bolts in place, you wouldn't know that this was happening. The end that is supposed to be properly seated is simply free to rattle around in its thread.
So I experimented further with a new pin. I ground down the shoulder at the narrow end until it was in the same position as the one on the old pin. I did a test fit in the rear calliper and discovered that it would be much easier to remove the pin with my socket set - without having to swing the exhaust out of the way. When fitted, the end of the pin (with the rubber seal on it) protrudes a tiny fraction, but this appeared to be of no consequence that I could see. The rubber ring still sealed and supported the end of the pin. And the pin seated properly on the shoulder near the thread without trying to separate the two halves of the calliper.
It seems to be a good solution - but this is a safety critical component - although it carries very little load, it keeps the pads in the callipers. Do I understand the mechanics of this well enough to risk replacing my old style with my modified new style ? Have I heat-hardened the pin by grinding it, for example ? I don't think so, but I am no expert..
All I can say for certain is that to put an unmodified newer style pin into an older style calliper is probably not a good idea, as the pin does will not seat properly.
But I carried out this experiment in 2012. I modified 3 pad pins for my ST1300 A6 and fitted them. When I sold the A6 I replaced the original pins.
My new ST1300A9 had the new style of pad pins fitted at the front. The rear was the old style, so I replaced it with one of my modified pins. 10 years and 56,000 miles later, the same pin is still in use and still looks to be in good shape. I continue to use the recommended torque settings - and I have a socket and torque wrench which just fits in the gap between pad pin and the racket supporting the exhaust.
Not a recommendation or advice. Just my observations.
Last edited: