CYYJ
Michael
I agree with @BakerBoy , in fact, I think his analysis is absolutely dead-on the money.
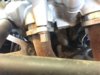
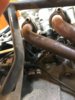
At some time in the past, someone took the camshaft cover off to adjust valve clearances, and they didn't put it back on carefully. As a result, you have oil leaks from several places where the valve cover mates up with the top of the block. One of these locations is at the forward end of the valve cover, the other is, as @BakerBoy pointed out, from a spark plug well drain hole.
Fortunately, the fix is "fairly easy". You just need to take the valve cover off and then re-install it in accordance with the instructions in the Service Manual.
Here are two photos that will give you a better idea of what you are dealing with.
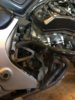
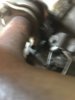
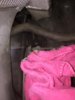
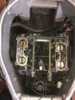
The photo below shows the rubber gasket that goes around the bottom of the camshaft cover. It is reusable, but the Service Manual calls for adding a little bit of high temperature tolerant room temperature vulcanization (RTV) sealant to the two half-moons you see at the extreme right of the photo. My guess is that your gasket has been permanently damaged (deformed) as a result of not being installed properly, so you might want to plan on getting a new gasket.
Gasket Around Camshaft Cover
RTV Sealant Application Area
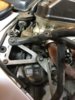
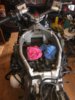
The left side camshaft cover can be a bit of a pain to remove and replace - if I recall correctly, there is very limited clearance between the forward upper corner of the cover and either the frame of the bike or various hoses & cables that run by that area. I suspect that the previous owner was having difficulty properly seating the camshaft cover because of this interference, and as a result, he tried to slide it upwards and inwards, and in the process of sliding it the gasket pulled away from the camshaft cover.
When I did my valve adjustment, I had the bike disassembled in other areas (the upper fuel tank was lifted and tilted, and I had removed the upper and lower components of the airbox). This made it possible for me to move the interfering cables & hoses out of the way and properly seat the left side camshaft cover. It will take you about an extra 2 to 3 hours of work to remove the upper and lower airbox pieces, but I suggest you do this because the problem you have now implies that it was not possible in the past to correctly reinstall the left camshaft cover due to various other components being in the way up in the top forward corner of the cover.
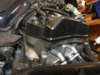
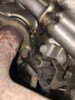
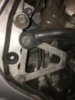
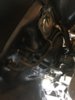
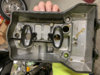
The photo below shows the top of the cylinder head when the camshaft cover has been removed. This picture is of the right side of the bike, your problem is on the left. You can see how on the right side of the bike (the 'easy' side), I had to pull a hose away in order to allow me to drop the camshaft cover straight down over the cams. This interference problem is worse on the left side.
Right Side of Engine, Camshaft Cover Removed
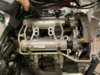
Lastly, like @BakerBoy said, DO NOT OVERTORQUE THE BOLTS HOLDING THE CAMSHAFT COVER IN PLACE! If you do, they will strip out the threaded holes that they screw into in a heartbeat. They are steel screws that fit into an aluminum casting. The specified torque value is very, very low. Use a torque wrench, and do not be tempted to give them that "extra snug up", or you will regret it.
Michael
At some time in the past, someone took the camshaft cover off to adjust valve clearances, and they didn't put it back on carefully. As a result, you have oil leaks from several places where the valve cover mates up with the top of the block. One of these locations is at the forward end of the valve cover, the other is, as @BakerBoy pointed out, from a spark plug well drain hole.
Fortunately, the fix is "fairly easy". You just need to take the valve cover off and then re-install it in accordance with the instructions in the Service Manual.
Here are two photos that will give you a better idea of what you are dealing with.
The photo below shows the rubber gasket that goes around the bottom of the camshaft cover. It is reusable, but the Service Manual calls for adding a little bit of high temperature tolerant room temperature vulcanization (RTV) sealant to the two half-moons you see at the extreme right of the photo. My guess is that your gasket has been permanently damaged (deformed) as a result of not being installed properly, so you might want to plan on getting a new gasket.
Gasket Around Camshaft Cover
RTV Sealant Application Area
The left side camshaft cover can be a bit of a pain to remove and replace - if I recall correctly, there is very limited clearance between the forward upper corner of the cover and either the frame of the bike or various hoses & cables that run by that area. I suspect that the previous owner was having difficulty properly seating the camshaft cover because of this interference, and as a result, he tried to slide it upwards and inwards, and in the process of sliding it the gasket pulled away from the camshaft cover.
When I did my valve adjustment, I had the bike disassembled in other areas (the upper fuel tank was lifted and tilted, and I had removed the upper and lower components of the airbox). This made it possible for me to move the interfering cables & hoses out of the way and properly seat the left side camshaft cover. It will take you about an extra 2 to 3 hours of work to remove the upper and lower airbox pieces, but I suggest you do this because the problem you have now implies that it was not possible in the past to correctly reinstall the left camshaft cover due to various other components being in the way up in the top forward corner of the cover.
The photo below shows the top of the cylinder head when the camshaft cover has been removed. This picture is of the right side of the bike, your problem is on the left. You can see how on the right side of the bike (the 'easy' side), I had to pull a hose away in order to allow me to drop the camshaft cover straight down over the cams. This interference problem is worse on the left side.
Right Side of Engine, Camshaft Cover Removed
Lastly, like @BakerBoy said, DO NOT OVERTORQUE THE BOLTS HOLDING THE CAMSHAFT COVER IN PLACE! If you do, they will strip out the threaded holes that they screw into in a heartbeat. They are steel screws that fit into an aluminum casting. The specified torque value is very, very low. Use a torque wrench, and do not be tempted to give them that "extra snug up", or you will regret it.
Michael
Last edited: