
St1100 Total Restoration
- Thread starter Error85
- Start date
Another thing,a side going project..
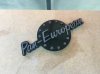
Thinking about the body color brings me the idea of choosing between stickers or badges. I prefer pan european badge. The problem is they are way expensive and hard to find. I cannot buy from ebay anymore because paypal is banned here due to tax issues with government etc..
Anyway it is an excuse for me to test those 3d printers")
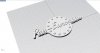
Based on the sticker on the top i modeled the text(btw i am an industrial designer). I tried to figure out proportions from the badge..

But there was a problem with the print. See those marks.. There are too many,too deep The guy said there was an issue with his printer and offered me to print it again.I was going to say okay but then i noticed that the stars on top are smaller then the bottom,something was wrong with my drawing too.Told him to wait until i model another one. I took them anyway..
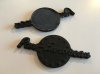
Painted one to see how it would look and how long it would last
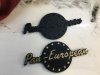
Well it is not that bad but definitely can be better. Cost 20€ for printing both(didn't pay),4€ for spray paint. I left the painted one outdoor under the sun and rain to see how it will react..
I was wondering if anyone can give me the dimensions(in mm) on the picture? Want to give another try..
Thinking about the body color brings me the idea of choosing between stickers or badges. I prefer pan european badge. The problem is they are way expensive and hard to find. I cannot buy from ebay anymore because paypal is banned here due to tax issues with government etc..
Anyway it is an excuse for me to test those 3d printers
Based on the sticker on the top i modeled the text(btw i am an industrial designer). I tried to figure out proportions from the badge..
But there was a problem with the print. See those marks.. There are too many,too deep The guy said there was an issue with his printer and offered me to print it again.I was going to say okay but then i noticed that the stars on top are smaller then the bottom,something was wrong with my drawing too.Told him to wait until i model another one. I took them anyway..
Painted one to see how it would look and how long it would last
Well it is not that bad but definitely can be better. Cost 20€ for printing both(didn't pay),4€ for spray paint. I left the painted one outdoor under the sun and rain to see how it will react..
I was wondering if anyone can give me the dimensions(in mm) on the picture? Want to give another try..
Last edited:
You sir are a restoration GOD!Used my home made sandblaster box
As you should. (and so do I.) There's no small motorcycle maintenance Zen involved in getting down to the need sub-atomic level of restoration.Error8 said:well..i feel joy just looking at them
I for one will live vicariously through the well-documented resto journey.
You sir are a restoration GOD!
As you should. (and so do I.) There's no small motorcycle maintenance Zen involved in getting down to the need sub-atomic level of restoration.
I for one will live vicariously through the well-documented resto journey.
Thank you very much for your support. What can i say, i like detailing.
I don't like leaving anything behind. It is not just about the look but the function also. But there is risk involved. You know the saying 'If it ain't broke don't fix it',well it is a risk i am willing to take. It is not only about money,broken parts or fixing things .Some people say 'why are you working on this buy a new one' or ' have someone to do it for you'.. It is all about perspective.I do it because it is kind of a holiday to my mind.When i work on this kind of stuff somehow i feel relaxed and satisfied. What ever the final result is, I just like doing it. I believe some here feel the same way and maybe that is why we are all here..(got a little emotional there
) I am probably one of the youngest here(32), just sharing what i do and i still got so much to learn from you all.Anyway, you are now one of the reasons for me to continue to do what i do.. Thanks again :yes:
Error85...
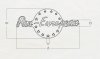
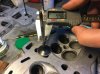
A = 133mm
B = 63mm
C = 7mm
D = 14mm
One thing - both of your 'n's in 'Pan European' have rather long tails. Following the 'a's, my badge 'n's almost look like italic 'm's without so much of a curl that you show in your picture...
...In fact, you show a black/gold badge just like I measured....
A = 133mm
B = 63mm
C = 7mm
D = 14mm
One thing - both of your 'n's in 'Pan European' have rather long tails. Following the 'a's, my badge 'n's almost look like italic 'm's without so much of a curl that you show in your picture...
...In fact, you show a black/gold badge just like I measured....
Last edited:
Thank you Roger. I will model with your dimensions. Yes, letters are not original i copied from that sticker ,will make shorter tails. When i am done, i can share the .stl file(for 3d printing) if anyone needs it. Thinking about designing custom mountings later.Error85...
A = 133mm
B = 63mm
C = 7mm
D = 14mm
One thing - both of your 'n's in 'Pan European' have rather long tails. Following the 'a's, my badge 'n's almost look like italic 'm's without so much of a curl that you show in your picture...
...In fact, you show a black/gold badge just like I measured....
Made me tear up just a little. Thank you for that.Error85 said:It is all about perspective.I do it because it is kind of a holiday to my mind.When i work on this kind of stuff somehow i feel relaxed and satisfied. What ever the final result is, I just like doing it.
Great thread I just found here! Congrats on the new ride and good luck with the restoration! When I bought mine just over 2 years ago, it had been sitting in a barn with half the panels off it. I needed a full fuel/carb system overhaul, but not nearly as much work as you're tackling -- impressive work!
Last edited:
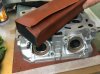
This weeks update..
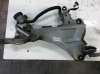
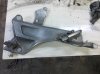
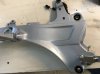
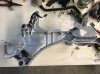
Finished working on rest of the brake parts..
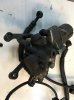
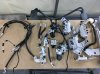
%90 of brake parts finished..
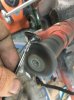
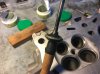
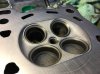
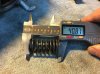
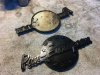
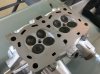
Meanwhile another cargo arrived with valve stem seals in it,moving on with the heads..This will be my first valve job.
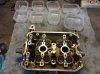
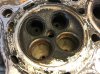

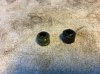
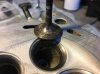
Valves and seals after 167.000kms you can guess which one is intake or exhaust
Finished working on rest of the brake parts..
%90 of brake parts finished..
Meanwhile another cargo arrived with valve stem seals in it,moving on with the heads..This will be my first valve job.
Valves and seals after 167.000kms you can guess which one is intake or exhaust
Last edited:
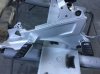
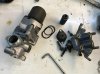
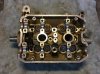
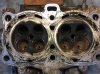
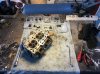
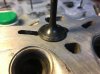
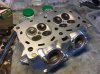
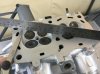
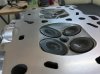
Soda blasted whole head,wire wheel around ports..2000 grid wet sanding on head surface just to clean it up..
Cleaning intake valves were easy but can't say the same for the exhaust valves. It was a real pain to clean thoose. Tried wd40 and solvent before wire brushing them but didn't change much.Just kept on wire wheel..
Lapping heads by hand; i used engine oil around valve stem to reduce friction. Started thick compound and moved to fine. You feel it in your hand,gets rough at first and goes smooth. This process takes around 15mins each a little more with exhaust valves.Checked all measurements with the service manual, every thing was with in specifications..
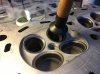
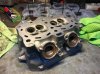
After pressure washed , painted with heat resistant sprey paint..
Cleaning intake valves were easy but can't say the same for the exhaust valves. It was a real pain to clean thoose. Tried wd40 and solvent before wire brushing them but didn't change much.Just kept on wire wheel..
Lapping heads by hand; i used engine oil around valve stem to reduce friction. Started thick compound and moved to fine. You feel it in your hand,gets rough at first and goes smooth. This process takes around 15mins each a little more with exhaust valves.Checked all measurements with the service manual, every thing was with in specifications..
After pressure washed , painted with heat resistant sprey paint..
Last edited:
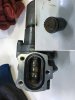
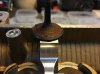
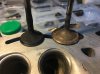
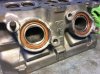
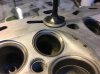
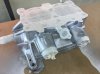
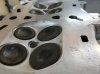
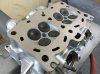
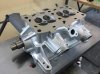
Assembly..Cleaned everything with caliper cleaner,measurements done.Painted side on the springs faces up. I was not sure about using oil or grease on seals,didn't say on the manual (Haynes) but i used drop of engine oil anyway.I put the valve half way in the guide,put the seal through the valve using valve as a guide to keep it straight and insert the seal to its place by rotating with socket until it click..As you see in the picture i carved one side of an old socket (14mm) and i used a clamp to secure the spring in place same as removing them..
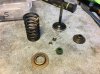
And it is done..
It is a hard job especially if you don't have right tools and you are working alone. Did the lapping by hand.In total it took more than 6 hours on one side only. But i got the hang of it should take shorter on the other side.
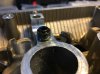
No major problems except broken water pipe.While wire brushing, it just broke in to 2 in my hands..
Anyway I am generally happy with the results, at least it is better than before.
If you see something wrong or missing please tell me before it is too late to undo.
And it is done..
It is a hard job especially if you don't have right tools and you are working alone. Did the lapping by hand.In total it took more than 6 hours on one side only. But i got the hang of it should take shorter on the other side.
No major problems except broken water pipe.While wire brushing, it just broke in to 2 in my hands..
Anyway I am generally happy with the results, at least it is better than before.
If you see something wrong or missing please tell me before it is too late to undo.
Last edited:
And about that badge..
Thanks to Roger i got the measurements for the badge and remodeled it with new letters. If any one needs it pm me your email and i will send .stl file(1.21mb) for 3d printing.
The proportions and print quality is much better than previous one. Made with abs and soaked with a chemical that makes it more flat and shiny.
Sanded the letters on a flat surface with 800 grid and then 1200 wet.
Painted with black, gold and finally acrylic clear coat.
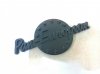

It looks way better than previous one and i am very happy with the final result.This definitely can be a substitute. I will decide whether putting it on or not when the time comes. I just have to see it on the painted bike first..
Thanks to Roger i got the measurements for the badge and remodeled it with new letters. If any one needs it pm me your email and i will send .stl file(1.21mb) for 3d printing.
The proportions and print quality is much better than previous one. Made with abs and soaked with a chemical that makes it more flat and shiny.
Sanded the letters on a flat surface with 800 grid and then 1200 wet.
Painted with black, gold and finally acrylic clear coat.
It looks way better than previous one and i am very happy with the final result.This definitely can be a substitute. I will decide whether putting it on or not when the time comes. I just have to see it on the painted bike first..
- Joined
- Oct 17, 2015
- Messages
- 1,959
- Location
- near Harrow, Ontario, Canada
- Bike
- '83 BMW R100RS
- STOC #
- 8870
Fantastic work Error - you are way out in front on this one IMO.
Pete
Pete
Very impressive Error! I wish I had the skills to do what you are doing but as someone said we will live vicariously through you! Keep up the good work! I will follow along and can't wait to see the end result. You are married to this bike!LOL!
Thank you for the support:yes:
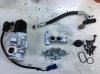
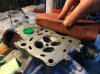
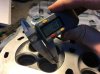
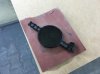
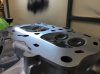
Forgot to mention..head resurfacing
Starting with 400grid taped on a glass surface

Moved to 800 then 1000 with long block, I also did 2000 grid wet sanding just to see
Checking time to time
Result..looking good to me
Forgot to mention..head resurfacing
Starting with 400grid taped on a glass surface
Moved to 800 then 1000 with long block, I also did 2000 grid wet sanding just to see
Checking time to time
Result..looking good to me
Patience, diligence, attention to detail! Excellent work.
Error : You are having way too much fun on this project !!
I hope those were new seals that you installed. And, how did you measure the valve guide clearance ??
BTW - I would have started with 200 and then ending with 320. The surface doesn't need to be like glass. Some say a bit of a rough surface is better than too smooth.
I usually use a 1/4" glass plate as my "flat surface". Works, OK I guess. I once brought a 2.2 L Chrysler head into the local machine shop to have the valves and seats ground and they said the head probably needs resurfacing, too. I told them I did that already, but they didn't think that was possible. They said they would check it and maybe resurface if it didn't pass the straight edge test. That made me nervous ( $$$ ). When I picked the head up, they wanted to know how I resurfaced the head since they couldn't even get a 1/2 thousandth feeler gauge between the head & straight edge.
Of course I'm not bragging. Just passing on some information so Posters can save a few $$ , doing this themselves. Others may be retired and on a fixed income, such as myself.
Also, if you have a vacuum source that you can measure, you can check the quality of the completed valve job by applying a vacuum to each port by using a flat plate with a rubber seal against each port side and check to verify a good vacuum can be held. That's the method used by Serdi machines.
Last edited:
...Wow...
- Joined
- Feb 5, 2005
- Messages
- 8,538
- Age
- 77
- Location
- Kingman, Arizona
- Bike
- 2000 ST1100 ABS TCS
- STOC #
- 004
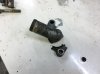
Those aluminum elbows on top of the heads are a common failure point, lots of leaks over the years. First time I did'em, I coudn't believe there was an o-ring in there.
Keep up the good work and keep us poSTed.
Keep up the good work and keep us poSTed.