Exquisite work!

St1100 Total Restoration
- Thread starter Error85
- Start date
Error : You are having way too much fun on this project !!
I hope those were new seals that you installed. And, how did you measure the valve guide clearance ??
BTW - I would have started with 200 and then ending with 320. The surface doesn't need to be like glass. Some say a bit of a rough surface is better than too smooth.
I usually use a 1/4" glass plate as my "flat surface". Works, OK I guess. I once brought a 2.2 L Chrysler head into the local machine shop to have the valves and seats ground and they said the head probably needs resurfacing, too. I told them I did that already, but they didn't think that was possible. They said they would check it and maybe resurface if it didn't pass the straight edge test. That made me nervous ( $$$ ). When I picked the head up, they wanted to know how I resurfaced the head since they couldn't even get a 1/2 thousandth feeler gauge between the head & straight edge.
Of course I'm not bragging. Just passing on some information so Posters can save a few $$ , doing this themselves. Others may be retired and on a fixed income, such as myself.
Also, if you have a vacuum source that you can measure, you can check the quality of the completed valve job by applying a vacuum to each port by using a flat plate with a rubber seal against each port side and check to verify a good vacuum can be held. That's the method used by Serdi machines.
I bought original Honda seals from hondapartshouse. I asked for a friend of mine(mechanic) to come with his tools. Don't know the name in English ( a pen like tool with a ball on tip, you measure the radious?) and i need it once a year so don't have it also he is better with the measurement stuff.
About the grit i know some starts with 120 and finish with 400. I think many finish around 400. I remember when i did my v8 i started with 220. But this one is very small compared to a v8( my first bike project btw) so there should be less chance of warpage/ defect compared to a long one. As you already know the important thing is to make the surface as flat as possible with less grinding as possible. I checked the surface for scratches and warpage. Manual says 0.10 mm max and it was within the limits. Only a small lover spot between the chambers which is common. I think which grit you start depends on the surface's condition,the balance between how much grinding do you need and how fast you need it. I didn't need to go too deep so started with 400 to check,was going to move to a lower grit but then i noticed how soft the aluminum is and 400 was doing okay so kept at it. Around of 10 mins sanding lets say %80 was 400,%19 was 800 and that was it. The rest was my ummm..how do you say
")
That is a good idea with the vacuum check. Will try to do that with what i have. Thanks
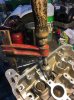
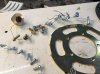
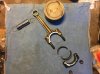
I used a similar setup on my bike when (long story short) a valve keeper dropped into the oil pain. I was able to get it back on with compressed air and some persistence without removing the head. Keep your old broken sockets, you never know when you might turn them into a tool.Assembly..Cleaned everything with caliper cleaner,measurements done.Painted side on the springs faces up. I was not sure about using oil or grease on seals,didn't say on the manual (Haynes) but i used drop of engine oil anyway.I put the valve half way in the guide,put the seal through the valve using valve as a guide to keep it straight and insert the seal to its place by rotating with socket until it click..As you see in the picture i carved one side of an old socket (14mm) and i used a clamp to secure the spring in place same as removing them..
https://photos.google.com/share/AF1QipOz4AfviyyfHaQ8jWvcGbsiqKrvIBl12CMvUX7xmejk7npKMPlUXIerwjbca540lg?key=bkY4MEM5QU11XzBNVTdhX0p1TG56TnM4bzI0Nk53
Last edited:
- Joined
- Nov 20, 2005
- Messages
- 9,512
- Location
- Cedar City, Utah
- Bike
- 12/04 ST 1300s
- 2024 Miles
- 000148
- STOC #
- 5901
Excellent write up and with pictures to boot! 
Looking good! Keep up the good work!
Looking good! Keep up the good work!
Error : Good to hear you replaced the valve stem seals, since you didn't mention it before. Also good to hear you measured the valve guide for wear by using a small-hole gauge. I have a set in my tool kit. They are cheap to buy ( "Cheap" is my middle name ). You simply adjust it to fit the widest part of the guide and then measure it with a micrometer. The only problem is if there is a lot of "bell-mouthing" , it's not practical to remove it from the guide without making it smaller than the diameter of the bell-mouth. But you can get a rough idea of the amount of bell-mouthing. Here is a link to get a better idea about what I'm talking about : https://en.wikipedia.org/wiki/Bore_gauge
BTW, Wholesale Tools has fairly good quality stuff at decent prices.
http://www.wttool.com/
http://tool.wttool.com/search?w=hole+gages
BTW, Wholesale Tools has fairly good quality stuff at decent prices.
http://www.wttool.com/
http://tool.wttool.com/search?w=hole+gages
Last edited:
gmast1100
Gettin old sux
- Joined
- Dec 26, 2008
- Messages
- 1,554
- Age
- 76
- Location
- Blairsville, GA
- Bike
- 2016 Kawasaki Versys
- STOC #
- 297
Very nice and involved job.
Where in Turkey do you live? I was stationed in Izmir in 1982-83.
Where in Turkey do you live? I was stationed in Izmir in 1982-83.
Dave.David
Rider
That's a lot of work man, I did that to a 78 CB750 K and a 82 GL1100 Interstate when I worked in a machine shop, but at my age and without a shop, wow, you are a better man. Can a ask your age?
Thank you for the pictures and write up, keep it going bud.
Thank you for the pictures and write up, keep it going bud.
Thanks. I live in IzmirVery nice and involved job.
Where in Turkey do you live? I was stationed in Izmir in 1982-83.
ı am guessing you were on a duty at the military base stationed here at the time?Sunday Rider
Site Supporter
Thanks so much for sharing your work with us. Appreciate all your effort and time to record this wonderful work.
Thank you. I am 32. It all started with a carting race that i won at the age of 17. Then built my own race car(fiat 124) to participate in domestic cups as an amateur.Then i participated in national cups with different race cars like renaultmotorsport clio cup car,honda type-r,fiat kit car.. raced professional for two years and won 2 championships,i was good at it. But unfortunatelly it was (and still) hard to do it as a profession here. Got some offers like racing in F3 for India.Long story short ,i quit.That's a lot of work man, I did that to a 78 CB750 K and a 82 GL1100 Interstate when I worked in a machine shop, but at my age and without a shop, wow, you are a better man. Can a ask your age?
Thank you for the pictures and write up, keep it going bud.
I don’t know where did i get the idea of restoring cars (probably from racing with them) but i know it makes me feel good. I am a handyman like my father.
Five years ago I built a small garage next to office and started working on a 1992 Range Rover Classic 3.9 then 1999 Dodge Durango 5.9 , a solar race car for universty,an electick bike etc.. I did the same job to all like i am doing to this bike now. Meditation.It is kind of a hobby to me now.I don’t know how long i can keep doing it and yes it may be an expensive hobby, i barely get my money back with almost no profit but when i build it from ground up and get to ride the thing it all worth in the end..
Yes!but when i build it from ground up and get to ride the thing it all worth in the end..
There are a lot of people here doing interesting stuff but I haven't seen a thread this intriguing since Miz built a 1/12 scale model of an ST1100. Another journey of rare attention to detail.
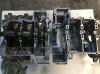
It has been two weeks since i ordered pistons,rings etc and they should be here around this week. So i started to get things ready for their arrival.
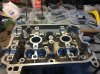
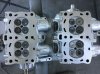
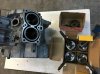
Before that i finished working on the heads and they are both ready.
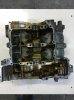
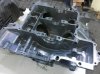
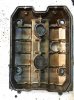
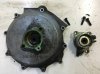
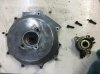
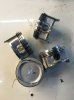
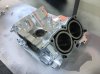
Cleaned main engine parts will paint them after machining..
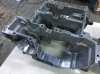
More detailing..
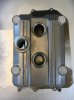
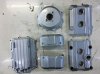
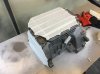
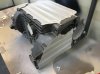
First i removed dirt and oil with grease remover and wire wheel then sanded with 400 grit for a smooth surface. Cleaned again with thinner and painted with heat resistant paint and clear coat. First time i clear coated engine parts.I have been reading about it some say it is okay some say it peels off after a year. I will have to see that myself to comment but i know painting is %90 prep and i think it should last longer if you do it right. I know they made heat resistant clears but i couldn't find any around here.
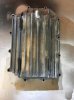
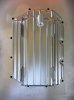
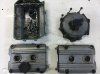
On head covers i used the same paint that i did on foot rest area so they should match with them and wheels.

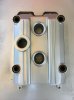
One thing i don't like is getting rid of old gaskets especially in small areas. Use wd40 or brake caliper cleaner to soften them but it is still a pain to me.
Result is not bad..
Before that i finished working on the heads and they are both ready.
Cleaned main engine parts will paint them after machining..
More detailing..
First i removed dirt and oil with grease remover and wire wheel then sanded with 400 grit for a smooth surface. Cleaned again with thinner and painted with heat resistant paint and clear coat. First time i clear coated engine parts.I have been reading about it some say it is okay some say it peels off after a year. I will have to see that myself to comment but i know painting is %90 prep and i think it should last longer if you do it right. I know they made heat resistant clears but i couldn't find any around here.
On head covers i used the same paint that i did on foot rest area so they should match with them and wheels.
One thing i don't like is getting rid of old gaskets especially in small areas. Use wd40 or brake caliper cleaner to soften them but it is still a pain to me.
Result is not bad..
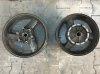
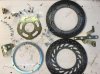
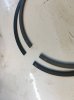
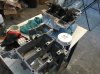
Moved to wheels to clear the garage a bit.
Deal with the forks later.
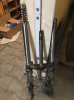
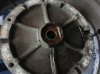
Had the tires removed.
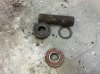
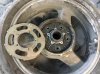
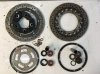
And replated disc bolts, rings etc. Looking brand new.
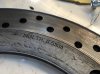
The marks on the rotors says front min 4mm and rear min 6.5mm. I measured 4-4.1mm front and 6.1mm rear. Brings a lot of questions: Should i replace those or go for a little longer? How do you do yours? I wonder if those are original rotors? Why they are so expensive? Best place to get them??
Deal with the forks later.
Had the tires removed.
And replated disc bolts, rings etc. Looking brand new.
The marks on the rotors says front min 4mm and rear min 6.5mm. I measured 4-4.1mm front and 6.1mm rear. Brings a lot of questions: Should i replace those or go for a little longer? How do you do yours? I wonder if those are original rotors? Why they are so expensive? Best place to get them??
If you want original discs then Dave Silvers in the UK and CMS in Holland have them in stock at the best prices. They seem to be going up though so I would change now, the rear is already 20 euros more than what I paid two years ago.
Hope it helps.
Upt'North
Hope it helps.
Upt'North
- Joined
- Oct 17, 2015
- Messages
- 1,960
- Location
- near Harrow, Ontario, Canada
- Bike
- '83 BMW R100RS
- STOC #
- 8870
You’re doing a super job on this rebuild Error - nice work!
Pete
Pete
Thank you,trying to do it rightYou’re doing a super job on this rebuild Error - nice work!
Pete
Really enjoying this excellent thread. Well done and keep up the good work!
Thank you all for your comments.I was busy at work so couldn't work on the project for a while. Mean time i got the cargo with the pistons,rings etc.
About the brake rotors,i ordered all original from motorcyclespareparts.eu for 586€. There is a %10 discount and free shipping until the end of this month. Also found these at alibaba for 163$,they are the cheapest i found (made in China).
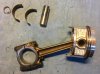
All the parts are brand new except the connecting rods..
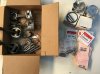
Old with new.. Pistons done.
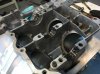
Ordered and installed all bearings according to their color coding. Made a chart to reduce confusion. Also,i have so many new parts now and i am making lists divided to sections, then hang them on the wall and underline the ones that i have so i won't miss any of them while assembling..
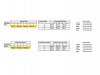
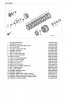
Before giving them to machine shop i also marked the pistons and main bearings with the engine block for easier assembly and to check shop didn't mix colors. After getting the parts gave them a good cleaning and checked clearances..
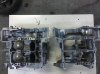
Painting before assembly..

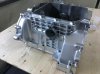
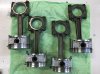
Lubed and installed crank,pistons..
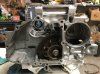

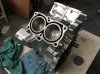
And that will be all for now..
About the brake rotors,i ordered all original from motorcyclespareparts.eu for 586€. There is a %10 discount and free shipping until the end of this month. Also found these at alibaba for 163$,they are the cheapest i found (made in China).
All the parts are brand new except the connecting rods..
Old with new.. Pistons done.
Ordered and installed all bearings according to their color coding. Made a chart to reduce confusion. Also,i have so many new parts now and i am making lists divided to sections, then hang them on the wall and underline the ones that i have so i won't miss any of them while assembling..
Before giving them to machine shop i also marked the pistons and main bearings with the engine block for easier assembly and to check shop didn't mix colors. After getting the parts gave them a good cleaning and checked clearances..
Painting before assembly..
Lubed and installed crank,pistons..
And that will be all for now..
This is so great.