Article [13] ST1300 - Flange Bearing Inspection

ChucksKLRST

Team Colorado
Joined
Dec 10, 2004
Messages
2,665
Age
74
Location
Aurora, Colorado
Bike
2019 Versys 1K SE LT
STOC #
086
Checking your Drive Flange Bearings on your ST1300
Here is a pictorial for checking your Drive Flange Bearings on your ST1300.

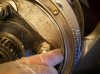
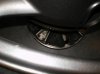
Photo 1 Ice pick method to remove large Snap Ring.

Photo 2 Screwdriver method to remove large Snap Ring.

Photo 3 Snap Ring pliers is the preferred method for removal.

Photo 4 Carefully work ring out of grove. Do not force or bend.

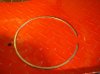
Photo 5 Snap ring removed

Photo 6 Clean off spline with rag.

Photo 7 Lay wheel over about 2 inched above floor and gently drop on floor. Flange assy will come out.

Photo 8 Flange assy out of wheel, laying on floor.

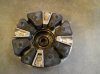
Photo 9 Flange assy with rubber drive cushions

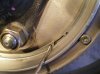
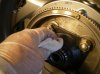
Photo 10 Check bearing by turning with your finger. Should be smooth turning. IMGP1427r.jpg

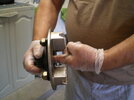
Photo 11 Check other side the same way.

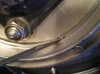
Photo 12 Inspect O-ring on Wheel.

Photo 13 Inspect O-ring on Flange.

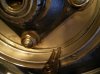
Photo 14 Inspect rubber drive cushions

Photo 15 apply Honda Molly to wheel bearing face.

Photo 16 install Rubber drive cushions in wheel

Photo 17 Lay wheel in your lap so as not to damage disk and install Drive Flange into wheel.

Photo 18 Install snap ring into grove in wheel.

Photo 19 Inspect and make sure snap ring is in grove all around wheel

Photo 20 apply Honda Molly to Flange Splines in preparation for reinstallation of wheel on to rear drive.


This whole procedure takes about 15 to 20 min. to do. It is well worth the piece of mind. My bearings were good this time. Next time if they are bad I will do a bearing replacement episode.
 

Attachments

Last edited by a moderator:
Joined
Jan 6, 2005
Messages
295
Age
57
Location
Glendale, AZ
Bike
04ST1300A
STOC #
5197
Re: Checking your Flange Drive Bearings

Great job Chuck and thanks

--Bryan
04ST1300A
:04biker:
 

Tom Mac 04a

Site Supporter
Joined
Jun 24, 2008
Messages
2,039
Location
LI , New York
Bike
04 ST1300a
STOC #
8347
Re: Checking your Flange Drive Bearings

Chuck, great pics and writeup...

Just on question, what's your total miles on this bike?

best
Tom Mac
 
OP
OP
ChucksKLRST

ChucksKLRST

Team Colorado
Joined
Dec 10, 2004
Messages
2,665
Age
74
Location
Aurora, Colorado
Bike
2019 Versys 1K SE LT
STOC #
086
Re: Checking your Flange Drive Bearings

Chuck, great pics and writeup...

Just on question, what's your total miles on this bike?

best
Tom Mac
60k and I have changed the two Flange bearings 3 times. I now check them at every tire change.
 
Joined
Aug 27, 2005
Messages
1,495
Location
Richardson, TX
Bike
'09 ST1300 ABS
STOC #
5914
Re: Checking your Flange Drive Bearings

Chuck

In your caption for Pic 15 you said, apply Honda Molly to wheel bearing face....

Is that the correct grease for that application?

Thanks

Forest
 

Mellow

Joe
Admin
Joined
Dec 1, 2004
Messages
18,893
Age
60
Bike
'21 BMW R1250RT
2024 Miles
000540
Re: Checking your Flange Drive Bearings

Chuck

In your caption for Pic 15 you said, apply Honda Molly to wheel bearing face....

Is that the correct grease for that application?

Thanks

Forest
The manual doesn't state that's necessary.. but I can't see where it would hurt.
 
OP
OP
ChucksKLRST

ChucksKLRST

Team Colorado
Joined
Dec 10, 2004
Messages
2,665
Age
74
Location
Aurora, Colorado
Bike
2019 Versys 1K SE LT
STOC #
086
Re: Checking your Flange Drive Bearings

Chuck

In your caption for Pic 15 you said, apply Honda Molly to wheel bearing face....

Is that the correct grease for that application?

Thanks

Forest
On page 16-10 2003 Honda Service manual, about 1/3rd of the way down the manual states.... "Apply 3g of Molly disulf paste to the mating surface of the rear wheel hub end and final driven flange A."

This step should be before.... "Install the driven flange assembly to the right wheel hub."

The manual sequence is wrong. My thought is these pieces will have a slight bit of movement against them self as the rubber dampers flex. So the requirement for Molly. I hope this clears it up.
 

Mellow

Joe
Admin
Joined
Dec 1, 2004
Messages
18,893
Age
60
Bike
'21 BMW R1250RT
2024 Miles
000540
Re: Checking your Flange Drive Bearings

On page 16-10 2003 Honda Service manual, about 1/3rd of the way down the manual states.... "Apply 3g of Molly disulf paste to the mating surface of the rear wheel hub end and final driven flange A."

This step should be before.... "Install the driven flange assembly to the right wheel hub."

The manual sequence is wrong. My thought is these pieces will have a slight bit of movement against them self as the rubber dampers flex. So the requirement for Molly. I hope this clears it up.
Thanks Chuck, that's page 16-11 on a 2003-2007 Service Manual. I think the confusion is the picture is of the assembled wheel.
 

Papa Ritch

Ritch Davis
Joined
Aug 4, 2005
Messages
58
Location
DAMASCUS,OREGON
Bike
09 SilverWing
STOC #
6273
Re: Checking your Flange Drive Bearings

Great job. It nice to have member who can write and take pictures like this to help people like me who want to do our own work. THANK YOU Ritch :03biker:
 

st11ray

2006 ST1300
Joined
Jul 29, 2007
Messages
2,735
Location
charlotte, nc
Bike
'06 ST1300
STOC #
7189
Re: Checking your Flange Drive Bearings

Are the Honda bearing remover shaft and bearing remover head tools needed for this job? Do you also need the driver, attachments, and pilot tools? Or do you improvise with something else?
 
OP
OP
ChucksKLRST

ChucksKLRST

Team Colorado
Joined
Dec 10, 2004
Messages
2,665
Age
74
Location
Aurora, Colorado
Bike
2019 Versys 1K SE LT
STOC #
086
Re: Checking your Flange Drive Bearings

Are the Honda bearing remover shaft and bearing remover head tools needed for this job? Do you also need the driver, attachments, and pilot tools? Or do you improvise with something else?

For checking no.

For Changing, I improvise by using deep well sockets and a rubber mallet. Next time I have to change the bearings I will do a write up on changing them.
 

joesmoe3

Happy Home
Joined
Mar 26, 2005
Messages
13
Location
Chantilly, Virginia
STOC #
5372
Re: Checking your Flange Drive Bearings

The initial post was most helpful!

FWIW, my bike has ~10,600 miles on it, and the bearing on the drive flange side was 'chunky'. Upon removal, (I had replacement bearings on hand for comparison) the outermost 6509 bearing was the culprit, and it clearly had experienced high heat.

Thank you.

By the way, I ordered the Honda tools for bearing removal, and it's the old adage -- with the right tools one can move mountains.

They weren't expensive, so the peace of mind was worth it in my case.
 
Last edited:

RCS

Joined
Jul 3, 2008
Messages
1,401
Location
Stamford, CT
Re: Checking your Flange Drive Bearings

The initial post was most helpful!

FWIW, my bike has ~10,600 miles on it, and the bearing on the drive flange side was 'chunky'. Upon removal, (I had replacement bearings on hand for comparison) the outermost 6509 bearing was the culprit, and it clearly had experienced high heat.

Thank you.

By the way, I ordered the Honda tools for bearing removal, and it's the old adage -- with the right tools one can move mountains.

They weren't expensive, so the peace of mind was worth it in my case.
+1. My bike had 11,800 miles on it. I can't remember whether it was the inner or outer of the two Final Drive Flange Bearings that was burn't/toasted - probably from experiencing high heat. I also ordered the special tools and should have them in 4 weeks since they are on backorder.
 

RCS

Joined
Jul 3, 2008
Messages
1,401
Location
Stamford, CT
Re: Checking your Flange Drive Bearings

Right tools? The rear bearings are simple to replace.

https://www.st-owners.com/forums/showthread.php?t=55014
Joe:

You are absolutely right. No special tools are needed. I did read your terrific thread before doing mine. I was able to pop out "Collar A" by putting the axle through the Collar and tapping it only once lightly with a rubber mallet.

To reinstall the bearings I didn't have a large enough socket so I used the old bearings and a pipe to keep it centered.

Given that an imperfect insertion of new bearings could be the cause of the problem, I wanted to have the right tools on hand for the insertion of the bearings. I want to ensure they go in perfectly and in prestine condition. Plus I wanted the tools to remove the other wheel bearings too since I know I'll be doing lots of highway miles on this ST.
 

Mellow

Joe
Admin
Joined
Dec 1, 2004
Messages
18,893
Age
60
Bike
'21 BMW R1250RT
2024 Miles
000540
Re: Checking your Flange Drive Bearings

Joe:

You are absolutely right. No special tools are needed. I did read your terrific thread before doing mine. I was able to pop out "Collar A" by putting the axle through the Collar and tapping it only once lightly with a rubber mallet.

To reinstall the bearings I didn't have a large enough socket so I used the old bearings and a pipe to keep it centered.

Given that an imperfect insertion of new bearings could be the cause of the problem, I wanted to have the right tools on hand for the insertion of the bearings. I want to ensure they go in perfectly and in prestine condition. Plus I wanted the tools to remove the other wheel bearings too since I know I'll be doing lots of highway miles on this ST.
I understand completely. So far, mine have looked great at every tire change since. I've put 10,000 additional miles on them.
 

Tankereng

Site Supporter
Joined
Mar 20, 2008
Messages
2,363
Age
49
Location
Colorado Springs
Bike
2018 Goldwing
STOC #
7405
Re: Checking your Flange Drive Bearings

Just ordered 10 Bearings....$29.95 vs. 2@5.95=$11.90

Anyone need a spare set? $10 Shipped to the US..Once I receive them..

Just received my bearing order today... I now have 10ea 6905-2RS bearings...on hand :D
 

okckeith

Site Supporter
Joined
Apr 24, 2007
Messages
3,401
Age
60
Location
Oklahoma City, Oklahoma
Bike
2017 Triumph Trophy
Re: Checking your Flange Drive Bearings

Just received my bearing order today... I now have 10ea 6905-2RS bearings...on hand :D
If you still have a set. I will get them from you at TexSTOC. I just checked mine last week. No problems yet. Would like to have a set on hand though.
 
Top Bottom