
MileHigh
Juvenile delinquent
Update, 11-2009
This article and related pictures where performed on a 2006 ST1300, non ABS.
Fluid replacement for ABS models is exactly the same.
This article is for fluid replacement only. If you need to replace brake pads or have additional braking problems, those should be be taken care of first.
Service interval is every 12,000 miles or 2 years. Whichever comes first. YMMV
This procedure can be performed by one person. A second person is an added bonus.
Although not required, it is advisable to have-
*A basic understanding of hydraulic brake systems.
*A basic understanding of the ST1300 Dual Combined Brake System-
?Linked Braking System.?
* A Service manual. Honda manual preferred. **Even with it's faults.**
Tool list
This article utilizes an air operated vacuum pump LINKY This model does require a decent air compressor with at least a 20 gal. tank and, able to produce 4.3 SCFM @ 90 PSI.
A hand operated vacuum pump will work just as well. LINKY Your hand and wrist will get tired after a while though.
Long Phillips screwdriver
Stubby Phillips screwdriver
8mm socket, with extension(s) and ratchet
8mm, 6 point box end wrench
5mm Allen hex bit
6mm Allen hex bit
Torque wrench
Pocket screwdriver
Tooth brush
Materials list
At least 2, sealed, new 12oz bottles of Honda DOT 4 brake fluid. Do not use brake fluid from a previously opened container. It will have absorbed moisture.
Shop rags or towels. Don't use kitchen paper towels. They don?t hold up and have lots of lint
Denatured alcohol
Masking tape
Fender covers or large beach/bath towels and, large plastic trash bags. The plastic bags can be placed over the fender covers or towels for excellent paint protection.
Lets get started.
This procedure utilizes the following procedure or ?steps?
It differs slightly from the service manual but, will accomplish the same result.
Differences in the service manual are -
When to reinstall the front left caliper bracket and, step 7. The service manual shows the wrong picture for step 7.
The steps where obtained from this article. Posts 6, 31 & 32 have updates that are included in my steps.
https://www.st-owners.com/forums/showthread.php?t=53678
Sides of bike are determined by sitting on bike. Right side is throttle side. Left side is clutch side.
Bleeding procedure steps-
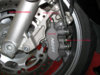
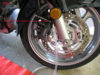
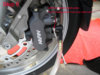
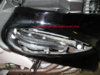
1. Left front caliper. Outer (top) bleeder. Fed from front reservoir.
2. Right front caliper. Outer (top) bleeder. Fed from front reservoir.
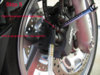
3. Proportional control valve. Left front caliper with secondary rear master cylinder must be tipped. Fed from rear reservoir
4. Rear caliper. Center (forward) bleeder. Fed from rear reservoir.
5. Right front caliper. Center (lower) bleeder. Fed from rear reservoir.
6. Left front caliper. Center (lower) bleeder. Fed from rear reservoir. After re-installing from step three above.
7. Rear caliper. Outer (back) bleeder. Fed from rear reservoir.
While using a vacuum bleeder, you will see air bubbles in the clear tubing!
This is normal since air is being drawn in past the threads on the bleed screw and, possibly the rubber boot on the bleeder tube.
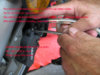
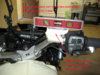
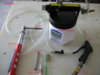
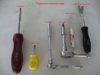
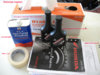
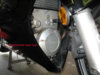
Tools needed, tupperware removal tools first

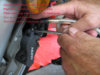
Tools needed, bleeding tools

Materials

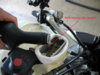
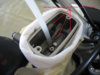
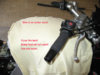
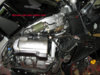
Cover that tank! Brake fluid will damage painted surfaces!

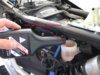
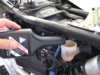
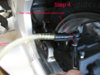
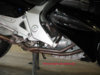
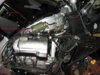
You have to pull the right side tupperware.


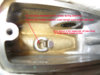
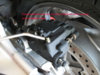
Where is everything located?


Just a little dirt removal first. Did I mention to cover the tank?")


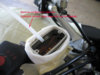
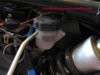
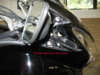
Make sure reservoir is level, otherwise fluid will spill out!


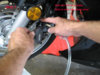
Get R done! These first two steps, are all fed from the front master cylinder reservoir (hand brake.)
Run almost a full reservoirs worth of fluid through with each bleed step. Do not let the reservoir empty. The front is more likely to do this!


Whew, we are done with the front reservoir. Lets start on the rear reservoir now


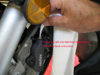
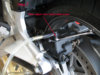
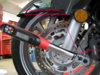
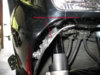
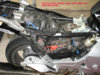
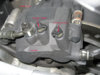
The left front caliper bracket, with caliper and, secondary rear master cylinder needs to be removed and tipped upward 15 degrees


Now we can bleed the Proportioning Control Valve from step 3. It is fed from the rear reservoir!

Don't forget to refill the reservoir after each bleed!

Your not done yet, step 4


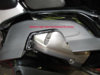
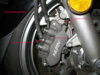
Step 5, right front. It is fed from the rear reservoir!!


Before you go on to step 6, you have to put the left front caliper bracket back on. Torque is 23 foot pounds.


Now you can do step 6, left front caliper center (lower) bleeder

Last bleeder, step 7

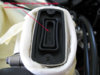
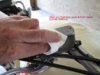
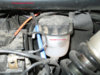
Take a look at both reservoir caps and diaphragms, use denatured alcohol to clean and remove any moisture

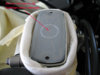
Fill both reservoirs to proper level and install caps.
Check the feel of both the hand brake and foot brake. You should have a solid feel to both.
If you had to move the front disc pads apart (wider) on the left front caliper to reinstall it, you may need to pump the front hand brake and, possibly the rear pedal a couple times to take back up the slack. Light short pumps/taps on each. Don't try to take up all the slack in one big pump/stroke.
Re-check fluid levels in both reservoirs.
Clean your vacuum bleeder equipment with denatured alcohol.
Side note. For those of you wondering, I did strip off the left side tupperware as well and, cleaned and waxed EVERYTHING on reassembly. Including the insides of all tupperware and, the front clutch cover and engine cylinder head covers on the engine as well.:
This article and related pictures where performed on a 2006 ST1300, non ABS.
Fluid replacement for ABS models is exactly the same.
This article is for fluid replacement only. If you need to replace brake pads or have additional braking problems, those should be be taken care of first.
Service interval is every 12,000 miles or 2 years. Whichever comes first. YMMV
This procedure can be performed by one person. A second person is an added bonus.
Although not required, it is advisable to have-
*A basic understanding of hydraulic brake systems.
*A basic understanding of the ST1300 Dual Combined Brake System-
?Linked Braking System.?
* A Service manual. Honda manual preferred. **Even with it's faults.**
Tool list
This article utilizes an air operated vacuum pump LINKY This model does require a decent air compressor with at least a 20 gal. tank and, able to produce 4.3 SCFM @ 90 PSI.
A hand operated vacuum pump will work just as well. LINKY Your hand and wrist will get tired after a while though.
Long Phillips screwdriver
Stubby Phillips screwdriver
8mm socket, with extension(s) and ratchet
8mm, 6 point box end wrench
5mm Allen hex bit
6mm Allen hex bit
Torque wrench
Pocket screwdriver
Tooth brush
Materials list
At least 2, sealed, new 12oz bottles of Honda DOT 4 brake fluid. Do not use brake fluid from a previously opened container. It will have absorbed moisture.
Shop rags or towels. Don't use kitchen paper towels. They don?t hold up and have lots of lint
Denatured alcohol
Masking tape
Fender covers or large beach/bath towels and, large plastic trash bags. The plastic bags can be placed over the fender covers or towels for excellent paint protection.
Lets get started.
This procedure utilizes the following procedure or ?steps?
It differs slightly from the service manual but, will accomplish the same result.
Differences in the service manual are -
When to reinstall the front left caliper bracket and, step 7. The service manual shows the wrong picture for step 7.
The steps where obtained from this article. Posts 6, 31 & 32 have updates that are included in my steps.
https://www.st-owners.com/forums/showthread.php?t=53678
Sides of bike are determined by sitting on bike. Right side is throttle side. Left side is clutch side.
Bleeding procedure steps-
1. Left front caliper. Outer (top) bleeder. Fed from front reservoir.
2. Right front caliper. Outer (top) bleeder. Fed from front reservoir.
3. Proportional control valve. Left front caliper with secondary rear master cylinder must be tipped. Fed from rear reservoir
4. Rear caliper. Center (forward) bleeder. Fed from rear reservoir.
5. Right front caliper. Center (lower) bleeder. Fed from rear reservoir.
6. Left front caliper. Center (lower) bleeder. Fed from rear reservoir. After re-installing from step three above.
7. Rear caliper. Outer (back) bleeder. Fed from rear reservoir.
While using a vacuum bleeder, you will see air bubbles in the clear tubing!
This is normal since air is being drawn in past the threads on the bleed screw and, possibly the rubber boot on the bleeder tube.
Tools needed, tupperware removal tools first
Tools needed, bleeding tools
Materials
Cover that tank! Brake fluid will damage painted surfaces!
You have to pull the right side tupperware.
Where is everything located?
Just a little dirt removal first. Did I mention to cover the tank?
Make sure reservoir is level, otherwise fluid will spill out!
Get R done! These first two steps, are all fed from the front master cylinder reservoir (hand brake.)
Run almost a full reservoirs worth of fluid through with each bleed step. Do not let the reservoir empty. The front is more likely to do this!
Whew, we are done with the front reservoir. Lets start on the rear reservoir now
The left front caliper bracket, with caliper and, secondary rear master cylinder needs to be removed and tipped upward 15 degrees
Now we can bleed the Proportioning Control Valve from step 3. It is fed from the rear reservoir!
Don't forget to refill the reservoir after each bleed!
Your not done yet, step 4
Step 5, right front. It is fed from the rear reservoir!!
Before you go on to step 6, you have to put the left front caliper bracket back on. Torque is 23 foot pounds.
Now you can do step 6, left front caliper center (lower) bleeder
Last bleeder, step 7
Take a look at both reservoir caps and diaphragms, use denatured alcohol to clean and remove any moisture
Fill both reservoirs to proper level and install caps.
Check the feel of both the hand brake and foot brake. You should have a solid feel to both.
If you had to move the front disc pads apart (wider) on the left front caliper to reinstall it, you may need to pump the front hand brake and, possibly the rear pedal a couple times to take back up the slack. Light short pumps/taps on each. Don't try to take up all the slack in one big pump/stroke.
Re-check fluid levels in both reservoirs.
Clean your vacuum bleeder equipment with denatured alcohol.
Side note. For those of you wondering, I did strip off the left side tupperware as well and, cleaned and waxed EVERYTHING on reassembly. Including the insides of all tupperware and, the front clutch cover and engine cylinder head covers on the engine as well.
:Attachments
-
 91.3 KB Views: 546
 -
 64.1 KB Views: 521
 -
 82.4 KB Views: 502
 -
 80.5 KB Views: 497
 -
 72.4 KB Views: 469
 -
 76 KB Views: 463
 -
 67 KB Views: 453
 -
 95.3 KB Views: 456
 -
 66.6 KB Views: 442
 -
 67 KB Views: 429
 -
 69.1 KB Views: 458
 -
 79.1 KB Views: 467
 -
 74.1 KB Views: 450
 -
 73.7 KB Views: 441
 -
 67 KB Views: 434
 -
 59.6 KB Views: 435
 -
 60 KB Views: 427
 -
 59.8 KB Views: 413
 -
 52.3 KB Views: 414
 -
 86.5 KB Views: 419
 -
 74.5 KB Views: 420
 -
 58.5 KB Views: 414
 -
 66.7 KB Views: 404
 -
 69.6 KB Views: 402
 -
 77.2 KB Views: 400
 -
 93.6 KB Views: 398
 -
 80.3 KB Views: 394
 -
 77.1 KB Views: 405
 -
 77.2 KB Views: 392
 -
 71.2 KB Views: 412
 -
 81.5 KB Views: 404
 -
 91.5 KB Views: 390
 -
 77.2 KB Views: 382
 -
 72.5 KB Views: 389
 -
 77.2 KB Views: 366
 -
 59.6 KB Views: 368
 -
 80.3 KB Views: 352
 -
 64 KB Views: 344
 -
 56.5 KB Views: 344
 -
 45.3 KB Views: 320
 -
 80.2 KB Views: 320
 -
 91.9 KB Views: 328
 -
 85 KB Views: 319
 -
 70.5 KB Views: 302
 -
 66.8 KB Views: 293
 -
 64.6 KB Views: 284
 -
 64.4 KB Views: 290
 -
 79.6 KB Views: 293
 -
 99.1 KB Views: 304
 -
 91.3 KB Views: 312
 -
 64.1 KB Views: 313
 -
 82.4 KB Views: 311
 -
 80.5 KB Views: 296
 -
 72.4 KB Views: 287
 -
 76 KB Views: 271
Last edited by a moderator: