I had 10K miles on my front brake pads, and after 3 tours of motocamping with 50 lbs of gear, I decided to check my brake pads. I was amazed to find only about 10 % wear in 10K miles! The stock Honda brake pads are great and I would not want more grip. (the few times I stupidly hit my front brakes too hard would have resulted in a nasty slider if the brakes gripped better than stock). Putting one side back in I scratched the pad so bad, I decided to replace all the front pads. Its so easy, even a 57 year old caveman can do it....
Put on you favorite Dylan or Johnny Cash, then
open the brake reservoir and remove most of the fluid. A pharmacy will sell you a 5 cc syringe.
remove pad pins then take out the old pads
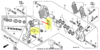
remove 2 caliper bolts per side
gently lift off the caliper
clean the inside slave "pots" with brake cleaner and an old toothbrush
put the old pads back in, without the pad pin and stick a large flathead screwdriver inbetween them and twist. You can easily force the slave pots back in all the way to make room for the new ones.
put the calipers back on but only insert the bolts for a loose fit. You may need a little side to side motion to get the new pads in.
install the pads and insert pad pins. Take your time on this, don't scratch them or the rotor, do it "nice and easy".
torque the caliber bolts to 25 lbs, and pad pin to 13 lbs.
Add DOT 4 to the brake reservoir, pump your front and rear brakes. Test the brakes, they will feel a little soft for a few brakes till they seat.
Did I forget anything? Oh yes, guys and gals over fifty: wearing reading glasses helps to see what you are doing. Total time was 90 mins.
Put on you favorite Dylan or Johnny Cash, then
open the brake reservoir and remove most of the fluid. A pharmacy will sell you a 5 cc syringe.
remove pad pins then take out the old pads
remove 2 caliper bolts per side
gently lift off the caliper
clean the inside slave "pots" with brake cleaner and an old toothbrush
put the old pads back in, without the pad pin and stick a large flathead screwdriver inbetween them and twist. You can easily force the slave pots back in all the way to make room for the new ones.
put the calipers back on but only insert the bolts for a loose fit. You may need a little side to side motion to get the new pads in.
install the pads and insert pad pins. Take your time on this, don't scratch them or the rotor, do it "nice and easy".
torque the caliber bolts to 25 lbs, and pad pin to 13 lbs.
Add DOT 4 to the brake reservoir, pump your front and rear brakes. Test the brakes, they will feel a little soft for a few brakes till they seat.
Did I forget anything? Oh yes, guys and gals over fifty: wearing reading glasses helps to see what you are doing. Total time was 90 mins.
 Thanks to the STreaker I've just replaced my first set of front pads. More thanks at: