I am trying to replace my headlight bulb. Unable to disconnect the bulb wiring plug. Not sure if it is clipped on or just jammed in there. If there is a clip can anyone direct me to a photo showing how to disconnect the plug.

Seeking advise on ST1100 Headlight bulb replacement
- Thread starter wolf9832
- Start date
- Joined
- Dec 21, 2004
- Messages
- 4,348
- Age
- 69
- Location
- Ledgewood, NJ 07852
- Bike
- 03&04 ST1300
- STOC #
- 5079
Re: Seeking advise on Headlight bulb replacement
The release clips are on both sides of the plug they can be hard to push in. Sorry I don't have a picture.
The release clips are on both sides of the plug they can be hard to push in. Sorry I don't have a picture.
Re: Seeking advise on Headlight bulb replacement
Thanks Steve, I'll give it a try
Thanks Steve, I'll give it a try
Shadowfax-ST
As ridden by Pat
Re: Seeking advise on Headlight bulb replacement
https://www.st-owners.com/forums/attachment.php?attachmentid=44869&d=1239835128
this links to my pic in one of the headlamp threads. It'll help.
https://www.st-owners.com/forums/attachment.php?attachmentid=44869&d=1239835128
this links to my pic in one of the headlamp threads. It'll help.
John OoSTerhuis
Life Is Good!
Re: Seeking advise on Headlight bulb replacement [ST1100]
Hello ____,
Unless there's a difference between USA and Canadian ST1100s that I'm not aware of, there's no "release clips" on the headlight bulb 3-P connector. They can be a ***** to pull off sometimes... well, moST times actually.") Personally, I've had the tupperware off and the headlight module in my lap the few times I've pulled the plugs off the bulbs.
Personally, I've had the tupperware off and the headlight module in my lap the few times I've pulled the plugs off the bulbs.
There is a wire bail clip that holds the base of the bulbs into their sockets in the headlight module, but no clip(s) on the wiring harness' headlight bulb connectors.
EDIT: while you poSTed in the ST1100 Tech forum, it might be a good idea to also put "ST1100" in the subject line (and probably also in the body of your poST somewheres...)
Regards, John
Hello ____,
Unless there's a difference between USA and Canadian ST1100s that I'm not aware of, there's no "release clips" on the headlight bulb 3-P connector. They can be a ***** to pull off sometimes... well, moST times actually.
Personally, I've had the tupperware off and the headlight module in my lap the few times I've pulled the plugs off the bulbs.There is a wire bail clip that holds the base of the bulbs into their sockets in the headlight module, but no clip(s) on the wiring harness' headlight bulb connectors.
EDIT: while you poSTed in the ST1100 Tech forum, it might be a good idea to also put "ST1100" in the subject line (and probably also in the body of your poST somewheres...)
Regards, John
Blue STreak
Bob Meyer
John is right. The 1300 has release clips, but not the 1100. Try using a flat blade screw driver to gently pry the socket loose. Move it just a tiny bit, one side at a time, until its loose enough to pull straight back.
Before you put it back together, put some dialectric grease in the sockets.
Before you put it back together, put some dialectric grease in the sockets.
Thanks for your all your help. Just got the plug and new bulb installed. Sure hope the bulb lasts with the effort involved in replacement.
Too late to help, but I found this process rather difficult and put this together. It is a combination of info from someone else (sorry, I could not find who wrote the original to give credit) and what I learned in doing it
LIGHT BULB REPLACEMENT
Right bulb - With the bike on the center stand, I turned the handlebars
to full lock RIGHT.
Check orientation of wires coming out of bulb holder from seated position. White and black seemed to come out to the right, green to the left, both at the top of the connector. This will help in aligning the bulb again. Do not pull the plug out
From the FRONT of the bike, reach in and pull the tab on the bottom of the boot firmly until it releases. Fully invert the boot as much as possible.
Push the retaining clip ?tab? towards the front of the bike and out away from the bulb and it should unclip the bulb. Rotate the retaining clip on the hinge out of the way
The bulb MAY be pulled right out or it may need to be rotated ? make a note of which way it needs to be rotated or remove the rotation reference here if it does not rotate
Note the relationship of the bottom tab of the rubber boot in reference to the bulb orientation as it may come off when pulling the bulb out of the connector. Install new bulb keeping the proper orientation, put back into headlight, make sure rubber boot is still inverted, swing retaining clip back in position and there should be a sortof click as it locks in place
Push rubber boot back into place, run a finger around the edge to make sure it gets fully seated
2) Then just push the retainer wire IN and UP (counter clock-wise). From
this angle, it's easy.
3) Remove old bulb.
4) Now (this can be the HARDEST part of this operation) push the retainer
wire out of the way and hope it STAYS there. Insert new bulb. This is
fairly easy (unless you're wrestling with the retainer wire too. To
align properly to 'seat' the bulb, simply look into the front of the
headlight, and you clearly see where the 'dark' is, and move the bulb in the
direction of the 'dark' area in the center of the reflector. You will feel
it when it's right.
5) Swing retainer wire back to position, push IN and DOWN (clock-wise).
6) Replace boot. Plug it in. YOU'RE DONE. With one, that is.
Repeat the steps for the left bulb, using your RIGHT hand for that side, and
turning the handlebars full lock LEFT.
LIGHT BULB REPLACEMENT
Right bulb - With the bike on the center stand, I turned the handlebars
to full lock RIGHT.
Check orientation of wires coming out of bulb holder from seated position. White and black seemed to come out to the right, green to the left, both at the top of the connector. This will help in aligning the bulb again. Do not pull the plug out
From the FRONT of the bike, reach in and pull the tab on the bottom of the boot firmly until it releases. Fully invert the boot as much as possible.
Push the retaining clip ?tab? towards the front of the bike and out away from the bulb and it should unclip the bulb. Rotate the retaining clip on the hinge out of the way
The bulb MAY be pulled right out or it may need to be rotated ? make a note of which way it needs to be rotated or remove the rotation reference here if it does not rotate
Note the relationship of the bottom tab of the rubber boot in reference to the bulb orientation as it may come off when pulling the bulb out of the connector. Install new bulb keeping the proper orientation, put back into headlight, make sure rubber boot is still inverted, swing retaining clip back in position and there should be a sortof click as it locks in place
Push rubber boot back into place, run a finger around the edge to make sure it gets fully seated
2) Then just push the retainer wire IN and UP (counter clock-wise). From
this angle, it's easy.
3) Remove old bulb.
4) Now (this can be the HARDEST part of this operation) push the retainer
wire out of the way and hope it STAYS there. Insert new bulb. This is
fairly easy (unless you're wrestling with the retainer wire too
. To align properly to 'seat' the bulb, simply look into the front of the
headlight, and you clearly see where the 'dark' is, and move the bulb in the
direction of the 'dark' area in the center of the reflector. You will feel
it when it's right.
5) Swing retainer wire back to position, push IN and DOWN (clock-wise).
6) Replace boot. Plug it in. YOU'RE DONE. With one, that is.
Repeat the steps for the left bulb, using your RIGHT hand for that side, and
turning the handlebars full lock LEFT.
Attachments
-
 2.4 KB Views: 112
- Joined
- Dec 12, 2004
- Messages
- 1,282
- Age
- 76
- Location
- Weatherford, TX
- Bike
- '16 Versys 650LT
- STOC #
- 1134
Here are some articles and pictures I've collected over the years that have to do with changing the ST1100's lightbulb.
The picture below is from Scott Finn's Website:
http://www.scottfinn.com/Motorcycle/default.htm

Below is an article from someone named Dennis. Sorry, don't have his last name. Been many moons ago. It discusses using H-4 bulbs:
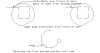
HERE ARE SOME DIAGRAMS. Having finally worn out my first headlight, I managed to change the bulb without removing any tupperware, going in from behind with the aid of a good worklight. Removing the clip was a bit tricky as it isn't too intuitive, so I attach the following sketch to help those of you haven't faced the problem yet. When you pull off the electrical connector and pull off the rubber boot covering the back of each headlight you will see something like this:

As you can see, the end of the wire clip is hooked under a lip on the rim of the housing, so you just have to push the little handle thingy forward to relieve some pressure and then sideways to unhook it. Not hard once you understand the principle. It may help to slightly LOOSEN the screw holding the clip, but don't forget to tighten it when you are done.
Next, if you are replacing the standard Honda bulb, you may want to get one of the adapter shims which allow you to use a common H4 bulb instead. In fact, you should buy a pair of these NOW (about $12) and keep them handy for the day you will need them - inside your owner's manual under the seat for example. Here is another sketch showing how simple these are and how they work. Since the bulb is positioned by these three ears you should not attempt to simply cut off the H4 ears and use it without the shim.

The picture below is from Scott Finn's Website:
http://www.scottfinn.com/Motorcycle/default.htm
Below is an article from someone named Dennis. Sorry, don't have his last name. Been many moons ago. It discusses using H-4 bulbs:
HERE ARE SOME DIAGRAMS. Having finally worn out my first headlight, I managed to change the bulb without removing any tupperware, going in from behind with the aid of a good worklight. Removing the clip was a bit tricky as it isn't too intuitive, so I attach the following sketch to help those of you haven't faced the problem yet. When you pull off the electrical connector and pull off the rubber boot covering the back of each headlight you will see something like this:
As you can see, the end of the wire clip is hooked under a lip on the rim of the housing, so you just have to push the little handle thingy forward to relieve some pressure and then sideways to unhook it. Not hard once you understand the principle. It may help to slightly LOOSEN the screw holding the clip, but don't forget to tighten it when you are done.
Next, if you are replacing the standard Honda bulb, you may want to get one of the adapter shims which allow you to use a common H4 bulb instead. In fact, you should buy a pair of these NOW (about $12) and keep them handy for the day you will need them - inside your owner's manual under the seat for example. Here is another sketch showing how simple these are and how they work. Since the bulb is positioned by these three ears you should not attempt to simply cut off the H4 ears and use it without the shim.
It never seizes to amaze me as to the amount of helpful information available on this forum. I am starting to collect the articles / pics for future reference. Thanx again
Hi Mick.
I have recently replaced both headlight bulbs with aftermarket H4's and was later told that I should use an adapter shim to get the correct aligment....most of the beam is up in the air. Called my local Honda deraler and the service guys were not aware of any adaptor....they wanted me to buy Honda only. Very interested in your article, especially as you have provided the drawing as a reference............one qestion.....where can you buy the adaptor shims?
Thanks and Regards
Barry Davidson.
Gardena, CA
There are a few places online, but Fleabay is a good place - http://www.ebay.com/sch/i.html?_nkw=st1100+h4+adaptor&_sacat=0&_odkw=st1100+shim&_osacat=0&_trksid=p3286.c0.m270.l1313Hi Mick.
I have recently replaced both headlight bulbs with aftermarket H4's and was later told that I should use an adapter shim to get the correct aligment....most of the beam is up in the air. Called my local Honda deraler and the service guys were not aware of any adaptor....they wanted me to buy Honda only. Very interested in your article, especially as you have provided the drawing as a reference............one qestion.....where can you buy the adaptor shims?
Thanks and Regards
Barry Davidson.
Gardena, CA
- Joined
- Dec 12, 2004
- Messages
- 1,282
- Age
- 76
- Location
- Weatherford, TX
- Bike
- '16 Versys 650LT
- STOC #
- 1134
California Sport Touring:one qestion.....where can you buy the adaptor shims?
http://www.casporttouring.com/store/merchant.mvc?Screen=PROD&Product_Code=17120&Category_Code=st1300_electrical
[EDIT 4/2/12]
While doing a search of my old ST email I found that Spoiled Biker also carried them and the link is still good:
http://www.spoiledbiker.com/product154.html
And just for a freebie, I ran across a link to Mike Martin's old site in my email. Darned if it isn't still up. It's an excellent site whose ST1100 maintenance and farkle tips should be hard copied before they go bye-bye if you plan on keeping your 1100 many more years:
http://home.insightbb.com/~mmartin36/ST_Maint.htm
Another good reference site for ST1100 maintenance and farkles is the "Archive of Wisdom" site at St-Riders. This site is what the old ST1100 Email List morphed into. When the site went up, one of the early things that was done was to archive as much of the community knowledge of the ST1100 as possible. This was done knowing that the time was coming when that info would be hard to find. :
http://www.st-riders.net/index.php?board=3.0
They even added a separate archive for the ST1300.
Andrew Shadow
Site Supporter
You can also cut the flat part with the three ears off of the old OEM Honda bulbs you are removing and use them as shims rather than buying them.
I used Jiang Chi H4 P43T 12V 45/45 W bulb p/n 04-196 - fits like OEM. Lasted so far for 2 years, about 14,000 km. Still a bit pricey (around $25 CAN) and still the same output (poor) as OEM.
ST-Gman
Jeff
Big thanks! I fought with this for about an hour yesterday, attempting to determine how the retainer clip actually worked, and how to move it. After seeing your picture above, knocked it out in about 10 minutes. Greatly appreciated!!
-Jeff
-Jeff
DonMac
My backyard
I decided to replace mine with H4s the other day but no matter what I did I couldn't get the bail on the first bulb loose so I wound up taking a bunch of tupperware off to get access to the back of the headlight. I still had to loosen the screw on the part that holds the wire bail on to get it to release. What I found was an original Honda bulb and an H4 with no shim. No wonder the bike had crappy lights!! I had bought shims from the Spoiled Biker and put them in along with new bright H4s and noticed I had a light out in the speedo. I found replacement bulbs for the dash lights in RED and also a bulb for the clock at Oriellys, and then put the whole mess back together. The dash lights look waaay too cool and I can now see at night.
ak85lp
(Paul)
I bought the headlight adapters a couple of years ago so I can use regular bulbs from Canadian Tire. This guy is right "up the road" from you in Etobicoke.It never seizes to amaze me as to the amount of helpful information available on this forum. I am starting to collect the articles / pics for future reference. Thanx again
http://www.ebay.com/itm/H4-Bulb-Adapter-Rings-Honda-ST-1100-1300-ST1300-ST1100-/260996467196?pt=Motorcycles_Parts_Accessories&vxp=mtr&hash=item3cc49a09fc
Hello Mick,
I see it has been several years since you posted this but I was wondering if the diagrams you mentioned may be available somewhere? I'm trying to change the bulbs on my ST1100 and I'm having a tough go at it.
thank you!
I see it has been several years since you posted this but I was wondering if the diagrams you mentioned may be available somewhere? I'm trying to change the bulbs on my ST1100 and I'm having a tough go at it.
thank you!