
Blue One
Vendor
- Joined
- Mar 19, 2008
- Messages
- 1,080
- Age
- 69
- Location
- Canada (Edmonton Alberta) - Texas
- Bike
- 04 ABS ST1300
I had the Travelcade Stealth seat with gel inserts on my ST1100 and loved it.
When I bought my ST1300 I kept the seat and was determined to fit it to my ST1300.
This is how we did it and a couple pictures of the results.
First of all I removed the cover and foam from the ST1300 pans. Then I selected the position I wanted in the adjustment range (Mid point for me as there will no longer be adjustability)
Then I bolted the 2 pans together into one with a couple small strips of metal on the sides.
The Travelcade seat was stripped of its ST1100 seat pan and cover. The foam for the horn area (just forward of the riders position gel pad) where the seat fits around the tank is obviously different.
So using a straight razor knife, I cut that part off the Travelcade seat. I then made a straight cut in the required place on the stock ST1300 seat foam and then glued that front piece to the Travelcade foam.
The seat now had the proper horn shape to fit the tank. The next step was fitting to the ST1300 pans. All that was required was A couple of adjustments.
The front seat pan of the ST1300 has a deep pocket down where the adjustment area is right below where you sit. The ST1100 was more flat.
I trimmed the ST1300 stock foam down to just fill that area of the seat pan flush so the ST1100 Travelcade seat would sit on top.
A couple of depressions were carved into the sides of the seat foam as well along the area where clearance is needed for the ST1300 saddlebag latch levers. These are about 1/2" x 4" with tapered ends for smoothness.
The whole thing was then glued to the seat pans (3M Super 77 spray glue for all gluing) and covered completely with 1/4" smoothing foam also glued in place.
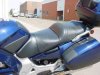
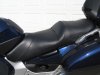
Next came the cover. As you will see the seat now has a new leather cover my sweetheart Jan sewed up for me.
To start out with however we had sewn the front part of the ST1300 cover to the Travelcades original saddlehyde vinyl cover.
I'll post a picture, the seam in the foam to graft the 2 seats is directly under that seam in the covers.
In all ,it was not as difficult as it all sounds. I ended up buying a $100 air powered upholstery stapler to help out.
The seat is extremely comfortable and quite a few people liked and sat on it at Westoc this year with the new leather.
Larry
When I bought my ST1300 I kept the seat and was determined to fit it to my ST1300.
This is how we did it and a couple pictures of the results.
First of all I removed the cover and foam from the ST1300 pans. Then I selected the position I wanted in the adjustment range (Mid point for me as there will no longer be adjustability)
Then I bolted the 2 pans together into one with a couple small strips of metal on the sides.
The Travelcade seat was stripped of its ST1100 seat pan and cover. The foam for the horn area (just forward of the riders position gel pad) where the seat fits around the tank is obviously different.
So using a straight razor knife, I cut that part off the Travelcade seat. I then made a straight cut in the required place on the stock ST1300 seat foam and then glued that front piece to the Travelcade foam.
The seat now had the proper horn shape to fit the tank. The next step was fitting to the ST1300 pans. All that was required was A couple of adjustments.
The front seat pan of the ST1300 has a deep pocket down where the adjustment area is right below where you sit. The ST1100 was more flat.
I trimmed the ST1300 stock foam down to just fill that area of the seat pan flush so the ST1100 Travelcade seat would sit on top.
A couple of depressions were carved into the sides of the seat foam as well along the area where clearance is needed for the ST1300 saddlebag latch levers. These are about 1/2" x 4" with tapered ends for smoothness.
The whole thing was then glued to the seat pans (3M Super 77 spray glue for all gluing) and covered completely with 1/4" smoothing foam also glued in place.
Next came the cover. As you will see the seat now has a new leather cover my sweetheart Jan sewed up for me.
To start out with however we had sewn the front part of the ST1300 cover to the Travelcades original saddlehyde vinyl cover.
I'll post a picture, the seam in the foam to graft the 2 seats is directly under that seam in the covers.
In all ,it was not as difficult as it all sounds. I ended up buying a $100 air powered upholstery stapler to help out.
The seat is extremely comfortable and quite a few people liked and sat on it at Westoc this year with the new leather.
Larry
Attachments
-
 77 KB Views: 611
 -
 194.3 KB Views: 506
Last edited by a moderator: