
thomascharles
Thomas
The Headlight Adjusting motor can be replaced without removing all the bike parts that are described in the shop manual.I removed and replaced the motor in two hours including taking the pictures required for this article. However, I had removed it once before. This was to check the connector for proper voltage and continuity to determine that it was a defective motor.
The steps are as follows.
1. Raise the wind shield to the highest position and remove. Also, pull mirror covers loose and let them hang below mirrors.
2. Remove the 8 plastic clips and four screws from the inner screen cowl and remove cowl.(screws are on dash side in picture)
3. Remove the four machine bolts that are under side box lids and the two machine screws that are adjacent to the mirror mounts.
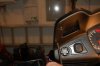
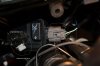
4. Remove the two connectors from the dash and move dash back out of the way.
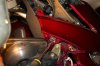
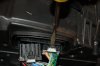
5. Locate the motor and remove the motor connector. Note: this must be removed before the motor can be rotated. I used a very small flat screw driver to lift tab and pull outward.
5a. If you want to confirm that the motor is the problem you can check the connectors at this point. There should be continuity between the green wire and ground. There should be battery voltage between the Black /brown wire and ground. The voltage between the Light Green wire and ground should vary between 1.2 and 10.8V as the aiming knob on the dash is rotated from one extreme to the other. Note: The dash connectors must be temporarily connected to test.
6. Rotate motor counter clockwise and then begin rotating large adjusting knob counter clockwise until the motor begins to back out of the housing and finally separates from the housing unit.
7 Install new motor. You must find the female threads by inserting the machine bolt into the housing and use the large adjusting knob , turning clockwise until the motor is pulled into the housing. Make sure that the motor is lined up with the housing. Pushing the motor into the housing and turning clockwise will lock the motor in place. Finding the female threads was not as difficult as it might seem. I kept the motor machine screw perpendicular to the housing, centered in the opening and felt where the bolt should be screwed into. The motor will be approx. a 1/4 inch out from the housing and a few turns of the knob should begin the screw into the female component. I turned the large adjusting knob an additional 8 to 10 turns to make sure that when the motor was activated it did not back the machine screw out of the assembly. Connect the motor connector.
8. Assemble the dash and cowl. I left the wind shield and mirror covers off until I tested and adjusted the headlight .
9. Start the bike and you should hear the headlight motor find where the dash knob is set.
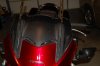
10 I used a 12mm nut driver to make adjustments to the headlight. This is accessible from the front of the bike under the headlight. You can also use a Phillips head screw driver. Once set changing the dash knob should raise and lower the headlight height.
11. Complete the assembly.
The steps are as follows.
1. Raise the wind shield to the highest position and remove. Also, pull mirror covers loose and let them hang below mirrors.
2. Remove the 8 plastic clips and four screws from the inner screen cowl and remove cowl.(screws are on dash side in picture)
3. Remove the four machine bolts that are under side box lids and the two machine screws that are adjacent to the mirror mounts.
4. Remove the two connectors from the dash and move dash back out of the way.
5. Locate the motor and remove the motor connector. Note: this must be removed before the motor can be rotated. I used a very small flat screw driver to lift tab and pull outward.
5a. If you want to confirm that the motor is the problem you can check the connectors at this point. There should be continuity between the green wire and ground. There should be battery voltage between the Black /brown wire and ground. The voltage between the Light Green wire and ground should vary between 1.2 and 10.8V as the aiming knob on the dash is rotated from one extreme to the other. Note: The dash connectors must be temporarily connected to test.
6. Rotate motor counter clockwise and then begin rotating large adjusting knob counter clockwise until the motor begins to back out of the housing and finally separates from the housing unit.
7 Install new motor. You must find the female threads by inserting the machine bolt into the housing and use the large adjusting knob , turning clockwise until the motor is pulled into the housing. Make sure that the motor is lined up with the housing. Pushing the motor into the housing and turning clockwise will lock the motor in place. Finding the female threads was not as difficult as it might seem. I kept the motor machine screw perpendicular to the housing, centered in the opening and felt where the bolt should be screwed into. The motor will be approx. a 1/4 inch out from the housing and a few turns of the knob should begin the screw into the female component. I turned the large adjusting knob an additional 8 to 10 turns to make sure that when the motor was activated it did not back the machine screw out of the assembly. Connect the motor connector.
8. Assemble the dash and cowl. I left the wind shield and mirror covers off until I tested and adjusted the headlight .
9. Start the bike and you should hear the headlight motor find where the dash knob is set.
10 I used a 12mm nut driver to make adjustments to the headlight. This is accessible from the front of the bike under the headlight. You can also use a Phillips head screw driver. Once set changing the dash knob should raise and lower the headlight height.
11. Complete the assembly.
Attachments
-
 167.5 KB Views: 406
 -
 179.4 KB Views: 451
 -
 164.3 KB Views: 446
 -
 155.2 KB Views: 430
 -
 164.1 KB Views: 493
 -
 173 KB Views: 527
Last edited by a moderator: