If your problem is with distorting the material when drilling the hole, consider sandwiching the flimsy material between two pieces of something more stout while drilling. Then use the hole(s) as your starting point for laying out the piece for snipping and bending.That didn't work so well.

How to modify H4 led to reduce glare ST1300
- Thread starter spiderman302
- Start date
OP
OP
- Joined
- Apr 22, 2011
- Messages
- 1,151
- Age
- 68
- Location
- Camarillo, Ca
- Bike
- 2006 ST1300A
- 2024 Miles
- 002552
Just for the record.
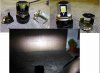
Last year I bought a 3600LM H4 LED bulb (the triangular one) and was quite disappointed with the light pattern, Glare and NO cut off. The vendor said that it was for off road only and blamed the problem on the reflector / lens and later the focus. I could not get it to cleanly fit in my ST1300 so I moved it to the DRZ400. However Lots of metal tape and bent sheet metal later, I created the first glare shield and improved the cut off. The two large emitters made for a large beam. Also the fact that they were round created a round cutoff. Notice in the picture to the left I put a piece of aluminum tape over the bottom edges of the two emitters to make a straighter cutoff. look closely at the emitters of the new 3800 LM leds and under the dome lens there is a Square emitter. Yes the straight edge does make a difference in making a clean cutoff. look at the nice cutoff on the same garage door made by the "bad" 3600LM LED. This is from my ST1300. (the light were ty-warped to keep in place for the photo) I also did not like the strong glare that was on the driveway. I offered the solution to the vendor but got no response. So I went out looking for something that would fit and have smaller side facing emitters. I tried a bunch of others. but when I got the V16 turbo 3800LM LED last December straight from China I knew it could be made to work... (This is a technical thread so lets just focus on solutions and other methods to make this work.)
Here is the 3600lm with clean cut off. Yes proof that it can be done, the magic is in the shield and a rectangular emitter...
OP
OP
- Joined
- Apr 22, 2011
- Messages
- 1,151
- Age
- 68
- Location
- Camarillo, Ca
- Bike
- 2006 ST1300A
- 2024 Miles
- 002552
How the shield works. Optics 101.
Go find a Mag light or similar flashlight that you can focus the beam.
Now this trick will work just the opposite(mirror) of the H4 shield but it will demonstrate the principle.
Turn on the light and focus a tight beam on the wall. Now slide a card over one half the lens. As the edge approaches the center line the spot stays a circle. Now slightly defocus the spot so that there is a small dark spot in the middle of the spot (a donut). Now slide the card over the lens notice now that the ring will turns into a semi circle. If the dark side of the semi circle is opposite the shadow then refocus the beam and defocus it in the other direction till there is a dark spot (donut) in the middle. Slide the card over the lens this time the shadow and the dark side of the ring will meet. You are now at perfect cutoff. Have fun with it.
So in the H4 system the low beam is NOT at the focus point but it sits just in front of it.
So if you added a Spacer (o-ring) to improve the focus to supposedly "improve" cutoff then the shield will not work and your high beam will be down in the dirt, not above the low beam.
If you look at any h4 headlight with a halogen bulb in it you should notice that the low beam light only comes from the top half of the reflector. The bottom half of the lens should be dark.
Only adjust focus on the H4 system to get the high beam just above the low beam cutoff line. Which is where you want it.
Now you know.
Q.E.D.
Last edited:
mlheck
Site Supporter
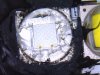
Ok, here's my attempt to try this. I must say the beer can worked much better. Also make sure you don't touch the wire coming out of the top or bottom of the chip with your shield. Lucky it worked again once I moved the shield. Getting these in the housing is easy than trying to get them out. The shields catch and bend when removing them.
Before shields

After shields

I used a sharpie the blacken the tabs.

Have to wait for dark and see how they look. These are the Cyclops lights.
Thanks Spiderman for the info.
NO COMMENTS ABOUT MY CLUTTERED GARAGE.
Before shields
After shields
I used a sharpie the blacken the tabs.
Have to wait for dark and see how they look. These are the Cyclops lights.
Thanks Spiderman for the info.
NO COMMENTS ABOUT MY CLUTTERED GARAGE.
Last edited:
OP
OP
- Joined
- Apr 22, 2011
- Messages
- 1,151
- Age
- 68
- Location
- Camarillo, Ca
- Bike
- 2006 ST1300A
- 2024 Miles
- 002552
Great job Michael! How did it work out on the road at night? What my photos do not show is that there is still plenty of light everywhere else.
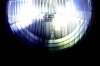
So here is a photo of the 3800 LED bulb with only one side with a shield and the other side no shield in an old Cibe round head light. You can see the effect of the shield on the bottom left side of the photo which makes the cut off line. but on the right unshielded side the light falls into the bottom of the reflector and is what creates the glare for on coming drivers. Since it is a mirror when it projects the dark bottom flips to the top (cut off) and the bright top ends up on the road. No shield means no cutoff.
So here is a photo of the 3800 LED bulb with only one side with a shield and the other side no shield in an old Cibe round head light. You can see the effect of the shield on the bottom left side of the photo which makes the cut off line. but on the right unshielded side the light falls into the bottom of the reflector and is what creates the glare for on coming drivers. Since it is a mirror when it projects the dark bottom flips to the top (cut off) and the bright top ends up on the road. No shield means no cutoff.
OP
OP
- Joined
- Apr 22, 2011
- Messages
- 1,151
- Age
- 68
- Location
- Camarillo, Ca
- Bike
- 2006 ST1300A
- 2024 Miles
- 002552
Here are some more methods of making a shield. You can use aluminum duct tape. I am including the mesh light which tried to provide a shield but it fell a little short. So I added some tape to improve it's cutoff. The tape needs to be just below the centerline of the low beam led. It is OK to have a little light go below the horizontal line. This last week I also tried another method but it had thermal issues that resulted in a melted lens.... These Leds do get very hot so the shield has to keep a little distance.
the soda can shield was attached with just a little thin bead of RTV along the bottom edge and the front edge. Make sure that you let the RTV fully cure (24hours) before you turn it on.

the soda can shield was attached with just a little thin bead of RTV along the bottom edge and the front edge. Make sure that you let the RTV fully cure (24hours) before you turn it on.
A few questions.My shield modification deals with the lack of cut off. If you want a hard cut off then paint the shield flat black. but if you want to reuse the blocked light then keep the mirror finish of the aluminum. You will then have some light scatter. It is important to keep the reflective shield as close to the low beam led as possible to keep a tight beam. I am adding a drawing of the basic dimensions. I have made a few using aluminum from a soda can. The mounting holes I drill with a 0.087 inch drill. I am hoping that many of you will try this and report your results back here. Most of the light leak is off the back of the bottom of the shield where it runs into the high beam led. But, as is, it provides a significant improvement that makes these Leds very useable with minimal glare to opposing traffic on road. Fold on dotted line and cut the solid lines. You will have to trim to fit.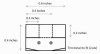
Please try it and let us know what you think!
1. Did you end up using a spacer to move the LED H4 back in the housing or does it seat on the headlight shell like an OEM lamp?
2. What exactly did you trim to make the LED H4 fit? The rubber boot that goes on the back of the headlight shell around the standard halogen lamp?
3. Are the above dimensions what you used in the final iteration of your experiments?
4. I assume you broke off the two lower tabs (4 and 7 o'clock) and are only using the 12 o'clock tab to position the lamp and the bail to hold it in place. Are you getting any rotational movement with this setup?
Thanks for all your info and experimentation. I wil probably try this mod during my winter layup. I don't want to take the chance that the bike will be apart during the precious riding season here.
Peter
- Joined
- Dec 21, 2004
- Messages
- 4,348
- Age
- 69
- Location
- Ledgewood, NJ 07852
- Bike
- 03&04 ST1300
- STOC #
- 5079
This step is not needed anylonger Cyclops sells the ST1300 Specific fitment now so you dont need to break of any tabs they fit like the OEM.4. I assume you broke off the two lower tabs (4 and 7 o'clock) and are only using the 12 o'clock tab to position the lamp and the bail to hold it in place. Are you getting any rotational movement with this setup?
OP
OP
- Joined
- Apr 22, 2011
- Messages
- 1,151
- Age
- 68
- Location
- Camarillo, Ca
- Bike
- 2006 ST1300A
- 2024 Miles
- 002552
Spacers are not needed for the ST1300. if you add spacers to sharpen the beam then you will move the high beam into the dirt. with the shield you do not need to change the spacing. only do so if your high beam is too low/high.
I had to trim out the tight center part of the boot. However I have been through several other bulb types so my boot is rather butchered. You want the fan out in the air and not covered up. but you need the boot or light will illuminate the cockpit. Water is no longer an issue since these lights will work under water.
these dimensions will work but I did make the bottom a .1 inch longer and bent the back edge up. if you want more light on the road right in front of you then make the top shield a little shorter (-.1 inches). The nice thing is that you can shape it to your likes. I am just giving a starting point.
I was an early adopter of this G3 light bulb so it came as a standard H4 so I just bent the tabs back. The ST1300 has a lip that holds the bulb well enough with the one tab. the hard part is getting the spring clip to lock. mine is most likely worse since I had to bend them trying other bulbs... once it is locked in place. I make sure that it is centered and square.
Last edited:
OP
OP
- Joined
- Apr 22, 2011
- Messages
- 1,151
- Age
- 68
- Location
- Camarillo, Ca
- Bike
- 2006 ST1300A
- 2024 Miles
- 002552
Ok - so I went out tonight and added the spacer trick that someone else thinks is a good solution. It did make the "wings" fade away. But it did not create any cutoff. there was a lot of light still above a better focused beam pattern. I checked the high beam before and after. Sure enough the high beam DROPPED below the low beam. It is hard to tell because the high beam is twice as bright as the low beam but the down the road spot is now below the horizon. If that is the solution you want then go for it. But I put back on my shielded beam with no spacers. It is really nice to have true cut off and a high beam that works. They have the focus right on the 3800 bulb.
The time and energy you put into your experiments and tuning is incredible. Thanks for keeping us in the loop. It's far more satisfying and interesting than just giving us the "market-ready" version.
OP
OP
- Joined
- Apr 22, 2011
- Messages
- 1,151
- Age
- 68
- Location
- Camarillo, Ca
- Bike
- 2006 ST1300A
- 2024 Miles
- 002552
I got a bit distressed by several vendors putting out wrong information about these LED lights because they do not really understand how the H4 system works. They are just repeating the misinformation that is out there and the problem is compounding. So I thought that maybe I could help by trying to explain the system and what needs to be done to make it work the way it should. More importantly the more of us riders know, the better choices we can make. (hopefully this thread could be made a sticky.)
----------------
If you look closely at your H4 Halogen bulb the high beam is behind the low beam filament. The critical focus point is set between the two filaments. So the low beam and high beam are out of focus by default but they are equal. If you focus the low beam you de-focus the high beam. Because the high beam filament is off axis (lower) it will also move the high beam lower by adding spacers.
Changing the focus on the 3800 LED is a workable compromise for some but you want to know what you are giving up. Since the 3800 is twice as bright on high beam you may not notice that your high beam is lower.
All lights without a shield will give a soft cutoff. It was the H4 that created the hard cutoff light pattern with it's shield under the low beam. That is why it became so popular in Europe while the USA was stuck in antiquity. Modern projector lights use a shield to create a hard cutoff in the same way. Some reflectors have a built in shield to allow use of an un-shielded bulb.
I hope hard cutoff vs soft cutoff clarifies the verbiage.
This is stuff I learned 40+ years ago trying to optimize the lighting on my 4x4 rock Jeep and I am still tinkering with it...
OP
OP
- Joined
- Apr 22, 2011
- Messages
- 1,151
- Age
- 68
- Location
- Camarillo, Ca
- Bike
- 2006 ST1300A
- 2024 Miles
- 002552
Ballast or no ballast?
Well both HIDs and LED's require a ballast. A ballast simply regulates the current through the light.
HID's's require High voltage (170 VAC) to operate as well as a very high voltage to start the arc. These voltages are lethal. That 35 watt ballast can kill you. So be careful. Not only that but the arc tube is a bomb waiting to go off. The pressure in the tube is about 450 psi. If any water gets into the housing it will be a mess. The ballast is a boost regulator that creates the high voltage AC the arc tube requires and it controls the current so that the brightness will be at a constant level.
LED's require Low voltage (3 VDC) So that little box between the bulb and the connector is the Ballast. the Ballast is a buck regulator. It drops the 14 volts (9 to 40 volts) down to 3 volts using a FET(switch) and an Inductor (aka ballast) the circuit precisely controls the current through the LED. By keeping the current constant you end up with a light that has the same brightness even if you change the voltage from 9 to 40 volts. However the regulator stops working if you drop the voltage below 9 volts. If you swing the voltage from about 9 to about 4 volts the LED will DIM. Somewhere below 4 volts the led will turn off. These buck regulators are very efficient (95%) today so very little power is lost so they do not get hot. LEDs are electrically safe.
Both LED's and HID's up close will damage your eyes. Be careful.
Both HID's and LED's use switching power supplies for the ballast. These devices create Radio Frequency noise. They are capable of interfering with any type of communication device that you may be using. Cell phone, blue tooth, FRS, CB, Ham radios, AM / FM Radios... Now the "good" lights will have enough filtering to minimize this but there are some that may cause problems and you will not know why your communications gear is not working.... the easy way to detect this is use a AM radio and tune it to no radio station where you only hear noise / hiss. Now turn on and off your lights. If you hear a loud tone (HID) or total silence (LED) there is a problem. If there is a slight change you are most likely OK.
Close.. but not quite.HID's's require High voltage (170 VAC) to operate as well as a very high voltage to start the arc. These voltages are lethal. That 35 watt ballast can kill you. So be careful. Not only that but the arc tube is a bomb waiting to go off. The pressure in the tube is about 450 psi. If any water gets into the housing it will be a mess.
Small hid's for automotive use will require 60-80v to keep lit. Initial voltage can be upwards of 20k but at the amperage used... will not give you a shock any stronger then you get form walking in socks on a carpet. As far as the bomb part, that is one reason they are shielded inside a second glass. But even if not, the 4ml of air at 450psi is not going to spread anything very far. Been there done that a few times. Even broke a few high-pressure single envelope lamps with higher volume of gas, no Ruperts (Drop) tail happening.
A ballast and a regulator is not the same thing. Also if you check the Vfd on the larger chip size / higher wattage LED's (30w) you will find they are pumping about 30v forward.LED's require Low voltage (3 VDC) So that little box between the bulb and the connector is the Ballast. the Ballast is a buck regulator. It drops the 14 volts (9 to 40 volts) down to 3 volts using a FET(switch) and an Inductor (aka ballast) the circuit precisely controls the current through the LED. By keeping the current constant you end up with a light that has the same brightness even if you change the voltage from 9 to 40 volts.
Love the future of LED as lighting and I like the time you are spending in helping get these mods worked on.
Last edited:
OP
OP
- Joined
- Apr 22, 2011
- Messages
- 1,151
- Age
- 68
- Location
- Camarillo, Ca
- Bike
- 2006 ST1300A
- 2024 Miles
- 002552
Sorry you are right 60-80 vac RMS, but it is 170 VAC pk-pk on the O'scope. It is not a sine wave so the math does not work. Voltage over 50 volts will stop your heart. Read the warning that comes with light. Most people just throw out the paperwork and hook it up. We are use to the safe 14 volts in our machines. 35 watts will limit the ac current to 200 ma and it only takes 100 ma to cause v-fib. My language was bit strong to make everyone think about their safety with these things.
A regulator is a controlled ballast. I am an EE and I use to design and test these things for a living. The 10 watt Cree lights come in 3, 6, 12 volt versions. I peeled the lens/phosphor off of one of these LEDs and there are 49 (odd) blue emitters on one die. On the larger LEDs they series - parallel the emitters to keep the current down.
A regulator is a controlled ballast. I am an EE and I use to design and test these things for a living. The 10 watt Cree lights come in 3, 6, 12 volt versions. I peeled the lens/phosphor off of one of these LEDs and there are 49 (odd) blue emitters on one die. On the larger LEDs they series - parallel the emitters to keep the current down.
OP
OP
- Joined
- Apr 22, 2011
- Messages
- 1,151
- Age
- 68
- Location
- Camarillo, Ca
- Bike
- 2006 ST1300A
- 2024 Miles
- 002552
Cree does make a 4000k led. Some of the OEM of the bulb will offer the lower color temp. But if you read the Cree data sheet you will find that the 4000k only has about 70% of the max lumens that the 6000k does. The fact that the 6000k bulb is the one with the most lumens per watt and that it is closer to 5500k, which is considered by Kodak to be the color of noon day sun, is why 6000k is more popular.
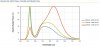
LEDs are just plastic fluorescent lights. The early ones were made from a UV LED with a yellow phosphor on top. The UV excited the phosphor to make the white light. Modern ones use an array of blue leds on one die to excite the phosphor. If you look at the color spectrum you will see a strong blue spike next to a lower bell curve that is the energy from the phosphor. This is why we perceive that even the white leds seem to be a bit blue.
If you look you will find 4000k bulbs - but they too will have a blue spike. It would be better to use a light yellow or light rose filter to remove the blue or just use amber leds for a fog light. [ red would even be better for fog but the LEO's would not be happy with you ]
]
LEDs are just plastic fluorescent lights. The early ones were made from a UV LED with a yellow phosphor on top. The UV excited the phosphor to make the white light. Modern ones use an array of blue leds on one die to excite the phosphor. If you look at the color spectrum you will see a strong blue spike next to a lower bell curve that is the energy from the phosphor. This is why we perceive that even the white leds seem to be a bit blue.
If you look you will find 4000k bulbs - but they too will have a blue spike. It would be better to use a light yellow or light rose filter to remove the blue or just use amber leds for a fog light. [ red would even be better for fog but the LEO's would not be happy with you
]
Last edited:
OP
OP
- Joined
- Apr 22, 2011
- Messages
- 1,151
- Age
- 68
- Location
- Camarillo, Ca
- Bike
- 2006 ST1300A
- 2024 Miles
- 002552
"I tried the piece bent at a 45 on the top side but it really threw the pattern off."
Yes that will happen IF you forgot to paint it BLACK. The upper shield (45 degrees) is to reduce (control) the light that hits the road directly in front of the bike causing close in glare for the rider. If you leave it off you will have more light directly in front of you (5 to 20 feet). The light that was on the garage floor. Your bike reflector may not need it. But knowing why it is there you can adjust it to your liking.
Yes that will happen IF you forgot to paint it BLACK. The upper shield (45 degrees) is to reduce (control) the light that hits the road directly in front of the bike causing close in glare for the rider. If you leave it off you will have more light directly in front of you (5 to 20 feet). The light that was on the garage floor. Your bike reflector may not need it. But knowing why it is there you can adjust it to your liking.
mlheck
Site Supporter
Well I had my first real ride with this setup in the dark. Rode around some in town but couldn't get a feel for the light pattern.
I rode about 100 miles on a 2 lane highway last weekend in the dark. Deer season started here and the farmers are harvesting, so I was really hoping these worked. I've done the last modification as posted to the shields. I was a little disappointed by the light being projected down the road on low beam. Light to the side of the road was more noticeable and welcomed giving the conditions. On high beam the light was great all the way around.
Which adjustment to the shield would help put a little more light down the road directly in front of the bike? I don't mean right in front of the wheel, but straight out in front of me.
I've seen several motorcycles now running bulbs like these with no shields and they are a bit blinding even at mid-day.
OP
OP
- Joined
- Apr 22, 2011
- Messages
- 1,151
- Age
- 68
- Location
- Camarillo, Ca
- Bike
- 2006 ST1300A
- 2024 Miles
- 002552
Making small changes to the shield will not give you the increase that you are looking for. I suggest that you adjust up the low beam a little. I set my dash adjustment to the number 4 position and adjust the screw until the cutoff line is on the horizon. It took me a few tries to get it where I wanted. Now I have 3 clicks down (if I have a passenger) and 4 clicks up to improve the down range lighting. Instead of using my high beam during the day I just turn the knob all the way up when I am riding with my group. The group leader has commented on how bright my (low beam is adjusted up). He thinks that I am using the high beam.
I have changed out my 10 watt LED fog lights (mounted on the forks where the yellow reflector was) to 10 watt 10 degree spots (superbrightleds.com AUX-10W-S10B) to get the extra distance down the road. However I rarely use them since the 3800 lumen bulbs with the shield gives me 98% of my needs.
If you bend down the bottom shield a little you will increase the amount of light above the cut off or trim off the back edge by the high beam led. You can tailor it to your needs. Some light above the cut off is a good thing.
This modification (adding my shield) is very easy to do I am surprised that more riders have not tried it and reported back here their results.
mlheck
Site Supporter
I messed around with the height of the low beam on my night ride and found a happy spot. I guess what I'm looking for is the middle of the light pattern to be a little brighter. Will cutting off the tip up on the bottom shield help with this? I know I could just try it and find out, but I also figured you have been there and done that so use the knowledge gained.