Alternator bearing replacement?

Rossi

R.I.P. - 2014/08/28
Rest In Peace
Joined
Dec 16, 2007
Messages
484
Location
Nova Scotia, Canada
Bike
2000 ST1100
STOC #
7236
I started the bike yesterday (2000 ST1100) and heard a squealing noise at a specific rpm (1300-1400). I have heard this noise before, but never that bad. Went to the front of the bike, the noise was less obvious. The noise was worse on the left hand side. I dug out a steel rod and pressed one end on the alternator and the other to my ear. It sounded rough.

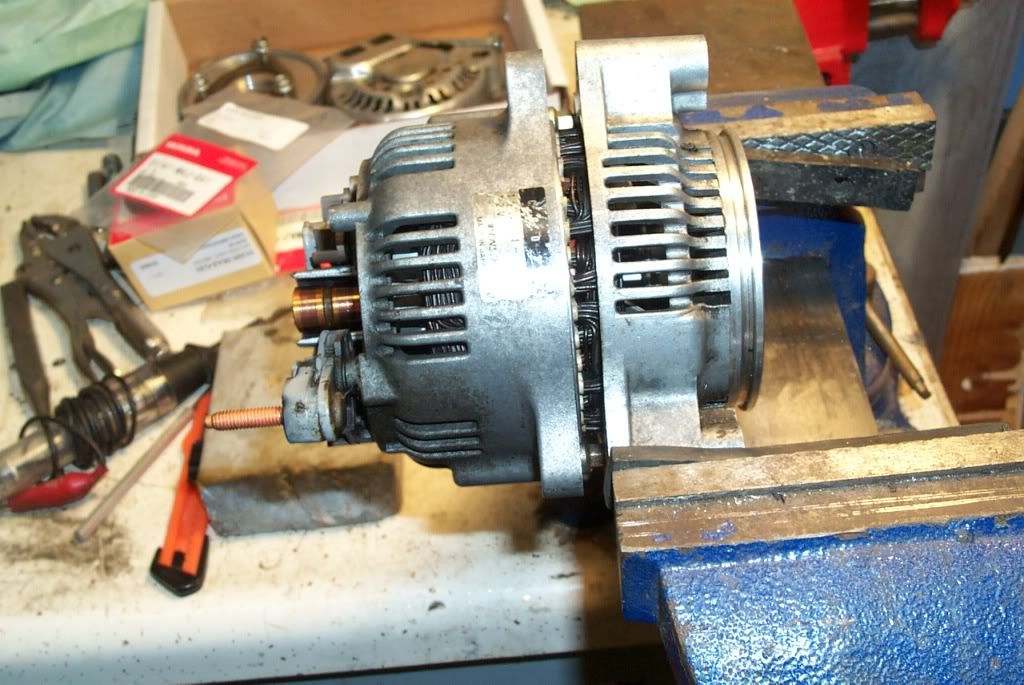
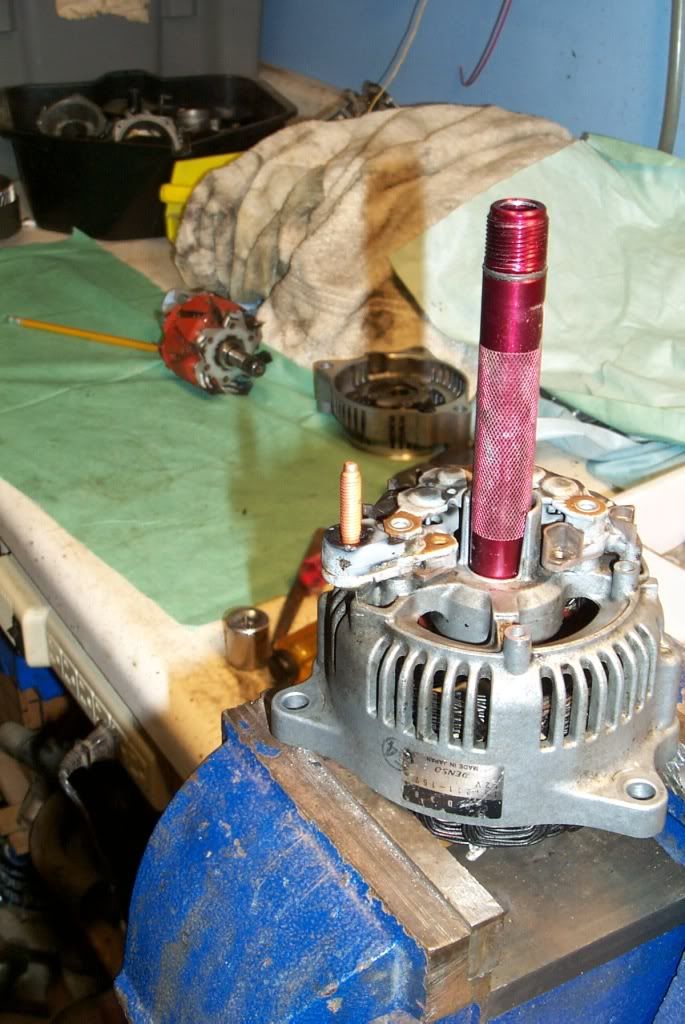
I'm thinking bearing replacement. How difficult is it to replace the bearings? All I can find is info regarding replacing the 28 ampere with a 40 ampere unit.

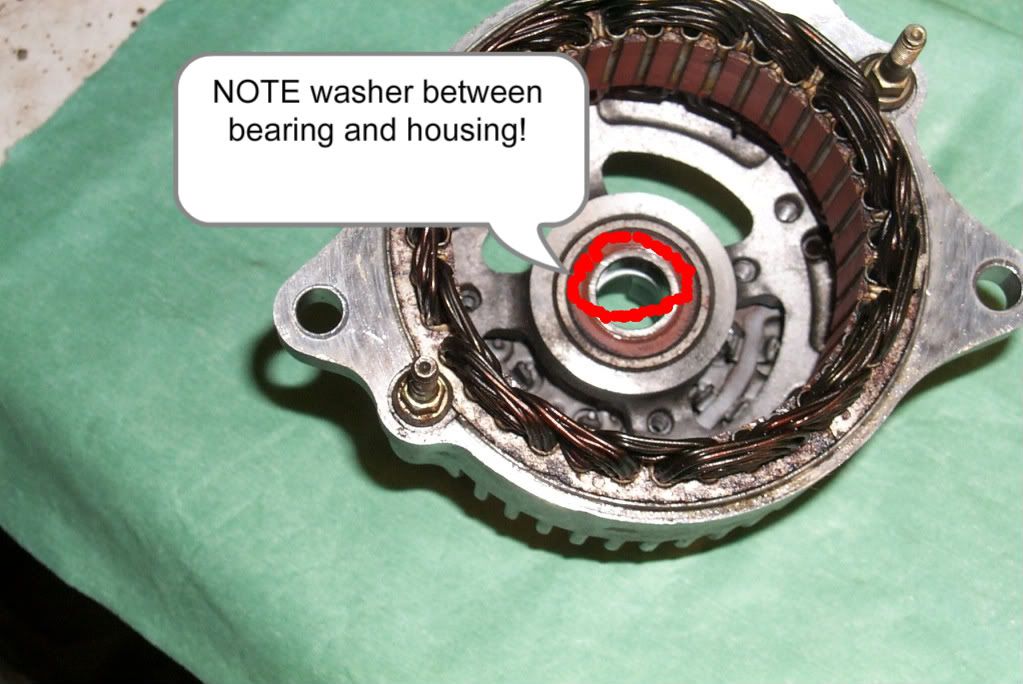
Also, is the alternator shaft unit that stays attached lubricated by engine oil, or is it possible that those bearings need replacing as well while I'm there?

Thanks in advance.
 
Joined
Mar 21, 2006
Messages
2,112
Age
72
Location
Yuma, Arizona. AKA Paradise Lost
Bike
'08 Connie C14
STOC #
6114
Hoo boy. Understand that I have an older ('93) ST, so could be over ruled.

The 'inside the motor' part is oil lubed. About the only thing that could be bad would be the bearing at the back of the alternator.

From my experience with the 40 amp conversion, you could just unbolt the alternator from the mount and not have to pull the drive itself out of the motor, therefore no Lewis pin needed. It would make it a lot easier IMHO.

Tank cover, gas tank, alternator, I would think. I would think that back would come out with out removing the swing arm.

I may have just quoted you a batch of BS. We'll see.
 

sirepair

Let's RIDE!
Site Supporter
Joined
Jun 7, 2007
Messages
3,231
Location
Chillicothe, Ohio
Bike
2003 ST1100P
STOC #
7105
The rear bearing is also oil cooled.

There are 3 bearings that carry the alternator shaft; one in the motor, one on the mounting plate, and one in the housing. Me thinks (dangerous) the housing can be removed, as Tom stated, fairly easily while leaving the shaft in the motor.

Disassembled oil cooled alt
 

0204bit

Earlygo
Joined
May 18, 2008
Messages
33
Location
MN
Bike
'93 ST1100A
You will have to remove the alternator to repair it and that requires removing the rear swing arm as outlined in the instructions for swaping a 40 amp alternator for the original 28 amp. When my alternator started leaking oil I opted for the 40 amp replacement.

I still have the original 28 amp alternator and regulator which worked fine when I removed it. The only thing that was wrong with it was the bad case oil seal. I will send the alt. to you for the cost of postage if you want it!
 

sirepair

Let's RIDE!
Site Supporter
Joined
Jun 7, 2007
Messages
3,231
Location
Chillicothe, Ohio
Bike
2003 ST1100P
STOC #
7105
This diagram shows four bearings total. 2 internal (34,35), 2 external (13, 14).
Link is to the 40 amp alt (96 and up) which does have a total of 4 bearings.

The 28 amp alt is not shown completely exploded. I've got a dismantled 28 amp unit in the workshop, I can see if I can get gearing numbers from it if needed.
 
Joined
Mar 21, 2006
Messages
2,112
Age
72
Location
Yuma, Arizona. AKA Paradise Lost
Bike
'08 Connie C14
STOC #
6114
This is a 2000, so is an air cooled 40 amp unit.

I think the diagram #s 13 and 14 could be changed without removing the swing arm, by splitting the alternator and not removing the base.

I'd really like to get a consenting opinion from a 40 amp guy. Mine is a hybred, no doubt about it.
 
OP
OP

Rossi

R.I.P. - 2014/08/28
Rest In Peace
Joined
Dec 16, 2007
Messages
484
Location
Nova Scotia, Canada
Bike
2000 ST1100
STOC #
7236
Thanks. I have found all the parts lists. I was just wondering if bearing removal (once the alternator is out) is a pain or if they come out relatively easy. Is there any special trick to it?
 

sirepair

Let's RIDE!
Site Supporter
Joined
Jun 7, 2007
Messages
3,231
Location
Chillicothe, Ohio
Bike
2003 ST1100P
STOC #
7105
Went out to the workshop and pulled out the old 28 amper. Removed the outer housing and the bearing stayed on the shaft. Bearing is a NSK 6000. 25x10x8 I believe. I pried it off of the end of the shaft with a screwdriver blade (not elegant, but functional!)

The "center" bearing felt the worst (though the outer bearing was a little crappy). It would be more work to R&R this bearing; you would have to pull the flywheel/gear. This is an NTN SC04A84 bearing: 46(?)x20x10 I think. I don't have my calipers here so I'm guesstimating the measurements.

Hope this helps!
 

sirepair

Let's RIDE!
Site Supporter
Joined
Jun 7, 2007
Messages
3,231
Location
Chillicothe, Ohio
Bike
2003 ST1100P
STOC #
7105
OK, I should REALLY have comprehended the first post better....:nuts1:

Sorry for my posts!

Now that I UNDERSTAND I can be of some help there too!! Before I replaced my 28 amp with the used 40 amp, I installed new bearings. Here's some pics.

You will need a vise, hammer, a punch, a pointed punch and an appropriately sized "sleeve" (I used an old mini-mag flashlight barrel) to remove the bearings.

Once the alt has been removed from the bike and the regulator/rectifier has been removed, place it in the jaws of the vise so that you are only grasping the "front" half of the housing. Use the punch and hammer to drive the shaft, along with the back half of the housing, out of the front half. Mine was pretty tight and took some "persuasion"! Might want to soak a bit with penetrating oil.


Now that the front half is removed, place the back half in the vise as pictured here:


USE A POINTED PUNCH to drive the shaft out of this end so that the commutator does not get damaged!! You should be able to see a "dimple" in the end of the shaft for your punch to go in to.

Once the rotor has been removed, you can drive out the bearing. Pay close attention to the spacer/shim that is installed between the bearing and the rear housing.


Here's where I used my ol' Mini-mag flashlight barrel to drive out the rear bearing, making sure not to damage the spacer/shim. A piece of conduit may also work for this.


Note the "lip" on the spacer/shim and the groove on the bearing. This is the proper order/orientation for the parts to go into the rear housing, with the housing being on the left.


Assembly is pretty straight forward. You may want to use some assembly lube on the shafts as you press it back together.

Hope this helps!!
 
Joined
Mar 21, 2006
Messages
2,112
Age
72
Location
Yuma, Arizona. AKA Paradise Lost
Bike
'08 Connie C14
STOC #
6114
There you go Pat! I knew somebody would have the full 40 amp unit:)

So. Do you think he can change the 2 back bearings with out pulling the whole unit out? Seems a horrible deal to have to pull the swing arm for a pair of bearings...At least there is lots of documentation on how to do it.

EDIT: Not that I have written my report (yet) but I had to split the alternator at one point. Made the install pretty darn easy with no shaft or mounting bracket to worry about.

I just had my gas tank and such out for carb work. I think I could have gotten the back half of the alternator out with out pulling the swing arm.
 
Last edited:

sirepair

Let's RIDE!
Site Supporter
Joined
Jun 7, 2007
Messages
3,231
Location
Chillicothe, Ohio
Bike
2003 ST1100P
STOC #
7105
I'm not sure that you could get the alt apart while mounted. It took a fair bit of hammering on the shaft (I was starting to worry!) to get the two halfs of mine to split while in the vise. It would be worth a shot to try before removing the swingarm, though.

Being that there is such a tight space to work in, it would probably be easier to pull the swingarm and take out the whole alt (leaving the adapter plate/flywheel/gear in place) than splitting the alt on the motor.

Pulling the swingarm isn't that big of a deal, except needing the big honkin socket and hex . I'm sure John Oo can get a kit to Rossi, if needed.
 
OP
OP

Rossi

R.I.P. - 2014/08/28
Rest In Peace
Joined
Dec 16, 2007
Messages
484
Location
Nova Scotia, Canada
Bike
2000 ST1100
STOC #
7236
I'm not sure that you could get the alt apart while mounted. It took a fair bit of hammering on the shaft (I was starting to worry!) to get the two halfs of mine to split while in the vise. It would be worth a shot to try before removing the swingarm, though.

Being that there is such a tight space to work in, it would probably be easier to pull the swingarm and take out the whole alt (leaving the adapter plate/flywheel/gear in place) than splitting the alt on the motor.

Pulling the swingarm isn't that big of a deal, except needing the big honkin socket and hex . I'm sure John Oo can get a kit to Rossi, if needed.
Thanks for all the input.

I've got about 3 months of bike downtime (I haaaates winter) so I will remove the swingarm to access the alternator. That will also give me a chance to check and relube the u-joint, driveshaft, splines, etc. As for the special tools, I can make some (self taught welder/machinist).

Will probably start in January.
 
Joined
Mar 21, 2006
Messages
2,112
Age
72
Location
Yuma, Arizona. AKA Paradise Lost
Bike
'08 Connie C14
STOC #
6114
Quote by Rossi
As for the special tools, I can make some (self taught welder/machinist).
Sounds like a real good plan, Julien. I tend to forget that riding season takes a break for most folks. With time, it's real do able. Heck, I made a swing arm tool, I'm sure you can!
 

0204bit

Earlygo
Joined
May 18, 2008
Messages
33
Location
MN
Bike
'93 ST1100A
May I suggest that you use a press, if at all possible, to push the armature shaft out and if that is not available use a brass drift to hit the shaft with. If the bearing is hard to get out you may break the housing by pounding on it a lot and a steel drift will surly peen or mushroom the end of the armature shaft. Either part (armature or housing) are very expensive to replace. Believe me it is not worth it. Any alternator repair shop or machine shop will have a press to do it right. Make sure they support the housing all the way around, not in just a couple of places! You don't want to stress the housing in any single place.
 
OP
OP

Rossi

R.I.P. - 2014/08/28
Rest In Peace
Joined
Dec 16, 2007
Messages
484
Location
Nova Scotia, Canada
Bike
2000 ST1100
STOC #
7236
Good suggestion 0204bit.

We have a press at work, and I have a brass drift in my tool box.
 
OP
OP

Rossi

R.I.P. - 2014/08/28
Rest In Peace
Joined
Dec 16, 2007
Messages
484
Location
Nova Scotia, Canada
Bike
2000 ST1100
STOC #
7236
Thanks John.

Sorry for the late response. We were away for the weekend but got back before the snow storm.

I can probably start on the special tool in the near future.
 
Joined
Sep 17, 2015
Messages
3
Location
Mullin,Texas
Bike
1991 Honda St1100
You will have to remove the alternator to repair it and that requires removing the rear swing arm as outlined in the instructions for swaping a 40 amp alternator for the original 28 amp. When my alternator started leaking oil I opted for the 40 amp replacement.

I still have the original 28 amp alternator and regulator which worked fine when I removed it. The only thing that was wrong with it was the bad case oil seal. I will send the alt. to you for the cost of postage if you want it!
this is Jessie r again and iI wanted to say I'll take it if you still have it so please contact me ASAP. THANKS
 
Top Bottom