
1993 ST1100 ABS TCS (Early ABS System System) Broken Front ABS Sensor Replacement Clone Honeywell 1GT101DC from Alliexpress
Hi, one of the things i have been fearful of with this bike is breaking anything to do with the ABS system or having a modulator fail, in NZ its a requirement if ABS is fitted that the vehicle must complete its ABS system check which is generally the ABS illuminating and then extinguishing, you will fail an inspection and not be able to register the bike, so it becomes an issue.
I have been overhauling the bike and fixing some of the cosmetic issues, one of the things that had bugged me was different coloured rims, one dark blue/grey and the other light grey, I painted one to try to fix oxidation of the rim but not the other, so in needing a new set of tyres I thought I would get the old tyres pulled off and give them a gloss black paint job to match them up. This is where my fun begins.
To get a good paint finish I pulled the discs off and took the ABS ring off the front (regret this), masked them up including the landings for the ABS ring and discs so that I would not have to fight to get them back on and amongst a long list of other things put it back together and did some light runs up and down our street (dead end) at low speed just to check everything seemed to be in the right place.
I buttoned everything up and booked an inspection with the motorbike mechanic, was riding to work with the intention of taking it to the shop and collecting in the afternoon, two corners down the road after a bit of heavy braking I hear this metal on metal grinding, whirring sound the lights for ABS and Traction start to go nuts flashing and flickering. I pull over turn it off and on ABS error warning, knowing its never going to pass I take it home and take the car to work and push the inspection back a couple of days.
At home I put in diagnostics and get error code 5 which on this model is front ABS sensor, I sort of suspected this from the grinding noise coming from the font. NOTE: the error code for ABS 1 (ABS / TCS) the early ABS system from years 93 and 94 are different from the later ABS II (ABS / CBS) which started In 95. I recorded the code on a video and cleared, put on centre stand and jacked up front and the sensor had no real clearance but not scuffing anymore.
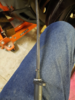
Pulled the sensor to find the following lathe work where the tone ring had tried to eat the sensor or a good portion of it, bit shocked to be honest!
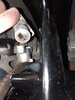
I added a washer between the ears of the ABS sensor and the horn for some basic clearance and then put into “Spin Test” mode but nothing from the front however rear seemed to be reporting.
Took for a test drive but system would not arm correctly, reporting an error but no error code which is to be expected when it cannot re arm. I was under some pressure to pass the inspection so what I did was expose the led check light panel, pull the ABS lights out and stuff them in plastic bag then jam the TCS Active lights in the ABS hole and hot glue them in place, this makes it look like the ABS light comes on for 4 seconds and goes out and this got me through the vehicle inspection..
The bike passed but he did comment yo have the discs on the wrong side…. Left on right, right on left, its not an inspection fail but you should swap them back. So this started me thinking. The discs are very similar but obviously Mr Honda did not stamp them L and R for no reason so there is a difference, maybe under heavy braking they deflected the ABS tone ring enough to catch and destroy the sensor, this is my current and only hypothesis. In my defense I did mark them with L and R and direction of rotation, but I was working late and made a simple if rather foolish mistake, I also never should have taken the ABS tone ring off this was another mistake.
I then searched online and contacted Honda but already knew the answer that these are now “Unobtanium”. I noticed a few people referencing the Honeywell unit 1GT101DC and 1GT101 but these appear to not be in production from Honeywell but aftermarket copies seem to be coming out of China via Alliexpress, this seemed to be a but of a long shot but for the price $36 NZD ($17 USD) it seemed like it was worth the shot, so I ordered one from Alliexpress as follows.

https://www.aliexpress.com/item/4000982835825.html?spm=a2g0o.store_pc_promotion.promoteWysiwyg_500646510.2
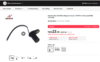
I don’t have much experience with Alliexpress other than ordering some components for an IOT proof of concept model at work with mixed results, so rather shocked when it arrived in about 8 days, tracked it all the way and it was exactly what it said in terms of appearance.

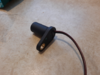
Initial impressions were it looked okay however it did have a short pig tail and the cables seemed light weight and likely to crack unless they are well sheaved and protected. I had a start point and in reality, nothing to lose.
I pulled and cut off the old sensor and yes its scored and has signs of heat stress and also a crack at the bottom of the channel that had been cut through the face of the sensor, this confirmed to me it was poked.

The next thing was to work out the wiring, someone had mentioned that there are three wires on the bike a ground a 12v feed and a 5v input which I believe grounds through the sensor in the presence of a magnetic field generated by the passage of the tone ring, so I hooked up my multi meter to the exposed wires, while keeping them apart.
This generated the following table (careful not sure if this applies to all models remembering mine has the early ABS version).
Bike Side Wire Colour | State | Purpose |
| Green | Earth | Earth |
| Blue | 5-6 V | Sensor Signal |
| Black | 12 V | Power Feed |
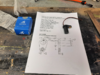
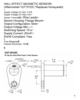
There was not instructions, specifications or anything other than bubble wrap and the Hall Sensor in the box but googling found me a data sheet like the following and the wires seem to trace out as expected.
This Chinese version has very faint tracer colours on the cable so you need good light and reading glasses at maximum perch on the nose. Based on this diagram they should be soldered together as follows. You would have thought Black with Black and Green and Black has never been a good combo for me logically.
Bike Side Wire Colour | State on Bike | Purpose | Hall Sensor |
| Green | Earth | Earth | Black |
| Blue | 5-6 V | Sensor Signal | Black with White Trace |
| Black | 12 V | Power Feed | Black with Red Trace |
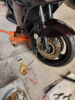
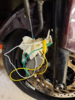
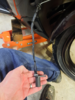
After this and thinking about the pin out some more I put it in the holder on the bike with some washers for spacers and taped this together with some jumper clips to arrive at the following then put in Spin Mode and what do you know the it started blinking when I spinning the front wheel indicating a signal was received, I was surprised.
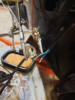
I cut the boot from the old sensor and slide this over the new sensors pig tail and glued this in place to reduce the risk of vibrations cracking the cabling at the entry to the sensor itself. I also pushed out the brass insert and elongated the hole so that could screw it in the correct position.
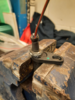
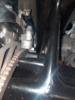
I bought some heat shrink, some abrasion perforated tubing and some stainless washers and set about stitching it back together.
I heatshrinked each soldered line and then heatshrinked over the top of this
Then I added this abrasion cover and zip tied this in place.
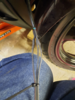
Remounted it and rechecked the spin test for a pass and then spaced it I found at five washers spaced it would not work, at four washers spaced it did work, I wanted it as far away from the tone ring but still working, used SS washers that don’t rust and Loctite to ensure the cap screw does not back out given there is only one holding it in place now rather than two.
Took it for a ride and its working well as far as onboard diagnostics can tell. Things I have learned.
- Don’t screw around with Tone Ring, leave it in place.
- Check L and R fitting elements, if tired leave it for another day if at all possible.
- If removing wheels and re fitting be careful not to hit the ABS sensor
- Check the air gap for the ABS sensor post re fitting tires before initial riding, make sure no scuffing sounds.
- Don’t give up
