Pumper
Well, the story goes like this... I went to a friends house to work on a bike that was given to him. Seems that the son said his dad thought it was the fuel pump, but then it was never repaired and remained all apart. Come get it said the son. So the tank was out of it already. Last time ridden was 2003, or the tag reads the last year registered. I pulled the pump out and everything was rusty. So he gave to me and now I'm stuck with it.
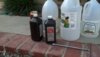
Getting an OEM shop manual for this in a few days. Bike has 23k on it. Crashed lightly on the guard extenders. Owner bought those new, still in the plastic bags. New AC too still wrapped. Brought it home and threw a few hours at it so far. 4am to 11 and took a lunch break. Posted this up and will go back to it later. Filled the tank up with vinegar, hydrogen peroxide, and tap water for the first go-round. When it evaporates down past the brim, I'll top it off with peroxide. Seems to work for me.
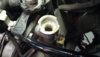
Took the radiator cap off and dry as a bone with white crust packing everything, so a few chemicals will take care of that. The engine seems to move so I did no hear some snap like the water pump housing was causing a lockup that way. Had oil up all 4 plug threads; with #3 oil fouled, the others dry. I have a cheap scope and might take a look for scoring.
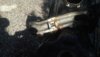
Looking at years of sitting, then removing a connector and it hung up some. Again, a few chemicals to dip those connectors into, and back to solid connections with some fresh metal to contact with. I took everything off and washed the dust and dirt off the plastic. I'm temped to power-wash the bike off at this point, but I'll windup cleaning it all off with WD-40. Frame, harnesses, plastic, engine, etc.
When I banged the rear axle to see if it was rusted and it moved, I'm now about to check the front. Whoever worked on the wheel swaps for new tires, needless to say they were over tight for my hex and caliper bolts, service on the road; way too tight. Other than that, the bike is pretty much a virgin with a few valves out of spec but plenty of clearance so I figure no burnt valve if they were never touched.
While it's down, I'll pack the front wheel bearings, line up the axle to the triples so the front axle floats in both forks. Rear end is solid and no chain to line up and lube. So when all is said and cleaned, I'm going to spray the whole bike down with WD and now if this thing sits in a windy ocean spray, I won't see the sea eat the bike up is the test.
Once I finally get the carb bank off, I'll take a leakdown and a compression test. Don't want to spend a dime on the bike till the title is in my name, but I see parts are still available for this. Have a new can of NAPA carb dip I used for one carb so this comes in handy again.
I'd like to thank those who showed me what to look for diaphragm wise, pump wise, what am I missing wise and all that.
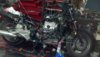
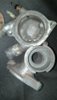
Any tricks to getting that carb bank off? I removed the right top engine mount and you could see the top insulator band's screw almost dead on thru the thread hole. Are they kidding me? I'm still chasing the lower band screws so this pops off somehow. Even the throttle bell-crank where the cable ends attach to is gummy to open. I don't know what to find at the bowls but brown molasses. That tank stunk like 30 plus years.
Getting an OEM shop manual for this in a few days. Bike has 23k on it. Crashed lightly on the guard extenders. Owner bought those new, still in the plastic bags. New AC too still wrapped. Brought it home and threw a few hours at it so far. 4am to 11 and took a lunch break. Posted this up and will go back to it later. Filled the tank up with vinegar, hydrogen peroxide, and tap water for the first go-round. When it evaporates down past the brim, I'll top it off with peroxide. Seems to work for me.
Took the radiator cap off and dry as a bone with white crust packing everything, so a few chemicals will take care of that. The engine seems to move so I did no hear some snap like the water pump housing was causing a lockup that way. Had oil up all 4 plug threads; with #3 oil fouled, the others dry. I have a cheap scope and might take a look for scoring.
Looking at years of sitting, then removing a connector and it hung up some. Again, a few chemicals to dip those connectors into, and back to solid connections with some fresh metal to contact with. I took everything off and washed the dust and dirt off the plastic. I'm temped to power-wash the bike off at this point, but I'll windup cleaning it all off with WD-40. Frame, harnesses, plastic, engine, etc.
When I banged the rear axle to see if it was rusted and it moved, I'm now about to check the front. Whoever worked on the wheel swaps for new tires, needless to say they were over tight for my hex and caliper bolts, service on the road; way too tight. Other than that, the bike is pretty much a virgin with a few valves out of spec but plenty of clearance so I figure no burnt valve if they were never touched.
While it's down, I'll pack the front wheel bearings, line up the axle to the triples so the front axle floats in both forks. Rear end is solid and no chain to line up and lube. So when all is said and cleaned, I'm going to spray the whole bike down with WD and now if this thing sits in a windy ocean spray, I won't see the sea eat the bike up is the test.
Once I finally get the carb bank off, I'll take a leakdown and a compression test. Don't want to spend a dime on the bike till the title is in my name, but I see parts are still available for this. Have a new can of NAPA carb dip I used for one carb so this comes in handy again.
I'd like to thank those who showed me what to look for diaphragm wise, pump wise, what am I missing wise and all that.
Any tricks to getting that carb bank off? I removed the right top engine mount and you could see the top insulator band's screw almost dead on thru the thread hole. Are they kidding me? I'm still chasing the lower band screws so this pops off somehow. Even the throttle bell-crank where the cable ends attach to is gummy to open. I don't know what to find at the bowls but brown molasses. That tank stunk like 30 plus years.
Google Photos
Home for all your photos and videos, automatically organized and easy to share.
photos.google.com
Last edited by a moderator: