- Joined
- Mar 23, 2005
- Messages
- 893
- Location
- Spokane, WA
- Bike
- 08 FJR1300/01 ST1100
- 2024 Miles
- 001754
- STOC #
- 5341
Winter farkle time and I had decided I wanted to re-seal my leaky exhaust. It was fortunate because I had more going on than I thought.
I ordered up new seals for everything along with a handful of fasteners and do-dads from Partzilla and pulled the exhaust.
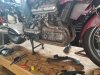
I'll take a moment to caution other owners. The seal used between the headers and the head are crushable and, over time, you will need to retorque the header nuts because they will be loose once the seal crushes more. I read about a problem with the header nuts vibrating off sometimes and... to my surprise... I was missing one on cylinder #3. Both #3 and #4 seals were leaking and the #4 bolt was finger tight loose. When I reinstalled I re-torqued for 2 days and a half dozen heat cycles and I was still getting movement in the nuts. After that... they seemed consistent. But, I'll be checking them at the end of this riding season and will add it to the list of duties I should perform.
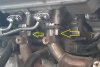
I'll also mention they are a weird long nut and a strange sized 7mm. I decided to pick up 4 extra to pass out to ST1100 owners at NEWSTOC. I figure if we get some on the road we have a chance of saving someone sometime somewhere who found his vibrated off.
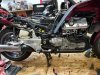
So, take a look. You can see them all through the side fairing and make sure they are all there... these are the outside ones and there are partners to the inside. I had heard an exhaust sound at the end of last season, but had no idea I was missing a nut!
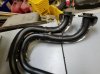
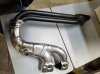
I sent the headers and heat shields over to Brad at Performance Coatings in Seattle. He's done work for my business for years and they came back gorgeous. He did the headers in satin black and the heat shields in a ceramic fake-chrome called Chromex.
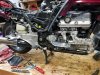
During the down time I polished the rear muffler set, pinstriped the fake cooling fins on the valve cover, and generally cleaned. I doubt she's ever been that clean! Reinstalled...
Back together with the heat shield and newly polished Hwy Wings...
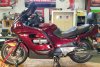
Tupperware on, ready to ride:
All in all I'm very glad I did it. Not only did I get the smaller exhaust leaks sealed, I found an issue that would have turned nasty and found my lost hp! I've only ridden a hundred miles and it was so cold I couldn't tell you if the coating is making a difference or not. But, come summer, I'll report back. I expect they should make a reasonably noticeable difference based on my experience in the past.
So much for winter farkles... time to ride!
I ordered up new seals for everything along with a handful of fasteners and do-dads from Partzilla and pulled the exhaust.
I'll take a moment to caution other owners. The seal used between the headers and the head are crushable and, over time, you will need to retorque the header nuts because they will be loose once the seal crushes more. I read about a problem with the header nuts vibrating off sometimes and... to my surprise... I was missing one on cylinder #3. Both #3 and #4 seals were leaking and the #4 bolt was finger tight loose. When I reinstalled I re-torqued for 2 days and a half dozen heat cycles and I was still getting movement in the nuts. After that... they seemed consistent. But, I'll be checking them at the end of this riding season and will add it to the list of duties I should perform.
I'll also mention they are a weird long nut and a strange sized 7mm. I decided to pick up 4 extra to pass out to ST1100 owners at NEWSTOC. I figure if we get some on the road we have a chance of saving someone sometime somewhere who found his vibrated off.
So, take a look. You can see them all through the side fairing and make sure they are all there... these are the outside ones and there are partners to the inside. I had heard an exhaust sound at the end of last season, but had no idea I was missing a nut!
I sent the headers and heat shields over to Brad at Performance Coatings in Seattle. He's done work for my business for years and they came back gorgeous. He did the headers in satin black and the heat shields in a ceramic fake-chrome called Chromex.
During the down time I polished the rear muffler set, pinstriped the fake cooling fins on the valve cover, and generally cleaned. I doubt she's ever been that clean! Reinstalled...
Back together with the heat shield and newly polished Hwy Wings...
Tupperware on, ready to ride:
All in all I'm very glad I did it. Not only did I get the smaller exhaust leaks sealed, I found an issue that would have turned nasty and found my lost hp! I've only ridden a hundred miles and it was so cold I couldn't tell you if the coating is making a difference or not. But, come summer, I'll report back. I expect they should make a reasonably noticeable difference based on my experience in the past.
So much for winter farkles... time to ride!
Last edited: