Front fork rebuild questions

Joined
Sep 11, 2011
Messages
382
Location
Pearland, Tx.
Bike
97 ST1100 04 ST1300
STOC #
8492
First off, I've done quite a few fork jobs. With that said, I know that every now and then you run into something a little different that takes more time than it should to figure out.

Question - is there anything odd or funny in the process of rebuilding the front forks on the ST1100? I went though my Haynes manual and it looks pretty straight, but my ADHD could have sped right over something - anything particular to the 1100? (I also have the Honda manual, but haven't looked at it yet)
Thanks!
 
Joined
Mar 13, 2012
Messages
5,071
Location
soCal
Bike
'97 ST1100
STOC #
687
the short answer is no.

But, what exactly are you rebuilding, are you replacing the fork seals, or something else?
 
Last edited:

STRider

Site Supporter
Joined
Mar 17, 2020
Messages
1,114
Age
64
Location
Oregon
Bike
2012 ST1300A
STOC #
50
Great write-up referenced by JohnO.

When I had to rebuild the forks on my 91 ST1100 I also took the opportunity to replace the perished rubber and worn components of the TRAC anti-dive unit. See the highlighted items in the parts diagram. Their availability might present a challenge currently, YMMV I also replaced my bushings since I bought them ahead of time, but in retrospect they didn't justify replacement.

Also consider replacing the crush washer on the damper retaining bolt. It's like those on the banjo bolts of a brake line. Intended to be one-use, but you may get away with reusing it.

Finally, the paint on my sliders was pretty dinged up. I took the opportunity to repaint mine with VHT Roll Bar and Chassis Paint, satin black. https://www.amazon.com/VHT-ESP671007-Satin-Black-Chassis/dp/B000CPAVI4

Good luck!

1691190262133.png
 
OP
OP
Aladinbama
Joined
Sep 11, 2011
Messages
382
Location
Pearland, Tx.
Bike
97 ST1100 04 ST1300
STOC #
8492
the short answer is no.

But, what exactly are you rebuilding, are you replacing the fork seals, or something else?
It's got 126,000 miles on it and hasn't been touched for the 70K+ I've owned it. The seals are weeping and I want to ride it up to Iowa week after next :)

While I'm in there I figure I'd replace the bushings and add some progressive springs. Probably feel like a new bike when I'm done :)
I'll have to figure a way to address the anti-dive system as I've seen no kits that are readily available. Hopefully, the o-rings can be found locally.
 
Joined
Mar 13, 2012
Messages
5,071
Location
soCal
Bike
'97 ST1100
STOC #
687
It's got 126,000 miles on it and hasn't been touched for the 70K+ I've owned it. The seals are weeping and I want to ride it up to Iowa week after next :)

While I'm in there I figure I'd replace the bushings and add some progressive springs. Probably feel like a new bike when I'm done :)
I'll have to figure a way to address the anti-dive system as I've seen no kits that are readily available. Hopefully, the o-rings can be found locally.
If you're interested in finding generic seals the size is 41mm x 54mm x 11mm. That's all I've ever used, but others prefer the OEM seals, which I think makes you also purchase the dust covers which don't usually need replacing anyway.
 

ST1100Y

Site Supporter
Joined
Dec 4, 2012
Messages
5,037
Age
59
Location
Vienna, AuSTria
Bike
ST1100Y, ST1100R
STOC #
637
Pretty straightforward job...
Some hints from experience though:

before anything else
- remove handlebar covers
- loosen upper triple clamp pinch bolts
- loosen fork caps 1/4 turn

then you can deal with everything else, calipers, front wheel, fender/brace, etc...
RH leg has that plastic clip holding the brake hose; you'll need a stubby #2 JIS there... (if you overlook that thing you'll wonder why the fork won't slide out...)
Non ABS forks have drain bolts at the sides, up to you if you want to make use of them... but ensure to loosen the caps first... :biggrin:

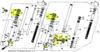
Once a fork leg is removed flip it upside down to deal with the damper retaining bolt, do this first, you can/will drain most of the oil out there (prep you plastic oil-pan...)
Then remove the cap, drain the rest of oil out (I then flush with lots brake cleaner to reduce the oil-mess on the workbench...)
Once all is apart, wash thoroughly, again: its a mess in there...

upon assembly proper orientation of the new slider bushings needs to be observed
You don't want to have the cut in a load bearing position (forward or rearward), but facing sideways (in/outward), during this I mark the [OUTSIDE] on the upper tube with a piece of masking tape an a marker and maintain it's orientation in the fork bottom...

Pump/bleed the shocks a couple of times after filling fork oil (you'll hear and feel once the air is purged), and keep fork vertically until installation.

When placing the forks back into the triple clamps, I see to get the tubes flush with the upper clamp, cap rim protrudes...

I torque the lower clamps first for alignment.... (just installed new tubes on my rig, worked perfectly...)
 
Top Bottom