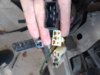
Would it work to cut the bad part out of the harness and just replace that connector on the plug...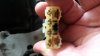

It is often hard to pinpoint a cause for failure of a connector. Typically these joints (as compared to a soldered splice) have higher resistance which leads to more heat at the connection which increases resistance, etc..... A bit of dirt, or corrosion, or just a loose connection could have started this spiral which ended in a burned out connection. Corrosion is one reason why Honda packs all multi pin connectors with grease. You will find endless debates on this and other websites regarding the use of dielectric grease. This stuff is generally any grease that does not conduct electricity and is something you do not want on an electrical connection. What the grease does however, is seal the connection from moisture and subsequent corrosion and the di grease is wiped away by the spring pressure of any male-female connector pair. So, you now have a connection that is encased in grease that will (probably) not corrode. Lol, maybe we did want that grease on the connectors after all.....Did you figure out what fried the wire in the first place?
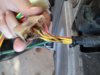
Very good advice Kiltman!.........somthin' I've been pointing out on occassion for the past few yrs........specially when folks start 'slam-bashing the 28amp system with the 'tick-tick-tick' nonsenseReplace the connector with individual spade connectors, you may have to splice and solder new wire to the harness. make sure you remove any corroded wire from the mix. The next one to go will be the red connector by the starter relay. Because the relay is upside down it collects water in the connector and the corrosion wicks up the wire, (It will probably be the thicker red wire that will have the issue) which causes a poor connection and makes the alternator work harder ( I had this one go twice because I didn't cut out all the corroded wire and it melted).
Now would be a good time to replace the connector on the three yellow wires coming from the alternator and soldering them.
If you do replace the red connector with individual spade connectors take note of which wire goes to which terminal. If you accidentally hook the green wire with the red tracer to the wrong terminal it may short out a diode to the clutch switch and your nuetral light will come on every time you engage the clutch.
As stated in previous posts dielectric grease will help stop the corrosion and protect the connections.
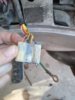
I made up a survival kit. In a baggie I put a number of spade connectors and pin connectors along with pieces of coloured wire plus a crimp tool, and stored them in the tail section. I was able to repair that burnt out red wire connector on the road. When I got home I did a proper solder splice which I should have done the first time around.
 ..
..Replace the connector with individual spade connectors, you may have to splice and solder new wire to the harness. make sure you remove any corroded wire from the mix. The next one to go will be the red connector by the starter relay. Because the relay is upside down it collects water in the connector and the corrosion wicks up the wire, (It will probably be the thicker red wire that will have the issue) which causes a poor connection and makes the alternator work harder ( I had this one go twice because I didn't cut out all the corroded wire and it melted).
Now would be a good time to replace the connector on the three yellow wires coming from the alternator and soldering them.
If you do replace the red connector with individual spade connectors take note of which wire goes to which terminal. If you accidentally hook the green wire with the red tracer to the wrong terminal it may short out a diode to the clutch switch and your nuetral light will come on every time you engage the clutch.
As stated in previous posts dielectric grease will help stop the corrosion and protect the connections.
I made up a survival kit. In a baggie I put a number of spade connectors and pin connectors along with pieces of coloured wire plus a crimp tool, and stored them in the tail section. I was able to repair that burnt out red wire connector on the road. When I got home I did a proper solder splice which I should have done the first time around.
Agree with everything..Very good advice Kiltman!.........somthin' I've been pointing out on occassion for the past few yrs........specially when folks start 'slam-bashing the 28amp system with the 'tick-tick-tick' nonsense
The problem IS owner neglect......very easy to overlook as everything is 'out of sight, out of mind'. All it takes is ONE faulty connection, SPECIALLY the VR plug-in on the pre 96 models, and not only loose the 'all important smoke', but will most time fry that plug-in along with actually melting the VR. If that is ALL that happens, feel fortunate, cause it can become REALLY costly, aside from leaving you litterally stranded 300miles from nowhere(murphy's law) along side the road.......and that is ONE thing you ainn't gonna 'jury rig' along side the road. My advice to ALL who own these 20+ yr. old scoots, no matter what flavor, is to go thru ALL accessable plug-ins if you yet haven't and unplug, clean, dielectic grease BEFORE re-connecting.......BEFORE an issue arises! Basicly, that's part of a PM(preventive maintenance).
Has paid off with my 92STeed, as it has NEVER had any electrical or ignition issues, and charging system is close to dead-on correct with the 'old school' charging system rule-of-thumb, 13.8-14.2v. Bikes charging systems for whatever reasons tend to be on the high side on the upper end, as mine is 14.5v charging under full electrical load.
No offense intended......just a word to the wise
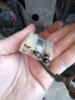
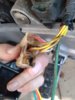
Um... er.... not quite all.Actually it was the rectifier that went out and did this.... Come to find out it is a 91 st1100 with 83000 miles and is the original equipment... all the connections look fine except the one..
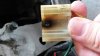
I actually just found this today when I tried to do a alternator test. .. I am wondering if cutting out bad wire and replacing with new wire and heat shrink could solve my problem.....
Since that connector is carrying the AC voltages from the 3 stator windings to the VRR and since one wire (at least) appears completely destroyed, you may get away with a simple repair here, providing the alternator and VRR weren't damaged by the failing connector's high resistance. Crossing fingers.I actually just found this today when I tried to do a alternator test. .. I am wondering if cutting out bad wire and replacing with new wire and heat shrink could solve my problem.....
Most likely the problem started at the 3-pin alt-connector (shown in other thread); the caused voltage drop increased the current -> connectors on VRR overheated too...I actually just found this today when I tried to do a alternator test...
Hey there, vrr and 6 pin connector burned up on me. I bought new VRR but it is nearly impossible to find the 6 pin connector that fits. So i tried to find the closest thing and it looked a good fit on the website but it is not. Any advice or ideas? 1993 st. She has been sitting for a year plus because of this issue and me not being able to find correct connector. Please help!Very good advice Kiltman!.........somthin' I've been pointing out on occassion for the past few yrs........specially when folks start 'slam-bashing the 28amp system with the 'tick-tick-tick' nonsense
The problem IS owner neglect......very easy to overlook as everything is 'out of sight, out of mind'. All it takes is ONE faulty connection, SPECIALLY the VR plug-in on the pre 96 models, and not only loose the 'all important smoke', but will most time fry that plug-in along with actually melting the VR. If that is ALL that happens, feel fortunate, cause it can become REALLY costly, aside from leaving you litterally stranded 300miles from nowhere(murphy's law) along side the road.......and that is ONE thing you ainn't gonna 'jury rig' along side the road. My advice to ALL who own these 20+ yr. old scoots, no matter what flavor, is to go thru ALL accessable plug-ins if you yet haven't and unplug, clean, dielectic grease BEFORE re-connecting.......BEFORE an issue arises! Basicly, that's part of a PM(preventive maintenance).
Has paid off with my 92STeed, as it has NEVER had any electrical or ignition issues, and charging system is close to dead-on correct with the 'old school' charging system rule-of-thumb, 13.8-14.2v. Bikes charging systems for whatever reasons tend to be on the high side on the upper end, as mine is 14.5v charging under full electrical load.
No offense intended......just a word to the wise