How NOT to reinstall rear brake caliper

Mellow

Joe
Admin
Joined
Dec 1, 2004
Messages
18,908
Age
60
Bike
'21 BMW R1250RT
2024 Miles
002760
You can but remove the pads completely first.. Line it all up and put the axle back in and pivot bolt... then.. you can install the pads.
 

Obo

Joined
Oct 22, 2019
Messages
4,295
Location
East Coast Canada
Bike
'03 ST1300A
If the pad retainer has dropped you won't be able to line up the holes as it basically becomes a wedge between the caliper and the disc.
Seeing the pads flopping in the front of the caliper like they seem to in the video makes me think this is what's happening.

1614706710999.png

If I'm wrong I'm sure Igofar will correct me :)
 
OP
OP
Sadlsor

Sadlsor

Site Supporter
Joined
Jan 15, 2020
Messages
4,271
Age
66
Location
Birmingham, Alabama
Bike
2008 ST1300A
STOC #
9065
If the pad retainer has dropped you won't be able to line up the holes as it basically becomes a wedge between the caliper and the disc.
Seeing the pads flopping in the front of the caliper like they seem to in the video makes me think this is what's happening.

:)
@Obo you are seeing it correctly, and you're pretty right on. But it is not the retainer / spring itself, because I can see the retainer tabs / ears clearly in place on the caliper body.
I have had the pads "seemingly" installed and correctly lined up, right until I try to put the whole caliper / pad assembly back on the aluminum hanger bracket. Then, one or both brake pads fall out and hang by the back slider pin, facing me. And that's where the forward threaded slider pin won't completely thread into the hanger bracket, and I "think" it may be hitting the inner brake pad tab. That pad on the hub side (inner) seems to be in position, but that's the only thing that can realistically be preventing the forward pin from threading in. I always stopped when I felt the resistance, as I surely do not want to bugger up the threads on the slider pin OR the softer aluminum bracket.
I'll try @Mellow 's suggestion, and then I'll just drop the wheel again if I must.
I'm just trying to be like @Igofar.
But I have a long way to go.
 
Joined
Feb 2, 2014
Messages
1,854
Location
houston, tx
Let me double-check if I buttoned up the rear on my ST ... if I didn't tighten it up, maybe I can demo an install via Youtube ... give me about 20 minutes to go check.

EDIT: did not slide axle all the way ... let me pull the caliper and see what shots and video and see if it's helpful
 
Last edited:
Joined
Feb 2, 2014
Messages
1,854
Location
houston, tx
In hindsight, these might not be very helpful, since the pads are already installed.
I think what you're after is a, "how do we install the pads" then we can install the caliper.

What this does show is you dont have to have the wheel completely off to install the caliper.
Here, I have the axle installed most of the way, then it's a matter of sliding the bracket / caliper on, push the axle the rest of the way and install the stopper bolt and tighten everything up.

Here's the high resolution photos from four different angles - not sure how helpful they are
Click on each photo in turn for a high-resolution version

And the video,
 
Joined
Feb 2, 2014
Messages
1,854
Location
houston, tx
I recently got a new smartphone and happen to be cleaning up storage and came across two PDFs authored by @jfheath , that I had downloaded.

So I went on a search, and found these articles ... you may have already found these, but pay special attention to the "rear wheel" PDF that's an attachment. There is also a PDF for the brake article that goes into detail, with photos


jfheath

John Heath
Site Supporter
Joined
Mar 18, 2006
Messages
2,848
Age
70
Location
Ilkley, W Yorkshire, UK
Bike
2013 ST1300 A9
2024 Miles
000679
STOC #
2570
That looked relatively easy @caldercay . I've never been able to remove the caliper without taking the pads off first. I don't bother trying these days. I'll have to give that another go.

But - I have noticed that it is possible for the tab end of the pads to drop out of the retaining clip - through the gap provided for the brake disc. The danger of this is that you put the caliper into place knowing that the pads are correctly seated, and you assume that they are still correctly seated. But it is not unknown for the inside caliper to have dropped out and it ends up riding on the hub, and then forever scraping a nice groove in the wheel hub, slowly separating the left hand side from the right hand side.

I think that is what has happened is @Sadlsor 's video. The first tell tale sign is that the pads are leaning twoards each other.

There is the danger that while the pads are flopping around in the caliper housing, and you are trying to negotiate the brake disk, that the pads knock the pad spring out of the roof of the caliper.
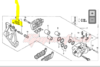
I find it so much easier to have the pads out, check the silver retainer clip is in place, check the pad spring is the correct way round, and firmly seated, and then get the calipr and caliper bracket onto the axle, and the stopper bolt in place. The pads can then be inserted. I put the outside one in first, press it up against the pad spring and slid the pad pin through the hole and lock it in place. Then slide in the rear, keeping the caliper and the brake disk rotor squeezing the pad - to ensure that the pad seats on the correct side of the tags on the pad spring. Then when the pad is seated in the retainer clip (you get to recognise the feel), push the pad upwards agains the spring and push the pad pin all the way through.

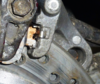
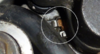
You still need to check that both pads are positioned correctly at the tab end. Check the inside pad through the spokes of the wheel. Check the outboard one near the stopper bolt hole - you need to move the brake hose out of the way. There are photos of this in the avoid the Pitfalls article linked above (and, as it turns out, added as an afterthought here).

1614778943036.png 1614779000351.png

Also check which needs to be tightened first - the stopper bolt or the axle bolt. The answer is that the stopper bolt must be tightened first so that when tightening the axle, it doesn't cause the caliper bracket to turn and put a side load onto the thread of the stopper, preventing the stopper bolt from tightening square. If you ask very nicely he'll show you the spiral fluting that this can create, and the long term binding that occurs as a consequence.
 
Last edited:
OP
OP
Sadlsor

Sadlsor

Site Supporter
Joined
Jan 15, 2020
Messages
4,271
Age
66
Location
Birmingham, Alabama
Bike
2008 ST1300A
STOC #
9065
But - I have noticed that it is possible for the tab end of the pads to drop out of the retaining clip - through the gap provided for the brake disc. The danger of this is that you put the caliper into place knowing that the pads are correctly seated, and you assume that they are still correctly seated.
Indeed, the tab ends have dropped out every single time I've tried this route. Likely due to the caliper bracket being separated from the actual caliper in these attempts.

I think that is what has happened is @Sadlsor 's video. The first tell tale sign is that the pads are leaning twoards each other.

There is the danger that while the pads are flopping around in the caliper housing, and you are trying to negotiate the brake disk, that the pads knock the pad spring out of the roof of the caliper.
Yes, but don't overthink this (that's MY job, LOL)... the leaning pads just happened to be in this position as I took a frustration break, and set up my camera. I do note and ensure the spring is properly placed before (or while) I vainly struggle to reassemble the bits without removing the wheel.
In the end, I have enough ideas to tackle it again.
To start, I will reattach the caliper to its mount arm, with the pads removed as suggested here.

And @caldercay, I do have both these references saved. I've read them many times, but I did not review them prior to tackling the caliper this time.
I will be a lot less hesitant to read them thoroughly before coming into this task the next time.
They certainly are of value, and as I don't do these chores as often as @aniwack and @Igofar and others here, it is not second nature to me. And in truth, it should NOT be second nature, because these bikes are not terribly labor-intensive.

My sincere thanks to all who shared their ideas to my plight.
 
Top Bottom