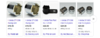
Ok - I have unearthed the info about all three types of left hand side bolts.
I have never had to do the swing arm bearings on either of my ST1300s, but I often had the 1100 swing arms off, to clean up, paint and treat.
The variations in thefixings has aften intrigued me - it wasn't until
@JimS posted the photo of his model that I had the final piece
Gleaned from the Honda manuals, Microfiches, On-line photos, and one pinched from
@JimS
The dates are as provided by the workshop manual and addendum.
 '02 (early products and '03) (Source UK ST1300 A2.A3 workshop manual)
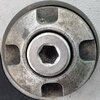
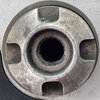
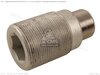
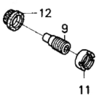
This is the middle one shown in the diagram as parts 12, 9 and 11. A flush locknut.
Tightening procedure:
Tighten right pivot bolt to 108Nm / 80lbf ft.
Tighten Left pivot bolt to 54Nm / 40 lbf ft - then slacken 90 degrees - then tighten to 41Nm / 30 lbf ft.
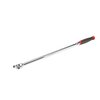
Tighten the locknut while holding the left pivot bolt - using the correct tool with the 'handle' Part number 07ZMA-MCA0100. 98Nm / 72 lbf ft
(This is an actual torque of 108Nm / 80 lbf ft - which is what would need to be applied to the locknut if the correct tool with the handle wasn't used.
------------------------------------------------------------------------------------------------
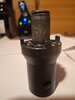
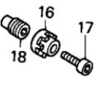 '02 (Latest Products) (Source UK ST1300 A2.A3 workshop manual and A4 Addendum)
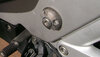
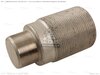
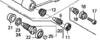
This is the right hand variation in the top diagram - parts 16, 17, 18)
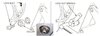
Align the swing arm holes with the frame holes.
Install right pivot bolt, do not tighten.
Apply oil to the
left hand pivot bolt threads. Fit, do not tighten.
Tightening procedure
Tighten
right pivot bolt to 108Nm / 80lbf ft.
Fit the
left pivot bolt collar.
Tighten Left pivot bolt to 54Nm / 40 lbf ft - then slacken left pivot bolt 90 degrees - then tighten to 41Nm / 30 lbf ft.
I have no idea how this works, and cannot find any clues. Does the collar just slip on ? Is it threaded, what torque. No info is given.
Neither can I find out what the lock bolt screws into.
My only guess is that the collar screws on - and it doesn't matter how tight it is ??? The lock bolt screws into the collar and pushes against the bottom of the hex socket in the pivot bolt - preventing both the collar and the pivot bolt form turning.
But what stop the pivot bolt from turning as the lock bolt is tightened ? I cannot find a picture of that collar anywhere.
Apply engine oil to the threads and flange surface then install the lock bolt.
Tighten the lockbolt while holding the collar - using the correct tool with the 'handle' Part number 07ZMA-MCA0100. 44Nm / 33 lbf ft
-----------------------------------------------------------------------------------------------------------
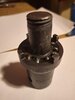
 After '03
 (Source - UK ST1300 A4 Addendum).
ie (2004 onwards - but I have seen 2004 models with the 2003 pivot bolt.)
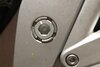
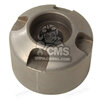
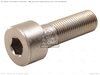
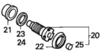
This is the left hand side variation shown in the top diagram - parts 20, 21, 22, 23
Clean and degrease the right pivot bolt threads.
Align the swing arm holes with the frame holes.
Install both pivot bolts but do not tighten
Install right pivot bolt - tighten by hand until the bolt is against the bearing.
Tighten the right pivot bolt 20Nm, 14 lbf ft.
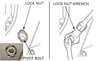
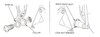
Tool - LockNut wrench 07916 KA50100
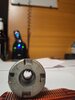
Cut a strip of tape 3.5mm wide and stick it over the joint between the bolt head and the frame of the bike. (Aim for the 12 o'clock position). It doesn't matter, but it is easier to see and describe.
Slice the tape at the joint - make sure the tape remains stuck in position.
Tighten the Pivot Bolt to 130Nm / 96 lbf ft
Check the tape. The tape on the bolt should have moved clockwise by the width of the tape, so that the left hand edge of the tape on the bolt, is now in line with the right hand edge of the tape on the frame.
If the above is not true, then tighten the pivot bolt until it is.
If the swing arm, the bearings or the pivot bolts have been replaced, then the setting has to be re-shimmed. Otherwise the old shim can be re-used. I'm not going to describe how to fit new shims - leave that to the workshop manual. nb - the commonly available 2003 pdf manual does not cover this procedure. Seek out how to do it.
Set up the left pivot bolt with its shim and collar.
Tighten the left pivot bolt to 130Nm / 96 lbf ft
Loosen the pivot bolt 90 degrees
Re-tighten the left pivot bolt to 130Nm / 96 lbf ft
Tool - LockNut wrench 07916 KA50100
Install the Left Pivot bolt cover and the dust seal.
-----------------------------------------------------------------------------------------------------------------
The code for the Swing Arm is the same for the UK for the 2002, 2004, 2006, 2009 models - which are the main varieties.
The bearings are the same as well.
I guess that this means that any of the pivot bolt arrangements can be used in any year. ??
--------------------------------------------------------------------------------------------------------------------