Does anyone know of a good mechanic located in New England who can change out a clutch slave cylinder on an ST1300?

Mechanic in New England
- Thread starter Handyman
- Start date
MAX BMW dealership has an excellent reputation (my brother in law used them for his Beemer, but that was some years ago). I have no idea if they service other makes, but given the paucity of decent (or even half way decent) Honda dealership mechanics, you are probably better off either doing it yourself with help from the peanut gallery here (which has the most extensive ST knowledge base around) or finding an independent mechanic via personal referral who will work with you and read the Honda Service Manual and follow the sometimes non intuitive instructions.
I believe the book calls for engine removal for the slave cylinder, but @Igofar has said he can do it in under an hour w/ the engine in place. Some guys here have done it themselves in a few hours. Absent said independent who is willing to consult with someone like Larry, (or @aniwack), I think you will be facing a high repair bill.
You might also be able to find an ST owner who will help you with the repair. Click on Riding (blue band atop this page) >RAN list>US LIst and start calling guys who are in your area.
What makes you think your slave cylinder has gone south?
It could be something simpler.
Have you inspected the clutch push rod,boot, and bushing?
I ask, because I've seen two cases recently that the owners were told that they needed a slave cylinder, when all it turned out to be was the push rod in the lever, bore a hole through the bushing and prevented it from working correctly.
$10 dollar fix instead of $2200 at a dealer.
Last edited:
rwthomas1
Site Supporter
Razee in North Kingstown, RI has a good reputation. I know their techs have been around a while.
OP
OP
Diagnosed by 2 shops.What makes you think your slave cylinder has gone south?
It could be something simpler.
Have you inspected the clutch push rod,boot, and bushing?
I ask, because I've seen two cases recently that the owners were told that they needed a slave cylinder, when all it turned out to be was the push rod in the lever, bore a hole through the bushing and prevented it from working correctly.
$10 dollar fix instead of $2200 at a dealer.
Hover your cursor over @Igofar then click on start conversation. Send him your phone number - he will call you back and discuss your options. The shops may very well be right, or wrong, and the number of problems with motorcycle mechanics and these bikes experienced by STOC members would lead most of us to think they erred in their diagnosis. Larry is about as close to a professional ST mechanic as you will find anywhere, and he will spend time with you on the phone (unlike dealerships) explaining what you can check to verify those diagnoses.Diagnosed by 2 shops.
If there is any doubt in your mind, go to searrch box atop this page, click on it and enter Igofar. Read the thread called Igofar Reviews.
So we’re the two cases I commented about.Diagnosed by 2 shops.
I can walk you through how to repair and or replace the CSC with just a couple simple hand tools, and the correct technique etc.
acedantinne
Site Supporter
handyman, I just finished my 04 clutch slave cylinder.Does anyone know of a good mechanic located in New England who can change out a clutch slave cylinder on an ST1300?
Attachments
-
 98.9 KB Views: 16
 -
 113.7 KB Views: 16
acedantinne
Site Supporter
My 04 was sitting on lift in garage. It leaked all the fluid on lift, center stand. I had repair kit=parts already. With the right tools, Its a 4 wrench job out of possible 5 wrench.
And that's doing it the hard way 
I haven't got the time today to re-type everything, but here are some instructions and a parts list of another member that I just helped do this job with last week over the phone etc.
https://www.ronayers.com/oemparts/l/hon/5053f0b1f870021c54be627d/2003-st1300-ac-parts
CYLINDER ASSY., CLUTCH SLAVE--------1 ea.
22860-MCS-000
Retail Price: $90.91
Your Price: $70.00
GASKET, SLAVE CYLINDER-----------1 ea.
22862-MGJ-D00
Retail Price: $4.98
Your Price: $3.84
PIN, DOWEL (8X10)--------------2 ea.
94301-08100
Retail Price: $1.93
Your Price: $1.62
OIL SEAL (8X25X8) (ARAI)-----1 ea. (in case your is leaking)
91204-MB0-013
Retail Price: $4.04
Your Price: $3.11
O-RING (18.1X3.6)-------------1 ea.
91302-MAL-601
Retail Price: $3.53
Your Price: $2.72
WASHER, OIL BOLT-------------3 ea.
90545-300-000
Retail Price: $4.12
Your Price: $3.46
I'm in the middle of a couple jobs right now, but will try and answer a couple of your questions, and explain my comments on the post.
The videos and write up in the article section will having you using the wrong tools, laying the bike over on its side, or have you standing on your head, and using either the side stand, or center stand.
In a nutshell here is show I do it....I'll try and post some pictures from my phone in a follow up message.
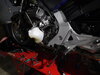
Place the bike on the center stand
Place a small center jack (see K&L center jack for idea) under the engine so you can raise/lower the back wheel enough to swing the center stand up/down (out of your way)
Remove the lower black cowl on the right side of the bike (5 screws & 1 push rivet)
Move this out of your way.
Find the shifter linkage shaft and mark a line across the end of it and the linkage (for alignment upon re-assembly)
Remove the one 10mm bolt and pull the shifter linkage off and push it out of the way.
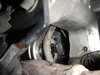
You'll see three rubber lines going through a metal band on the rear of the engine, remove the one bolt/band, and move it out of your way, route hoses out of your way.
Find speed sensor unit, remove the two 8mm head bolts and pull it out and move it out of your way. (you will loose a small amount of oil if you have not drained your oil already)
Find the oil filter-Remove it (after draining oil) not needed, but you will loose about 1/2 liter of oil (have pan ready underneath bike)
REMOVAL:
Take your 8mm socket (standard short one, not swivel) and loosen the right side fastener.
Use your 1/4 inch ratchet with the extension and 8mm swivel socket to remove the lower and upper fasteners.
* Use your center jack and raise the rear wheel up enough to fold the center stand up/down, and out of the way depending on which one your loosening etc. (it will make sense to you when you see it)
Take your Long Panel 12mm flex head, ratcheting wrench (spanner) and loosen the banjo fitting on the top BEFORE you remove the assembly.
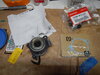
Notice there are two pipes, stacked, with crush washers top/middle/bottom (take a picture)
You can now remove the banjo bolt, all three fasteners, and remove the assembly.
On the left side of the housing, you'll see a flat pry spot if needed (the dowel pins may try and hold it in place, don't worry about them you've order new ones)
It helps to put a small dowel (bolt) or screwdriver in the opposite side to wiggle the cover off.
Remove and CLEAN the inside of the area with some brake fluid (remove all the debris) clean the shaft where it goes through the seal as well, inspect the oil seal (50/50 chance they are bad)
Take your wood chisel and lay it flat against the housing (from the bottom pointing up) and GENTLY push it upward, the gasket will usually pop off.
BE CAREFUL using blades and scrapers that you don't damage the aluminum housing etc.
Also be careful not to Nick the rubber hoses on the left side by the oil filter while working in this area.
With everything all clean, assemble the new pieces and slide it straight into place (the spring will try and push it outward)
Take your piece of wood and place it edge wise between the shaft and the housing, it will be your hand for you.
You can now use your extension and swivel socket to replace all three fasteners (do not tighten them down yet) leave them about one thread out (wiggle room).
Now put some grease on the crush washers and put the banjo fitting through the first one, add the second on (middle) then go through the second fitting, and add the third washer.
GENTLY/CAREFULLY start your banjo fitting (START BY TURNING IT COUNTER CLOCKWISE UNTIL YOU FEEL/HEAR IT CLICK INTO PLACE.
If you cross thread this, you will be pulling the engine to replace the rear cover (no fear, just a word of warning to be careful)
Put everything back together, and your ready to bleed the clutch....
I haven't got the time today to re-type everything, but here are some instructions and a parts list of another member that I just helped do this job with last week over the phone etc.
https://www.ronayers.com/oemparts/l/hon/5053f0b1f870021c54be627d/2003-st1300-ac-parts
CYLINDER ASSY., CLUTCH SLAVE--------1 ea.
22860-MCS-000
Retail Price: $90.91
Your Price: $70.00
GASKET, SLAVE CYLINDER-----------1 ea.
22862-MGJ-D00
Retail Price: $4.98
Your Price: $3.84
PIN, DOWEL (8X10)--------------2 ea.
94301-08100
Retail Price: $1.93
Your Price: $1.62
OIL SEAL (8X25X8) (ARAI)-----1 ea. (in case your is leaking)
91204-MB0-013
Retail Price: $4.04
Your Price: $3.11
O-RING (18.1X3.6)-------------1 ea.
91302-MAL-601
Retail Price: $3.53
Your Price: $2.72
WASHER, OIL BOLT-------------3 ea.
90545-300-000
Retail Price: $4.12
Your Price: $3.46
I'm in the middle of a couple jobs right now, but will try and answer a couple of your questions, and explain my comments on the post.
The videos and write up in the article section will having you using the wrong tools, laying the bike over on its side, or have you standing on your head, and using either the side stand, or center stand.
In a nutshell here is show I do it....I'll try and post some pictures from my phone in a follow up message.
Place the bike on the center stand
Place a small center jack (see K&L center jack for idea) under the engine so you can raise/lower the back wheel enough to swing the center stand up/down (out of your way)
Remove the lower black cowl on the right side of the bike (5 screws & 1 push rivet)
Move this out of your way.
Find the shifter linkage shaft and mark a line across the end of it and the linkage (for alignment upon re-assembly)
Remove the one 10mm bolt and pull the shifter linkage off and push it out of the way.
You'll see three rubber lines going through a metal band on the rear of the engine, remove the one bolt/band, and move it out of your way, route hoses out of your way.
Find speed sensor unit, remove the two 8mm head bolts and pull it out and move it out of your way. (you will loose a small amount of oil if you have not drained your oil already)
Find the oil filter-Remove it (after draining oil) not needed, but you will loose about 1/2 liter of oil (have pan ready underneath bike)
REMOVAL:
Take your 8mm socket (standard short one, not swivel) and loosen the right side fastener.
Use your 1/4 inch ratchet with the extension and 8mm swivel socket to remove the lower and upper fasteners.
* Use your center jack and raise the rear wheel up enough to fold the center stand up/down, and out of the way depending on which one your loosening etc. (it will make sense to you when you see it)
Take your Long Panel 12mm flex head, ratcheting wrench (spanner) and loosen the banjo fitting on the top BEFORE you remove the assembly.
Notice there are two pipes, stacked, with crush washers top/middle/bottom (take a picture)
You can now remove the banjo bolt, all three fasteners, and remove the assembly.
On the left side of the housing, you'll see a flat pry spot if needed (the dowel pins may try and hold it in place, don't worry about them you've order new ones)
It helps to put a small dowel (bolt) or screwdriver in the opposite side to wiggle the cover off.
Remove and CLEAN the inside of the area with some brake fluid (remove all the debris) clean the shaft where it goes through the seal as well, inspect the oil seal (50/50 chance they are bad)
Take your wood chisel and lay it flat against the housing (from the bottom pointing up) and GENTLY push it upward, the gasket will usually pop off.
BE CAREFUL using blades and scrapers that you don't damage the aluminum housing etc.
Also be careful not to Nick the rubber hoses on the left side by the oil filter while working in this area.
With everything all clean, assemble the new pieces and slide it straight into place (the spring will try and push it outward)
Take your piece of wood and place it edge wise between the shaft and the housing, it will be your hand for you.
You can now use your extension and swivel socket to replace all three fasteners (do not tighten them down yet) leave them about one thread out (wiggle room).
Now put some grease on the crush washers and put the banjo fitting through the first one, add the second on (middle) then go through the second fitting, and add the third washer.
GENTLY/CAREFULLY start your banjo fitting (START BY TURNING IT COUNTER CLOCKWISE UNTIL YOU FEEL/HEAR IT CLICK INTO PLACE.
If you cross thread this, you will be pulling the engine to replace the rear cover (no fear, just a word of warning to be careful)
Put everything back together, and your ready to bleed the clutch....
Does anyone know of a good mechanic located in New England who can change out a clutch slave cylinder on an ST1300?
acedantinne
Site Supporter
Handyman, I can help U out. Have tools needed. 1 small problem. I have colon cancer. Monday June 19 going for my 2nd colonoscopy in 3 months. hopefully last for 3 years. Plus last night got a call my youngest brother past away. My wife & I our waiting to hear more on the Joels passing and arrangements.
BoB D
BoB D
OP
OP
Thanks so much for this. I'll pass it along to my brother.And that's doing it the hard way
I haven't got the time today to re-type everything, but here are some instructions and a parts list of another member that I just helped do this job with last week over the phone etc.
https://www.ronayers.com/oemparts/l/hon/5053f0b1f870021c54be627d/2003-st1300-ac-parts
CYLINDER ASSY., CLUTCH SLAVE--------1 ea.
22860-MCS-000
Retail Price: $90.91
Your Price: $70.00
GASKET, SLAVE CYLINDER-----------1 ea.
22862-MGJ-D00
Retail Price: $4.98
Your Price: $3.84
PIN, DOWEL (8X10)--------------2 ea.
94301-08100
Retail Price: $1.93
Your Price: $1.62
OIL SEAL (8X25X8) (ARAI)-----1 ea. (in case your is leaking)
91204-MB0-013
Retail Price: $4.04
Your Price: $3.11
O-RING (18.1X3.6)-------------1 ea.
91302-MAL-601
Retail Price: $3.53
Your Price: $2.72
WASHER, OIL BOLT-------------3 ea.
90545-300-000
Retail Price: $4.12
Your Price: $3.46
I'm in the middle of a couple jobs right now, but will try and answer a couple of your questions, and explain my comments on the post.
The videos and write up in the article section will having you using the wrong tools, laying the bike over on its side, or have you standing on your head, and using either the side stand, or center stand.
In a nutshell here is show I do it....I'll try and post some pictures from my phone in a follow up message.
Place the bike on the center stand
Place a small center jack (see K&L center jack for idea) under the engine so you can raise/lower the back wheel enough to swing the center stand up/down (out of your way)
Remove the lower black cowl on the right side of the bike (5 screws & 1 push rivet)
Move this out of your way.
Find the shifter linkage shaft and mark a line across the end of it and the linkage (for alignment upon re-assembly)
Remove the one 10mm bolt and pull the shifter linkage off and push it out of the way.
You'll see three rubber lines going through a metal band on the rear of the engine, remove the one bolt/band, and move it out of your way, route hoses out of your way.
Find speed sensor unit, remove the two 8mm head bolts and pull it out and move it out of your way. (you will loose a small amount of oil if you have not drained your oil already)
Find the oil filter-Remove it (after draining oil) not needed, but you will loose about 1/2 liter of oil (have pan ready underneath bike)
REMOVAL:
Take your 8mm socket (standard short one, not swivel) and loosen the right side fastener.
Use your 1/4 inch ratchet with the extension and 8mm swivel socket to remove the lower and upper fasteners.
* Use your center jack and raise the rear wheel up enough to fold the center stand up/down, and out of the way depending on which one your loosening etc. (it will make sense to you when you see it)
Take your Long Panel 12mm flex head, ratcheting wrench (spanner) and loosen the banjo fitting on the top BEFORE you remove the assembly.
Notice there are two pipes, stacked, with crush washers top/middle/bottom (take a picture)
You can now remove the banjo bolt, all three fasteners, and remove the assembly.
On the left side of the housing, you'll see a flat pry spot if needed (the dowel pins may try and hold it in place, don't worry about them you've order new ones)
It helps to put a small dowel (bolt) or screwdriver in the opposite side to wiggle the cover off.
Remove and CLEAN the inside of the area with some brake fluid (remove all the debris) clean the shaft where it goes through the seal as well, inspect the oil seal (50/50 chance they are bad)
Take your wood chisel and lay it flat against the housing (from the bottom pointing up) and GENTLY push it upward, the gasket will usually pop off.
BE CAREFUL using blades and scrapers that you don't damage the aluminum housing etc.
Also be careful not to Nick the rubber hoses on the left side by the oil filter while working in this area.
With everything all clean, assemble the new pieces and slide it straight into place (the spring will try and push it outward)
Take your piece of wood and place it edge wise between the shaft and the housing, it will be your hand for you.
You can now use your extension and swivel socket to replace all three fasteners (do not tighten them down yet) leave them about one thread out (wiggle room).
Now put some grease on the crush washers and put the banjo fitting through the first one, add the second on (middle) then go through the second fitting, and add the third washer.
GENTLY/CAREFULLY start your banjo fitting (START BY TURNING IT COUNTER CLOCKWISE UNTIL YOU FEEL/HEAR IT CLICK INTO PLACE.
If you cross thread this, you will be pulling the engine to replace the rear cover (no fear, just a word of warning to be careful)
Put everything back together, and your ready to bleed the clutch....
Very sorry Bob..Handyman, I can help U out. Have tools needed. 1 small problem. I have colon cancer. Monday June 19 going for my 2nd colonoscopy in 3 months. hopefully last for 3 years. Plus last night got a call my youngest brother past away. My wife & I our waiting to hear more on the Joels passing and arrangements.
BoB D
acedantinne
Site Supporter
Thanks Joe. some good news, 2 polyps removed this morning that test positive for cancer.in early Feb. Doctor removed 3 more. between kidney stones & polyps, covid, no X for body to heal.Very sorry Bob..
I did manage to get 2 rides in this year, late Feb. Frost nuts campout, Wilgus's state Park, Vt., Down East rally, Poland, Maine.
OP
OP
Bob, so sorry to hear of your loss, but glad the cancer seems under control. This need ios for my brother who lives in Burlington, VT. Will pass this along to him if your offer is still available.
acedantinne
Site Supporter
Thank U. Cancer is now gone, per doctor, 2 areas that were marked early Conoscopy, Feb. 1 12MM removed, 2nd 15MM removed. 3 new Poplys removed were benign. Good news. Back to every 3 year check up.Bob, so sorry to hear of your loss, but glad the cancer seems under control. This need ios for my brother who lives in Burlington, VT. Will pass this along to him if your offer is still available.
The offer is still good. Have him order the unit from Honda, it cost around 70.00 dollars.