Perplexing Front Brakes

Joined
Sep 18, 2005
Messages
1,440
Location
Houston, Tx
Bike
2003 ST1300
STOC #
5952
....the seal......help retract the piston ......

This guy at about 3:30 gives a good idea of what retraction should look like.


On the other hand.....1 1/2 turn on the rear is about all I've had for close to 20 years on my 1300 and the mileage has been right along the Honda specs, same as what many others have documented.


Igofar

Site Supporter
Joined
Jan 8, 2011
Messages
7,120
Location
Arizona
Bike
2023 Honda CT125A
And there you have it, one and a half turns on the rear wheel after 20 years, and gets the mileage in the stats…
I sent oilspot a video of my rear wheel spinning 3 plus turns with one push, and I’m getting 57-58 mpg.
I guess some folks just don’t settle for average, when it can be improved upon :rofl1:
I’ll try and call you tomorrow and we will continue trying to solve this for you.
 
OP
OP
oilspot
Joined
Jun 8, 2023
Messages
68
Age
58
Location
Savannah, GA
Bike
2006 ST1300ABS
Hopefully, I have resolved most of my brake issue.
Igofar provided tons of support and suggestions. My brakes were completely void of air (the #1 suggestion from Honda manual). The rear pedal was so firm, I had to readjust my brake light switch!!!

Okay, I kept you waiting long enough! After exhausting the easy stuff, I pulled the pistons from the calipers. The right front was a bit corroded and had some dirt in the seals. I pull the other six pistons and was relieved none were like the R front. (See pictures).
Then I had to bleed (and bleed again). Now my brakes don’t drag!

I still have some tuning and tweaking before I replace the Tupperware, but I think the culprit was the cruddy piston(s).

I’ll update if I find anything else. Hopefully this will at least restore my fuel economy back to 48+. And eventually, I hope to exceed 50 mpg with further tutorial from Igofar (the white courtesy phone).
 

Attachments

OP
OP
oilspot
Joined
Jun 8, 2023
Messages
68
Age
58
Location
Savannah, GA
Bike
2006 ST1300ABS
This is worth checking. At minimum pull the Piston seals out and clean the grooves. You could possibly replace all the Brake piston seals as well.
You mentioned cleaning the pistons, did you by any chance get cleaner or solvent on the rubber seals?
After taking the pistons out and cleaning the seals, I have a much better understanding of how they work now. Originally I extended the pistons about half way and cleaned them with a thin pieced of shop rag dipped in brake fluid. I think I did a decent job of cleaning, but I found a small rough spot when the pistons were completely out of the caliper. So the "shoelace" cleaning method did work, but unfortunately wasn't going to address that rough area. I had to repolish that spot to ensure if was perfectly smooth - while being careful not to damage the anodized surface too much.
 
Joined
May 23, 2022
Messages
22
Age
44
Location
Wales
Did you get this sorted in the end?

i have a very identical problem where my front left caliper is binding, but runs free without pads. And because it’s that one it’s applying the rear slightly while riding. Have replaced seals and pistons and still not running free - same as you front off ground clearly wheel is dragging. Starting to think the caliper isn’t sitting square as before I replaced the pads (OEM used) the previous set were clearly chamfered.
Cheers
 

jfheath

John Heath
Site Supporter
Joined
Mar 18, 2006
Messages
2,832
Age
70
Location
Ilkley, W Yorkshire, UK
Bike
2013 ST1300 A9
2024 Miles
000679
STOC #
2570
i have a very identical problem where my front left caliper is binding, but runs free without pads. And because it’s that one it’s applying the rear slightly while riding. Have replaced seals and pistons and still not running free - same as you front off ground clearly wheel is dragging. Starting to think the caliper isn’t sitting square as before I replaced the pads (OEM used) the previous set were clearly chamfered.
Cheers
There are a few things to check.

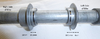
1. The wheel is installed correctly - make sure that the two spacers are the right way round and on the correct sides.
Note that the photo is showing the axle as if viewed from the front. Brake lever on the left of the photo, clutch lever on the right of the photo.

1713188450216.png


2. Make sure that the axle has been tightened in the correct sequence:

  • Push axle bolt home. Hold the axle and tighten the axle bolt.
    If you don't have a large enough Hex driver, then temporarily tighten the left hand (clutch side) fork pinch bolts, tighten the axle to correct torque.
  • Slacken the left hand pinch bolts
  • Tighten the right hand (brake lever side) fork pinch bolts to correct torque.
  • Bounce the front forks a few times.
  • Check that the left hand (clutch side) fork is flush with the end of the axle. It should be. If only a little out of place then move the fork leg until it is flush. If it is a lot out of alignment, then find out why.
  • Tighten the left hand (clutch lever side) fork pinch bolts.
  • Make sure that you have at least 0.7mm clearance where the disc passes through the slot in the caliper bracket.


3. Check that the pad spring is inserted the correct way round. Check the the retaining tag is not bent. Make sure that the pads are fitted behinf that retaining tag - ie to the side closest to the centre of the wheel.

4. Make sure that you have not put in a white heat shield (that is supplied only with OEM rear pads) between the pad backing plate and the chrome anti-squeal plate.

5. Make sure that you are not trying to put rear pads in the front caliper, or non-OEM pads that are too thick in the front caliper.

6. Make sure that without the pads in place, you can push the claiper in towards the disc and pull it away from the disc - and that it stays where you moved it to (ie it doesn't return of its own accord. If you cannot, then there may be an issue with the two slider pins. They are awkward to get at since the hydraulic hose keeps the caliper and the bracket fastened together. But if it is difficult to move, then that is what needs to happen - and will no doubt be the subject of a follow up question from you !

Read this. Article [13] - ST1300 - Brake Maintenance - Avoiding the Pitfalls | ST1300 Articles | ST-Owners.com


The reason that items 1 and 2 are important is that the wheel and the brake disc are secured to the axle. The left caliper is secured to the fork. The two are fixed independently of each other. If you get one of them wrong then the pads will not be able to move away from the disc surface.
 
Top Bottom