
Just installed a Road Hawk Ride (http://www.dogcamsport.co.uk/roadhawk-ride.html) to make it a constant fixture to the dash. The camera is a waterproof 720p video which continuously records in 5 minute segments. When reading up on which camera to get, I chose this one as I am able to attached to my push-bike helmet or the push-bike and use it off the ST. Also, if powered by the bike, the camera will automatically start to record when power is received and turn off when the power stops.
Whilst reading up on the Road Hawk, there were some issues with power spikes on engine start and destroying the camera electronics, so I also decided to install a switch to control power to the camera.
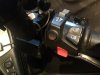
Switch Install
I pretty much copied the heated grip switch install from another site with the exception of the momentary button. Another slight difference in the install is that I ran the wiring with the rest of the wires. Be careful if you are thinking of doing this; I knackered a switch due to the clearance between the handle bar and the bottom of the switch when closing up covers.
Wiring loom
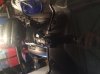
I already have a quartet harness fitted, so I didn't need to remove the side fairing and just opted to remove the screen and the top of the dash to access the harness from there.
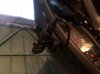
The loom was wired into the black connector on the harness and shares the power with the USB charger. The rest of the pre-manufactured wiring loom for the camera is taped into place below the dash and kept clear of the windscreen mechanism. I had to nip out a small amount of the upper dash to allow the wire to come out and connect to the camera. The base was screwed into place before re-assembly.
I'll post some riding video here once I convert it (to a format the Mac likes and that doesn't need VLC to run) and get it onto YouTube.
Whilst reading up on the Road Hawk, there were some issues with power spikes on engine start and destroying the camera electronics, so I also decided to install a switch to control power to the camera.
Switch Install
I pretty much copied the heated grip switch install from another site with the exception of the momentary button. Another slight difference in the install is that I ran the wiring with the rest of the wires. Be careful if you are thinking of doing this; I knackered a switch due to the clearance between the handle bar and the bottom of the switch when closing up covers.
Wiring loom
I already have a quartet harness fitted, so I didn't need to remove the side fairing and just opted to remove the screen and the top of the dash to access the harness from there.
The loom was wired into the black connector on the harness and shares the power with the USB charger. The rest of the pre-manufactured wiring loom for the camera is taped into place below the dash and kept clear of the windscreen mechanism. I had to nip out a small amount of the upper dash to allow the wire to come out and connect to the camera. The base was screwed into place before re-assembly.
I'll post some riding video here once I convert it (to a format the Mac likes and that doesn't need VLC to run) and get it onto YouTube.