Article [13] ST1300 - Brake Maintenance - Getting all the air out of the brake system

OP
OP
jfheath

jfheath

John Heath
Site Supporter
Joined
Mar 18, 2006
Messages
2,832
Age
70
Location
Ilkley, W Yorkshire, UK
Bike
2013 ST1300 A9
2024 Miles
000679
STOC #
2570
Basically, the link would have been to the same place - except I updated the original pdf, so the link in post #1 is to the new version. The quoted link in Dave's post #2 is now out of date, but I cannot change that.
 

Sadlsor

Site Supporter
Joined
Jan 15, 2020
Messages
4,284
Age
66
Location
Birmingham, Alabama
Bike
2008 ST1300A
STOC #
9065
Thanks very much (again!), John.
You've confirmed that I have what I need.
Life is hard when you (meaning ME) have a tendency to over-analyze everything.
I have the tools.
I have the technology.
I have the time (tomorrow).
I have Y'ALL.
I just have to jump in.
Stay tuned...
 

Igofar

Site Supporter
Joined
Jan 8, 2011
Messages
7,120
Location
Arizona
Bike
2023 Honda CT125A
Thanks very much (again!), John.
You've confirmed that I have what I need.
Life is hard when you (meaning ME) have a tendency to over-analyze everything.
I have the tools.
I have the technology.
I have the time (tomorrow).
I have Y'ALL.
I just have to jump in.
Stay tuned...
I'll be available tomorrow if you have any questions.
Standing by the white courtesy phone
:WCP1:
 
Joined
May 8, 2020
Messages
2
Age
64
Location
UK
Thanks for your prompt & very thorough response. I've printed it off & I am on my way to the garage now. I think most of the "basics" in the first part are covered. However, I'll diligently go back through them again. I note you use red rubber grease on the pistons (I'm sure I have some - somewhere), I have used silicon grease for both the pistons & sliders. Would you use red rubber in preference, or is any suitable grease?

I'm also thinking I probably ought to shell out for OEM pads - my thinking at the time was they were way easier on the budget; given that this MOT has cost me north of 800 quid (so far!) I suppose the additional cost of OEMs is negligible.

I'll need to engage a 3rd party to spin the wheel / activate the SMC as it's on a ramp, but I get the principle. I know it'll depend on what I may find in the SMC , but do you recommend straight replacement as opposed to overhaul or clean & refit?

I'm down in the midlands - Leamington Spa

Thanks again for sharing the knowledge. I'll let you know how I get on.
 
OP
OP
jfheath

jfheath

John Heath
Site Supporter
Joined
Mar 18, 2006
Messages
2,832
Age
70
Location
Ilkley, W Yorkshire, UK
Bike
2013 ST1300 A9
2024 Miles
000679
STOC #
2570
Silicone grease is fine on pistons and sliders. It must not be mineral oil based - ie 'normal' oils and greases. The reason bing that it causes the seals to swell. Silicone grease is perfect for this job. I had difficulty finding any so I ended up with a tub of red rubber grease which is made for hydraulic seals. I am still working my way through it.

I'll need to engage a 3rd party to spin the wheel / activate the SMC as it's on a ramp, but I get the principle. I know it'll depend on what I may find in the SMC , but do you recommend straight replacement as opposed to overhaul or clean & refit?
I always keep a length of chord for such situation. Tie it round a spoke in the rear wheel. Activate the SMC, pull on the chord. Heath-Robinson needed a partner for his primitive contraptions. I can do such stuff all by myself. You ought t o see the mechanism that I have for pressing down the brake pedal while working on the left side of the bike !

Your bike is a 2006 model on 2007 plates. It has done 52K miles, and is 15-16 years old. It has been sitting around unused for more time than it has been ridden. And you do not know how well it has been serviced - even if it has been done by a Honda dealer.

My bike is a 2013 built 2009 model. It is 8 years old and has 51K miles on the clock and I service the brakes thoroughly every year. Even so it had a precautionary replacement SMC at 38000 miles 3 years ago. Why ? Well I was looking at the brakes as they were not performing as they should, looking at how many of the ST1300 parts were becoming no longer available, and decided to do a complete brake service. Seals replace, piston check etc. In fact the old SMC was perfectly OK, os it is cleaned up and sealed away for a future rainy day.
I think a service kit is false economy. If you think you need to replace it, then if you don't need one now, at some point in the not too distant future, you will. And you will have the skills and knowledge to be able to look after it properly.

I buy stuff from Fowlers - they send out orders very quickly. It is pointless looking around for genuine Honda parts in the UK - Honda seem to have made sure that eveyone sells them at the same price. Belgium have places with big warehouses which have always been rapid - but it is a brave person that tries to buy anything from across the channel at the moment. Some seem to be cheaper until they add on the delivery. Some quote incl VAT, others don't.

Here is the fiche for the L Front Caliper for a 2006 model.

You need part no 2. The L Front Bracket assembly. £202 - they have some in stock.
Please check the part numbers for yourself though - you have the details for your particular bike. The SMC model changed in 2008. There was no 2007 model in the UK, the previous model was 2006. The 2006 SMC and the 2008 SMC are not interchangeable. Check the white label under your seat for the model number - it will say something like ST1300A-6.

You need to get a load of banjo washers - you mustn't re-use old ones - tightening them crushes the washer to make a seal. They are made of soft alloy or soft copper. Most workshops buy copper ones in bulk, rather than the official Honda. I do the same. DemonTweeks sell crush washers at about 6p each. Last time I ordered some, I bought 100. That way, I have no hesitation about removing a caliper - I laways have the washers to mount it properly. Mine have an internal diameter of a tad over 10mm.

But there may still be other issues causing your problem. eg - old fluid will crystalise. If it has done this behind the piston seals then the pistons will not return easily. But you have already indicated that they move easily under thumb pressure.
 
Joined
Jan 17, 2020
Messages
203
Location
Woking, Surrey, UK
Can we step back a moment and consider this. I mean no disrespect to those more knowledgeable than me by raising this.

Over the last 50 years I have tried to do all my servicing including bleeding the brakes. I even completely serviced the brakes, pistons, seals etc on my GL1500, but this didn't have linked brakes! I have never had any major problems.

I bought my ST1300 at the end of January this year and having read the problems experienced by some of the forum members, I didn't want to end up in and worse position than I started and so concluded that, on the first occasion, I would take the bike to the Honda dealer.

When I collected the bike later that day, the brakes were rock solid.

My question is:- "Could the dealers use different tools, approach or know something I don't to remove all the air?" For example, on Youtube, The Motorcycle MD (who is a Honda Mechanic) recommends using Pliers on the Honda brakelines:-


Relevant point is from 7m:30s

The video is not specifically for linked brakes but I can't see why they can't be used provided the OEM lines are in use?

Paul
 
Joined
Feb 2, 2014
Messages
1,854
Location
houston, tx
why they can't be used provided the OEM lines are in use?
A couple thoughts

a) nice way to weaken the brake line(s) ... though admittedly, there are hose clamps designed for that use[1]

b) he's not fully clamping down [before he releases the lever], so it's not a true "one way valve"

... let the games begin ...

[1] like when pushing the pistons back in ... clamp off the brake line just above the caliper - then open the bleed valve, then push pistons back in. This keeps dirty fluid from moving further up the brake line
 
Last edited:

Igofar

Site Supporter
Joined
Jan 8, 2011
Messages
7,120
Location
Arizona
Bike
2023 Honda CT125A
OMG! I couldn't even finish watching that video :doh1:
This is exactly why I would NOT let a local Honda Shop anywhere near my bike!
Where do I start?
Non-JIS driver (standard #2 craftsman) ...."but just whack it"...yeah right.
Handlebars were not even level.
"this is not bad at all"....yeah right, I could see debris in the housing.
Turkey baster too big and won't hang on to fluid, and you'll end up dripping all over everything. A children's aspirator much better tool.
Shoving paper towels down into the housing...yeah if you want to bend/dislodge the deflector spoon.
Clamping down ANY brake line(s) with pliers...:eek1: this should not even be done with "clamps designed for that use".
Did anyone happen to notice how he yanked open the bleeder way too far, and left the weight of the wrench on the bleeder.
This guy is probably causing a lot of customers to avoid this shop after watching this video.
As far as linked systems, nothing scary about them as far as bleeding them, just follow the correct procedure as outlined in either the service manual, or Mr. Heaths articles, and you'll be fine.
As far as different methods/tools, While I've used pressure bleeders, reverse bleeders, vacuum bleeders, speed bleeders, etc.
The best tool I've used is a simple one way check valve by Motion Pro ($16 USD on amazon)
Somebody please :d1: that video before somebody breaks something :rofl1:
 
Joined
Jan 17, 2020
Messages
203
Location
Woking, Surrey, UK
As far as linked systems, nothing scary about them as far as bleeding them, just follow the correct procedure as outlined in either the service manual, or Mr. Heaths articles, and you'll be fine.
After all the problems some members have had, this is the first reassuring advice I've read, when some members say they had to re-bleed their system 3-5 times to get rid of the air. Frankly, I couldn't be bothered.

Apart from that, I feel you've been less than charitable to the guy. I use a baster without problems and he did mention the need to have handlebars straight - he was not far off when doing the bleeding. JIS screwdrivers no longer officially made in Japan. Many Youtube channels take time out to offer advice to help others and so provided viewers step back and ask themselves "is that intuitive", I see nothing wrong. Easy to criticize.

Another Brit and temporary member of this forum, JasonB I believe, had his own video on Youtube for the re-bleed. Used nothing more than a single piece of tubing and didn't appear to have any problems. So why no air for him in the SMC for example to get rid of?


Paul
 
OP
OP
jfheath

jfheath

John Heath
Site Supporter
Joined
Mar 18, 2006
Messages
2,832
Age
70
Location
Ilkley, W Yorkshire, UK
Bike
2013 ST1300 A9
2024 Miles
000679
STOC #
2570
Sometimes you have no problems. Sometimes there are loads of them. My current 'bleed' has been going on for a few weeks now. I am in no hurry - I can't go anywhere. But I had decided to renew the PTFE tape on the bleed valve on the front right centre piston. That was a mistake. The valve came out easily, but it would not go back in again - the thread inside the caliper was damaged. How, I don't know - I have never taken it out before and I've had the bike from new. And I haven't been ham fisted with the spanner. But that required a replacement front caliper. Currently, the lever feels OK, but I can tell that there is still a small bubble in there, and I have run out of fluid ......

But if you have good brakes already (ie no air) and you just need to refresh the fluid, then the process is simple. Go round the sequence. Flush the old fluid out with new, exercise the SMC and if possibly the pistons. Just don't let the reservoirs run down and don't let any air into the system. (My reservoirs usually contain fluid that looks pretty clean, 'cos I do it once a year). For the first couple of years of owning an ABS II ST1100 (similar plumbing to the ST1300 ) that is all that I ever did.

The article at the head of this post was really written for the times when getting rid of the air becomes an issue - like when you have removed a caliper. Simply pumping more fluid through doesn't always work. The article is well over-the-top for simply renewing old fluid. But the diagrams are extremely useful, I think.
 
Last edited:
Joined
Jan 17, 2020
Messages
203
Location
Woking, Surrey, UK
Sometimes you have no problems. Sometimes there are loads of them. My current 'bleed' has been going on for a few weeks now. I am in no hurry - I can't go anywhere. But I had decided to renew the PTFE tape on the bleed valve on the front right centre piston. That was a mistake. The valve came out easily, but it would not go back in again - the thread inside the caliper was damaged. How, I don't know - I have never taken it out before and I've had the bike from new. And I haven't been ham fisted with the spanner. But that required a replacement front caliper. Currently, the lever feels OK, but I can tell that there is still a small bubble in there, and I have run out of fluid ......

But if you have good brakes already (ie no air) and you just need to refresh the fluid, then the process is simple. Go round the sequence. Flush the old fluid out with new, exercise the SMC and if possibly the pistons. Just don't let the reservoirs run down and don't let any air into the system. (My reservoirs usually contain fluid that looks pretty clean, 'cos I do it once a year). For the first couple of years of owning an ABS II ST1100 (similar plumbing to the ST1300 ) that is all that I ever did.

The article at the head of this post was really written for the times when getting rid of the air becomes an issue - like when you have removed a caliper. Simply pumping more fluid through doesn't alway work. The article is well over-the-top for simply renewing old fluid. But the diagrams are extremely useful, I think.
John sorry to read about your current problem. Reminds me of when the same thing happened to me. My heart sank. Tried drilling out but without success. Managed to find a used replacement on ebay which I overhauled and got working without further issues.
Your saga and your experience have convinced me to leave it to the dealer and let them take the risk of breakages. Previously, I have generally removed and overhauled the calipers every 2 years.

Good luck!

Paul
 
OP
OP
jfheath

jfheath

John Heath
Site Supporter
Joined
Mar 18, 2006
Messages
2,832
Age
70
Location
Ilkley, W Yorkshire, UK
Bike
2013 ST1300 A9
2024 Miles
000679
STOC #
2570
Don't be put off by my experience. I wasn't trying to put you off. I was trying to convince you that it is straight forward. It doesn't take that long to do the brakes. It's just that the bike is on the ramp, and we are in lockdown due to CoVid so if I don't feel like going out to work on it, I don't. It's not coming off the ramp until January. Yesterday and today it has been cold and wet. The cloud is just about clear of the roof top and the beer in the garage is colder than that in the fridge. I'm not going out there - the bike can wait a few more days. This is my 4th ST - I've done all of the work on all of them. Something generalyy goes wrong at some point - it is part of the 'fun' of working on bikes. But this is the first time I have ever had a thread fail like that.

Actually - I did take the bike off the ramp a couple of days ago - I needed to give it a clean up before the fairing goes back on again, and the sun was out. So down it came and it is now clean. It dried while I was out there - mainly thanks to the chap walking past who passed the time talking about bikes. All the time keeping a respectable distance from each other.

But the thing that went wrong on that particular day :- I hadn't considered how I was going to get the bike back onto the ramp !

Without the front headlight/fairing in place, the bike will not start, and trying to take a run at it could go drastically wrong - especially with wet tyres and a smooth painted metal ramp. So I had to put the nose back on to get the engine going again. Then I left it running for a bit, just enjoying the sound of it, kidding myself that it needed warming up to help the water to clear.

No, I didn't pay that much. I found a breaker in Belgium. He had loads of calipers, but only one for the right hand side for a 2008+ model. He hadn't listed the model years on any of his calipers, but fortunately I was able to tell the difference from the photos. In the photo it looked perfect, and I checked that the one in the photo would be the one I received. When I got it, it looked hardly used - except it was covered in brake fluid. No - it cost me £60 with postage. Plus the new seals. Well worth it. And it came with hardly used clean brake pads and pad pin !
 
Last edited:
Joined
Jan 17, 2020
Messages
203
Location
Woking, Surrey, UK
Don't be put off by my experience. I wasn't trying to put you off. I was trying to convince you that it is straight forward. It doesn't take that long to do the brakes. It's just that the bike is on the ramp, and we are in lockdown due to CoVid so if I don't feel like going out to work on it, I don't. It's not coming off the ramp until January. Yesterday and today it has been cold and wet. The cloud is just about clear of the roof top and the beer in the garage is colder than that in the fridge. I'm not going out there - the bike can wait a few more days. This is my 4th ST - I've done all of the work on all of them. Something generalyy goes wrong at some point - it is part of the 'fun' of working on bikes. But this is the first time I have ever had a thread fail like that.

Actually - I did take the bike off the ramp a couple of days ago - I needed to give it a clean up before the fairing goes back on again, and the sun was out. So down it came and it is now clean. It dried while I was out there - mainly thanks to the chap walking past who passed the time talking about bikes. All the time keeping a respectable distance from each other.
But that was the thing that went wrong on that particular day.

I hadn't considered how I was going to get the bike back onto the ramp !

Without the front headlight/fairing in place, the bike will not start, and trying to take a run at it could go drastically wrong - especially with wet tyres and a smooth painted metal ramp. So I had to put the nose back on to get the engine going again. Then I left it running for a bit, just enjoying the sound of it, kidding myself that it needed warming up to help the water to clear.

No, I didn't pay that much. I found a breaker in Belgium. He had loads of calipers, but only one for the right hand side for a 2008+ model. He hadn't listed the model years on any of his calipers, but fortunately I was able to tell the difference from the photos. In the photo it looked perfect, and I checked that the one in the photo would be the one I received. When I got it, it looked hardly used - except it was covered in brake fluid. No - it cost me £60 with postage. Plus the new seals. Well worth it. And it came with hardly used clean brake pads and pad pin !
John, it never crossed my mind that you were trying to put me off.

At last some good news. £60 for the caliper!! Well done.

As it's warmer down south, I've been riding every day apart from today (rainy and dark). Mind you I've been out recently when the temperature has been 3 deg. C. I ride in most weathers although my days of deliberately riding in the snow are long gone.

Paul
 
Joined
Aug 10, 2015
Messages
2,042
Location
Fort Worth, Texas
Bike
91 ST1100/06 ST1300
Non-JIS driver (standard #2 craftsman) ...."but just whack it"...yeah right.
I found Craftsman JIS drivers at my local Ace Hardware a few years back. Surprised me as I had never seen them at Sears itself. I bought a set for the bike side of my garage.

Just a tip....there aren't many slotted screws used in metric bikes anymore but the remaining ones seem to be a bit shallow. Most standard screwdrivers have tapered tips which will damage these slots very easily. I bought a set of handles/bits from a firearm shop. Standard blade bits have parallel faces near the tips. The assortment of blade widths makes matching bits with screws is easy.
 
Joined
Apr 19, 2021
Messages
27
Age
30
Location
53511
Hello all,

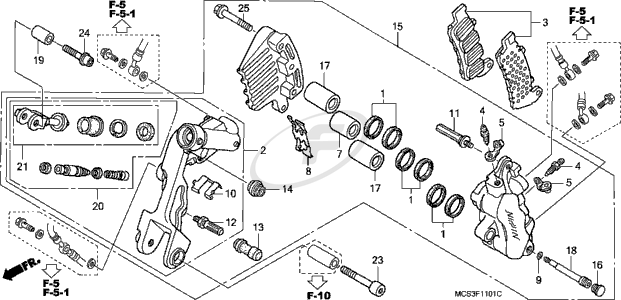
I'm working on my dad's 2003 ST1300A, and today I replaced a front brake line because I noticed last fall that the rubber outer portion of the line had separated near the metal crimped portion of the line, leaving the nylon exposed for who knows how long. This hose was "Hose C Front" in the parts diagrams, and part number was: 45131-MCS-G01.

This line connects on one end to the front left caliper (it's the top of the two banjo bolts on that caliper), and other end to a junction box where a hard pipe line screws into on top of the front fender.

Well, when I installed the line, I attached the hard pipe end to the junction box, then left the banjo bolt end (where it connects to the caliper) open for a minute or two to try and gravity feed some brake fluid into the line before I started the bleeding process. It seemed to work as I saw fluid flowing through the line, and I then followed the exact procedures/tips @jfheath wrote up, in addition to the pointers I received from @Igofar when we spoke last summer when I was just bleeding the brakes at that point.

Every thing went seemingly normal during the bleeding procedure, except for the very last bleed nipple: the rear caliper outer pistons bleed nipple (the right side nipple on the rear caliper). While bleeding that nipple, there was a couple of times where my dad--who was helping me--had pumped the foot pedal, held it down, I opened the bleed nipple, and nothing happened... No fluid moved, no air, just nothing--while this was happening, I tried to pump the SMC and it was hard like the foot pedal was still putting fluid pressure on it like it normally does. So, I tried to close the bleed nipple, asked my dad to pump it a few more times and hold it, then tried again and all of a sudden it worked as normal where fluid came out of the nipple... So, we continued as normal, pumping the pedal and SMC, while working that bleed nipple appropriately, and it worked normally for a few cycles, but then it did the same thing again where nothing happened.... At this point I was perplexed, so we went through the whole bleed procedure again just to make sure no air was trapped. Every single bleed nipple was flowing clear, clean fluid with no air. We got to that last nipple again, and it did the same thing--worked as normal for the first couple of bleeds, then it randomly didn't do anything again one time when I opened it... So, we closed it, pumped a few more times, then opened it again and it bled as normal with no air--and I also pumped the SMC which also didn't not let out any air.

Keep in mind, for each step of the bleeding procedure, I tapped all of the appropriate lines/junction boxes/delay vales/tilted and pumped the SMC/etc all as necessary as advised in @jfheath's brake bleeding PDF and the Honda manual. Also, I checked and refilled the appropriate reservoirs between each bleeding step. So, I know I didn't introduce any unintended air at any point during the bleeding process.

I'm a little confused, and am wondering if anyone has ever experienced this? Or, does anyone know what the cause of this happening might be?

Between all of the bleed nipples throughout the bike, and doing the whole process through twice, I flushed almost a whole quart bottle through the entire system. So, it's definitely clean, and I'd like to think free of air, but again this happening confuses me and I just want to check with all of you to get your input! What do you think could be causing this?

Thanks so much for your help,

Tanner
 
Top Bottom